Category: <span>Announcements</span>

AWS Week in Review – December 19, 2022

We are half way between the re:Invent conference and the end-of-year holidays, and I did expect the cadence of releases and news to slow down a bit, but nothing is further away from reality. Our teams continue to listen to your feedback and release new capabilities and incremental improvements.

This week, many items caught my attention. Here is my summary.

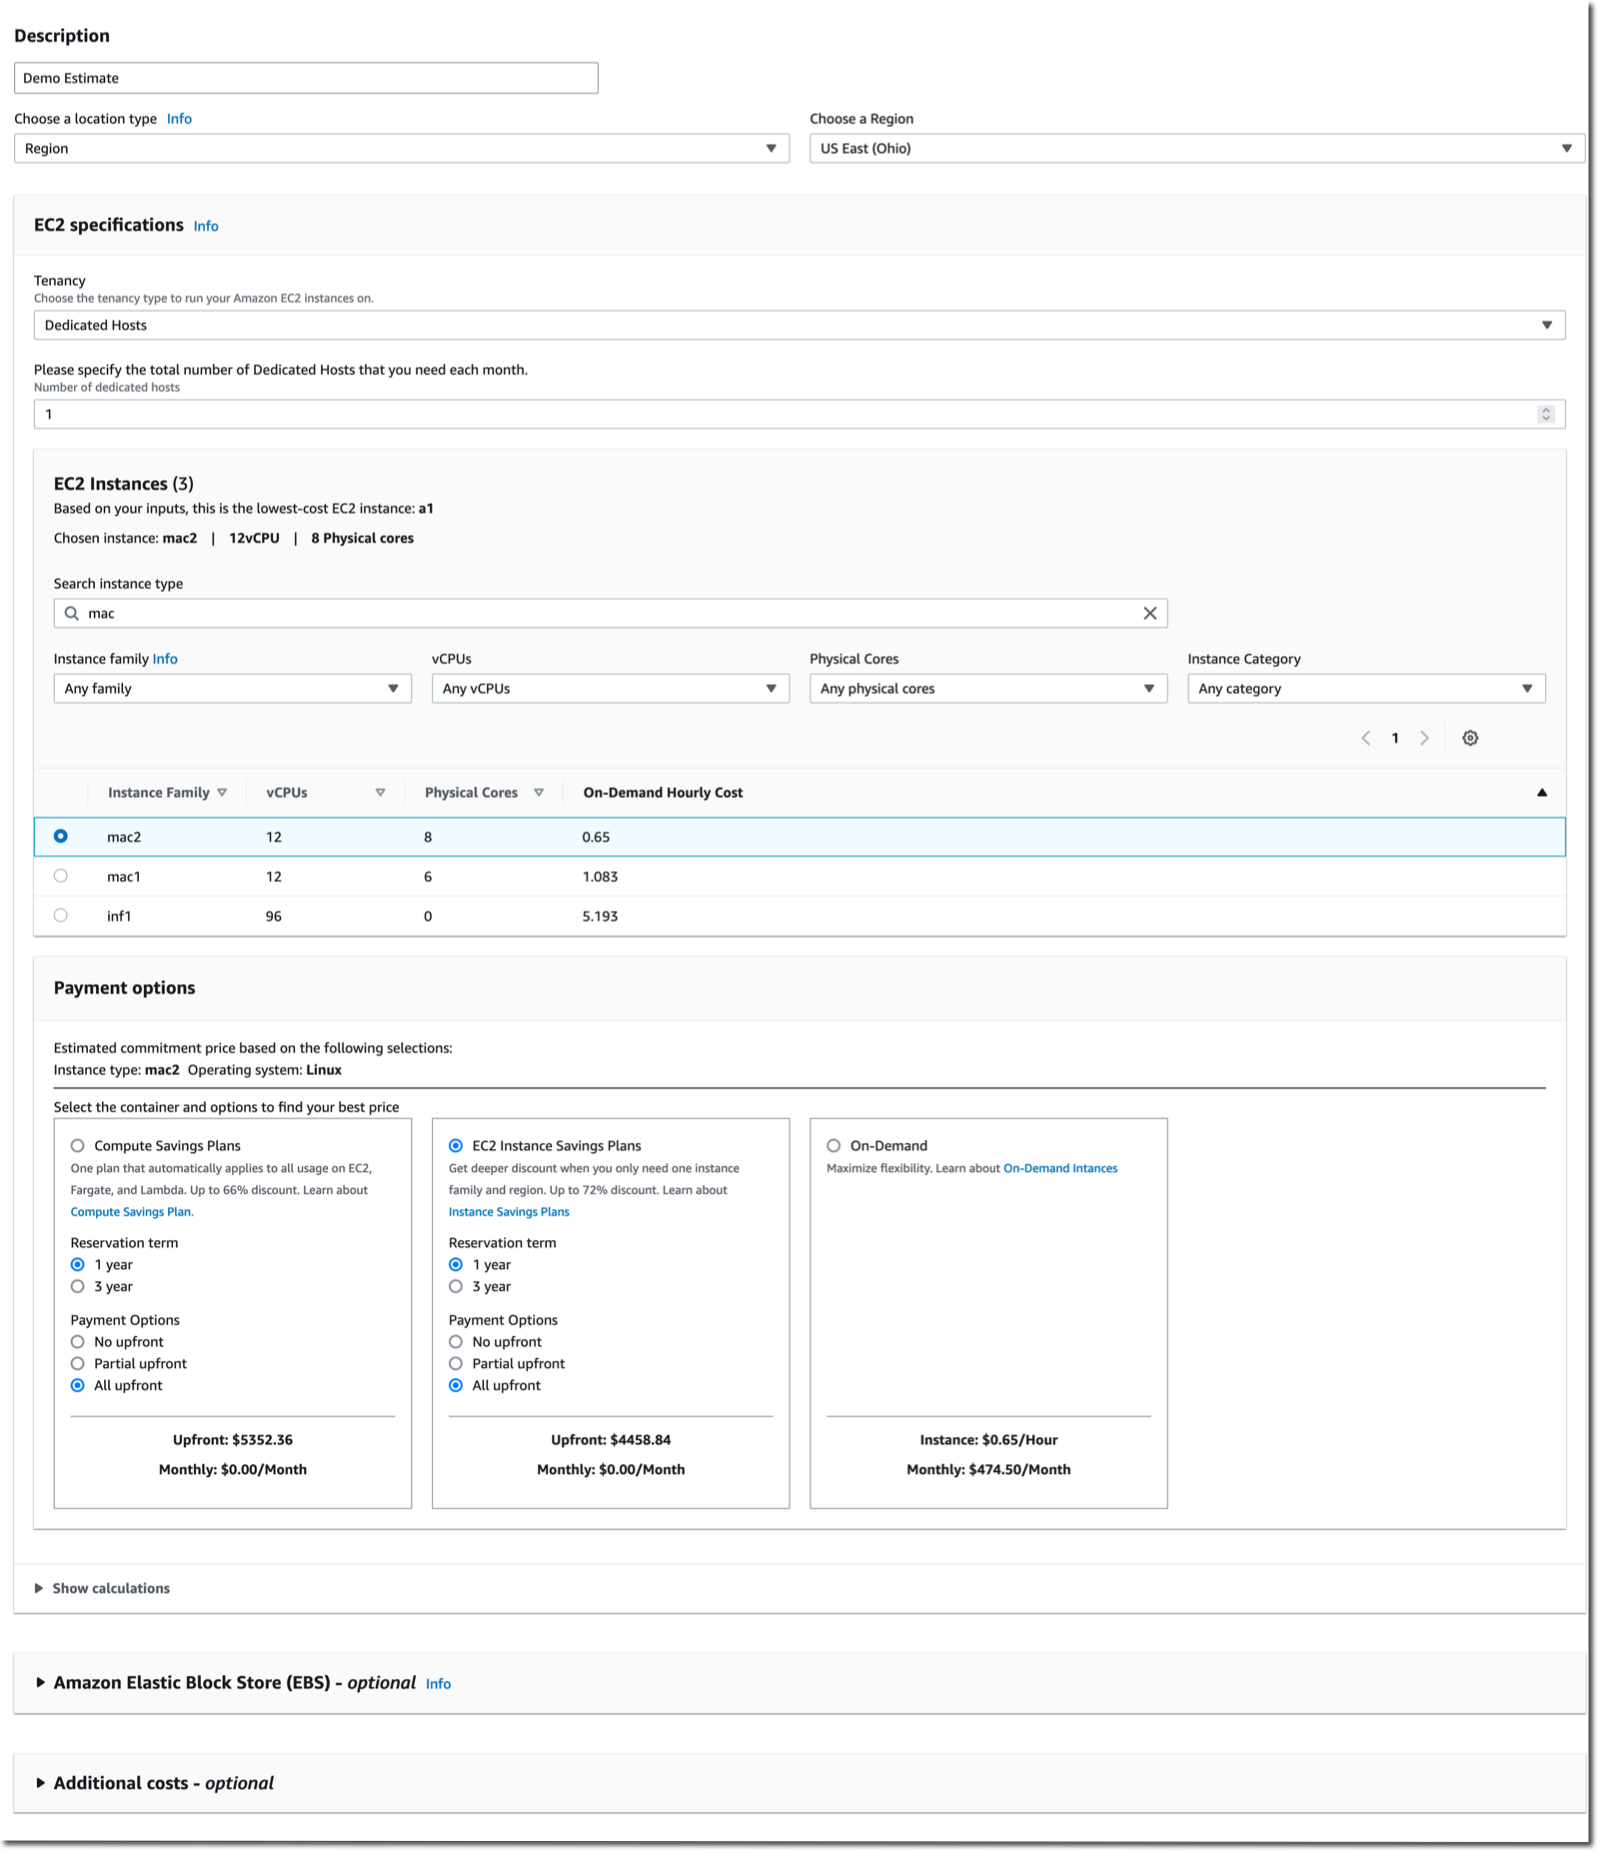
The AWS Pricing Calculator for Amazon EC2 is getting a redesign to provide you with a simplified, consistent, and efficient calculator to estimate costs. It also added a way to bulk estimate costs for EC2 instances, EC2 Dedicated Hosts, and Amazon EBS services. Try it for yourself today.

AWS Pricing Calculator

Amazon CloudWatch Metrics Insights alarms now enables you to trigger alarms on entire fleets of dynamically changing resources (such as automatically scaling EC2 instances) with a single alarm using standard SQL queries. For example, you can now write a query like this to collect data about CPU utilization over your entire dynamic fleet of EC2 instances.

SELECT AVG(CPUUtilization) FROM SCHEMA("AWS/EC2", InstanceId)

AWS Amplify is a command line tool and a set of libraries to help you to build web and mobile applications connected to a cloud backend. We released Amplify Library for Android 2.0, with improvements and simplifications for user authentication. The team also released Amplify JavaScript library version 5, with improvements for React and React Native developers, such as a new notifications channel, also known as in-app messaging, that developers can use to display contextual messages to their users based on their behavior. The Amplify JavaScript library has also received improvements to reduce the overall bundle size and installation size.

Amazon Connect added granular access control based on resource tags for routing profiles, security profiles, users, and queues. It also adds bulk import for user hierarchy tags. This allows you to use attribute-based access control policies for Amazon Connect resources.

Amazon RDS Proxy now supports PostgreSQL major version 14. RDS Proxy is a fully managed, highly available database proxy for Amazon Relational Database Service (Amazon RDS) that makes applications more scalable, more resilient to database failures, and more secure. It is typically used by serverless applications that can have a large number of open connections to the database server and may open and close database connections at a high rate, exhausting database memory and compute resources.

AWS Gateway Load Balancer endpoints now support Ipv6 addresses. You can now send IPv6 traffic through Gateway Load Balancers and its endpoints to distribute traffic flows to dual stack appliance targets.

Amazon Location Service now provides Open Data Maps maps, in addition to ESRI and Here maps. I also noticed that Amazon is a core member of the new Overture Maps Foundation, officially hosted by the Linux Foundation. The mission of the Overture Maps Foundation is to power new map products through openly available datasets that can be used and reused across applications and businesses. The program is driven by Amazon Web Services (AWS), Facebook’s parent company Meta, Microsoft, and Dutch mapping company TomTom.

AWS Mainframe Modernization is a set of managed tools providing infrastructure and software for migrating, modernizing, and running mainframe applications. It is now available in three additional AWS Regions and supports AWS CloudFormation, AWS PrivateLink, AWS Key Management Service.

X in Y. Jeff started this section a while ago to list the expansion of new services and capabilities to additional Regions. I noticed 11 Regional expansions this week:

Other AWS News
This week, I also noticed these AWS news items:

Amazon SageMaker turned 5 years old 🎉🎂. You can read the initial blog post we published at the time. To celebrate the event, the Amazon Science published this article where AWS’s Vice President Bratin Saha reflects on the past and future of AWS’s machine learning tools and AI services.

The security blog published a great post about the Cedar policy language. It explains how Amazon Verified Permissions provides a pre-built, flexible permissions system that you can use to build permissions based on both ABAC and RBAC in your applications. Cedar policy language is also at the heart of Amazon Verified Access I blogged about during re:Invent.

And just like every week, my most excellent colleague Ricardo published the open source newsletter.

Upcoming AWS Events
Check your calendars and sign up for these AWS events:

AWS re:Invent recaps in your area. During the re:Invent week, we had lots of new announcements, and in the next weeks, you can find in your area a recap of all these launches. All the events will be posted on this site, so check it regularly to find an event nearby.

AWS re:Invent keynotes, leadership sessions, and breakout sessions are available on demand. I recommend that you check the playlists and find the talks about your favorite topics in one collection.

AWS Summits season will restart in Q2 2023. The dates and locations will be announced here.

Stay Informed
That is my selection for this week! Heads up – the Week in Review will be taking a short break for the end of the year, but we’ll be back with regular updates starting on January 9, 2023. To better keep up with all of this news, do not forget to check out the following resources:

— seb
This post is part of our Week in Review series. Check back each week for a quick roundup of interesting news and announcements from AWS!

New – Bring ML Models Built Anywhere into Amazon SageMaker Canvas and Generate Predictions

Amazon SageMaker Canvas provides business analysts with a visual interface to solve business problems using machine learning (ML) without writing a single line of code. Since we introduced SageMaker Canvas in 2021, many users have asked us for an enhanced, seamless collaboration experience that enables data scientists to share trained models with their business analysts with a few simple clicks.

Today, I’m excited to announce that you can now bring ML models built anywhere into SageMaker Canvas and generate predictions.

New – Bring Your Own Model into SageMaker Canvas
As a data scientist or ML practitioner, you can now seamlessly share models built anywhere, within or outside Amazon SageMaker, with your business teams. This removes the heavy lifting for your engineering teams to build a separate tool or user interface to share ML models and collaborate between the different parts of your organization. As a business analyst, you can now leverage ML models shared by your data scientists within minutes to generate predictions.

Let me show you how this works in practice!

In this example, I share an ML model that has been trained to identify customers that are potentially at risk of churning with my marketing analyst. First, I register the model in the SageMaker model registry. SageMaker model registry lets you catalog models and manage model versions. I create a model group called 2022-customer-churn-model-group and then select Create model version to register my model.

Amazon SageMaker Model Registry

To register your model, provide the location of the inference image in Amazon ECR, as well as the location of your model.tar.gz file in Amazon S3. You can also add model endpoint recommendations and additional model information. Once you’ve registered your model, select the model version and select Share.

Amazon SageMaker Studio - Share models from model registry with SageMaker Canvas users

You can now choose the SageMaker Canvas user profile(s) within the same SageMaker domain you want to share your model with. Then, provide additional model details, such as information about training and validation datasets, the ML problem type, and model output information. You can also add a note for the SageMaker Canvas users you share the model with.

Amazon SageMaker Studio - Share a model from Model Registry with SageMaker Canvas users

Similarly, you can now also share models trained in SageMaker Autopilot and models available in SageMaker JumpStart with SageMaker Canvas users.

The business analysts will receive an in-app notification in SageMaker Canvas that a model has been shared with them, along with any notes you added.

Amazon SageMaker Canvas - Received model from SageMaker Studio

My marketing analyst can now open, analyze, and start using the model to generate ML predictions in SageMaker Canvas.

Amazon SageMaker Canvas - Imported model from SageMaker Studio

Select Batch prediction to generate ML predictions for an entire dataset or Single prediction to create predictions for a single input. You can download the results in a .csv file.

Amazon SageMaker Canvas - Generate Predictions

New – Improved Model Sharing and Collaboration from SageMaker Canvas with SageMaker Studio Users
We also improved the sharing and collaboration capabilities from SageMaker Canvas with data science and ML teams. As a business analyst, you can now select which SageMaker Studio user profile(s) you want to share your standard-build models with.

Your data scientists or ML practitioners will receive a similar in-app notification in SageMaker Studio once a model has been shared with them, along with any notes from you. In addition to just reviewing the model, SageMaker Studio users can now also, if needed, update the data transformations in SageMaker Data Wrangler, retrain the model in SageMaker Autopilot, and share back the updated model. SageMaker Studio users can also recommend an alternate model from the list of models in SageMaker Autopilot.

Once SageMaker Studio users share back a model, you receive another notification in SageMaker Canvas that an updated model has been shared back with you. This collaboration between business analysts and data scientists will help democratize ML across organizations by bringing transparency to automated decisions, building trust, and accelerating ML deployments.

Now Available
The enhanced, seamless collaboration capabilities for Amazon SageMaker Canvas, including the ability to bring your ML models built anywhere, are available today in all AWS Regions where SageMaker Canvas is available with no changes to the existing SageMaker Canvas pricing.

Start collaborating and bring your ML model to Amazon SageMaker Canvas today!

— Antje

Heads-Up: Amazon S3 Security Changes Are Coming in April of 2023

Starting in April of 2023 we will be making two changes to Amazon Simple Storage Service (Amazon S3) to put our latest best practices for bucket security into effect automatically. The changes will begin to go into effect in April and will be rolled out to all AWS Regions within weeks.

Once the changes are in effect for a target Region, all newly created buckets in the Region will by default have S3 Block Public Access enabled and access control lists (ACLs) disabled. Both of these options are already console defaults and have long been recommended as best practices. The options will become the default for buckets that are created using the S3 API, S3 CLI, the AWS SDKs, or AWS CloudFormation templates.

As a bit of history, S3 buckets and objects have always been private by default. We added Block Public Access in 2018 and the ability to disable ACLs in 2021 in order to give you more control, and have long been recommending the use of AWS Identity and Access Management (IAM) policies as a modern and more flexible alternative.

In light of this change, we recommend a deliberate and thoughtful approach to the creation of new buckets that rely on public buckets or ACLs, and believe that most applications do not need either one. If your application turns out to be one that does, then you will need to make the changes that I outline below (be sure to review your code, scripts, AWS CloudFormation templates, and any other automation).

What’s Changing
Let’s take a closer look at the changes that we are making:

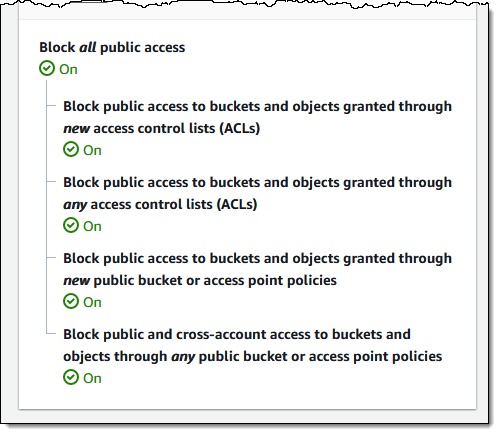
S3 Block Public Access – All four of the bucket-level settings described in this post will be enabled for newly created buckets:

A subsequent attempt to set a bucket policy or an access point policy that grants public access will be rejected with a 403 Access Denied error. If you need public access for a new bucket you can create it as usual and then delete the public access block by calling DeletePublicAccessBlock (you will need s3:PutBucketPublicAccessBlock permission in order to call this function; read Block Public Access to learn more about the functions and the permissions).

ACLs Disabled – The Bucket owner enforced setting will be enabled for newly created buckets, making bucket ACLs and object ACLs ineffective, and ensuring that the bucket owner is the object owner no matter who uploads the object. If you want to enable ACLs for a bucket, you can set the ObjectOwnership parameter to ObjectWriter in your CreateBucket request or you can call DeleteBucketOwnershipControls after you create the bucket. You will need s3:PutBucketOwnershipControls permission in order to use the parameter or to call the function; read Controlling Ownership of Objects and Creating a Bucket to learn more.

Stay Tuned
We will publish an initial What’s New post when we start to deploy this change and another one when the deployment has reached all AWS Regions. You can also run your own tests to detect the change in behavior.

Jeff

New – Process PDFs, Word Documents, and Images with Amazon Comprehend for IDP

Today we are announcing a new Amazon Comprehend feature for intelligent document processing (IDP). This feature allows you to classify and extract entities from PDF documents, Microsoft Word files, and images directly from Amazon Comprehend without you needing to extract the text first.

Many customers need to process documents that have a semi-structured format, like images of receipts that were scanned or tax statements in PDF format. Until today, those customers first needed to preprocess those documents to flatten them into machine-readable text, which can reduce the quality of the document context. Then they could use Amazon Comprehend to classify and extract entities from those preprocessed files.

Now with Amazon Comprehend for IDP, customers can process their semi-structured documents, such as PDFs, docx, PNG, JPG, or TIFF images, as well as plain-text documents, with a single API call. This new feature combines OCR and Amazon Comprehend’s existing natural language processing (NLP) capabilities to classify and extract entities from the documents. The custom document classification API allows you to organize documents into categories or classes, and the custom-named entity recognition API allows you to extract entities from documents like product codes or business-specific entities. For example, an insurance company can now process scanned customers’ claims with fewer API calls. Using the Amazon Comprehend entity recognition API, they can extract the customer number from the claims and use the custom classifier API to sort the claim into the different insurance categories—home, car, or personal.

Starting today, Amazon Comprehend for IDP APIs are available for real-time inferencing of files, as well as for asynchronous batch processing on large document sets. This feature simplifies the document processing pipeline and reduces development effort.

Getting Started
You can use Amazon Comprehend for IDP from the AWS Management Console, AWS SDKs, or AWS Command Line Interface (CLI).

In this demo, you will see how to asynchronously process a semi-structured file with a custom classifier. For extracting entities, the steps are different, and you can learn how to do it by checking the documentation.

In order to process a file with a classifier, you will first need to train a custom classifier. You can follow the steps in the Amazon Comprehend Developer Guide. You need to train this classifier with plain text data.

After you train your custom classifier, you can classify documents using either asynchronous or synchronous operations. For using the synchronous operation to analyze a single document, you need to create an endpoint to run real-time analysis using a custom model. You can find more information about real-time analysis in the documentation. For this demo, you are going to use the asynchronous operation, placing the documents to classify in an Amazon Simple Storage Service (Amazon S3) bucket and running an analysis batch job.

To get started classifying documents in batch from the console, on the Amazon Comprehend page, go to Analysis jobs and then Create job.

Create new job

Then you can configure the new analysis job. First, input a name and pick Custom classification and the custom classifier you created earlier.

Then you can configure the input data. First, select the S3 location for that data. In that location, you can place your PDFs, images, and Word Documents. Because you are processing semi-structured documents, you need to choose One document per file. If you want to override Amazon Comprehend settings for extracting and parsing the document, you can configure the Advanced document input options.

Input data for analysis job

After configuring the input data, you can select where the output of this analysis should be stored. Also, you need to give access permissions for this analysis job to read and write on the specified Amazon S3 locations, and then you are ready to create the job.

Configuring the classification job

The job takes a few minutes to run, depending on the size of the input. When the job is ready, you can check the output results. You can find the results in the Amazon S3 location you specified when you created the job.

In the results folder, you will find a .out file for each of the semi-structured files Amazon Comprehend classified. The .out file is a JSON, in which each line represents a page of the document. In the amazon-textract-output directory, you will find a folder for each classified file, and inside that folder, there is one file per page from the original file. Those page files contain the classification results. To learn more about the outputs of the classifications, check the documentation page.

Job output

Available Now
You can get started classifying and extracting entities from semi-structured files like PDFs, images, and Word Documents asynchronously and synchronously today from Amazon Comprehend in all the Regions where Amazon Comprehend is available. Learn more about this new launch in the Amazon Comprehend Developer Guide.

Marcia

New — Create Point-to-Point Integrations Between Event Producers and Consumers with Amazon EventBridge Pipes

It is increasingly common to use multiple cloud services as building blocks to assemble a modern event-driven application. Using purpose-built services to accomplish a particular task ensures developers get the best capabilities for their use case. However, communication between services can be difficult if they use different technologies to communicate, meaning that you need to learn the nuances of each service and how to integrate them with each other. We usually need to create integration code (or “glue” code) to connect and bridge communication between services. Writing glue code slows our velocity, increases the risk of bugs, and means we spend our time writing undifferentiated code rather than building better experiences for our customers.

Introducing Amazon EventBridge Pipes
Today, I’m excited to announce Amazon EventBridge Pipes, a new feature of Amazon EventBridge that makes it easier for you to build event-driven applications by providing a simple, consistent, and cost-effective way to create point-to-point integrations between event producers and consumers, removing the need to write undifferentiated glue code.

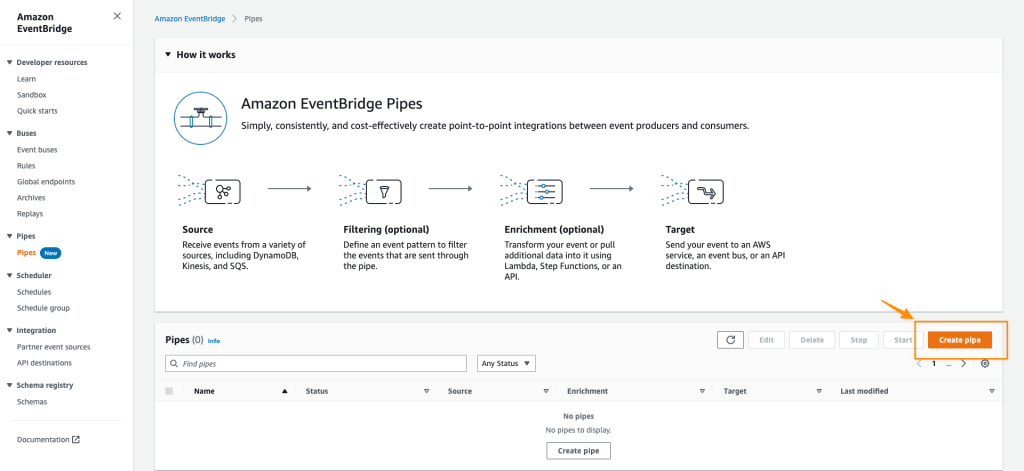
The simplest pipe consists of a source and a target. An optional filtering step allows only specific source events to flow into the Pipe and an optional enrichment step using AWS Lambda, AWS Step Functions, Amazon EventBridge API Destinations, or Amazon API Gateway enriches or transforms events before they reach the target. With Amazon EventBridge Pipes, you can integrate supported AWS and self-managed services as event producers and event consumers into your application in a simple, reliable, consistent and cost-effective way.

Amazon EventBridge Pipes bring the most popular features of Amazon EventBridge Event Bus, such as event filtering, integration with more than 14 AWS services, and automatic delivery retries.

How Amazon EventBridge Pipes Works
Amazon EventBridge Pipes provides you a seamless means of integrating supported AWS and self-managed services, favouring configuration over code. To start integrating services with EventBridge Pipes, you need to take the following steps:

  1. Choose a source that is producing your events. Supported sources include: Amazon DynamoDB, Amazon Kinesis Data Streams, Amazon SQS, Amazon Managed Streaming for Apache Kafka, and Amazon MQ (both ActiveMQ and RabbitMQ).
  2. (Optional) Specify an event filter to only process events that match your filter (you’re not charged for events that are filtered out).
  3. (Optional) Transform and enrich your events using built-in free transformations, or AWS Lambda, AWS Step Functions, Amazon API Gateway, or EventBridge API Destinations to perform more advanced transformations and enrichments.
  4. Choose a target destination from more than 14 AWS services, including Amazon Step Functions, Kinesis Data Streams, AWS Lambda, and third-party APIs using EventBridge API destinations.

Amazon EventBridge Pipes provides simplicity to accelerate development velocity by reducing the time needed to learn the services and write integration code, to get reliable and consistent integration.

EventBridge Pipes also comes with additional features that can help in building event-driven applications. For example, with event filtering, Pipes helps event-driven applications become more cost-effective by only processing the events of interest.

Get Started with Amazon EventBridge Pipes
Let’s see how to get started with Amazon EventBridge Pipes. In this post, I will show how to integrate an Amazon SQS queue with AWS Step Functions using Amazon EventBridge Pipes.

The following screenshot is my existing Amazon SQS queue and AWS Step Functions state machine. In my case, I need to run the state machine for every event in the queue. To do so, I need to connect my SQS queue and Step Functions state machine with EventBridge Pipes.

Existing Amazon SQS queue and AWS Step Functions state machine

First, I open the Amazon EventBridge console. In the navigation section, I select Pipes. Then I select Create pipe.

On this page, I can start configuring a pipe and set the AWS Identity and Access Management (IAM) permission, and I can navigate to the Pipe settings tab.

Navigate to Pipe Settings

In the Permissions section, I can define a new IAM role for this pipe or use an existing role. To improve developer experience, the EventBridge Pipes console will figure out the IAM role for me, so I don’t need to manually configure required permissions and let EventBridge Pipes configures least-privilege permissions for IAM role. Since this is my first time creating a pipe, I select Create a new role for this specific resource.

Setting IAM Permission for pipe

Then, I go back to the Build pipe section. On this page, I can see the available event sources supported by EventBridge Pipes.

List of available services as the event source

I select SQS and select my existing SQS queue. If I need to do batch processing, I can select Additional settings to start defining Batch size and Batch window. Then, I select Next.

Select SQS Queue as event source

On the next page, things get even more interesting because I can define Event filtering from the event source that I just selected. This step is optional, but the event filtering feature makes it easy for me to process events that only need to be processed by my event-driven application. In addition, this event filtering feature also helps me to be more cost-effective, as this pipe won’t process unnecessary events. For example, if I use Step Functions as the target, the event filtering will only execute events that match the filter.

Event filtering in Amazon EventBridge Pipes

I can use sample events from AWS events or define custom events. For example, I want to process events for returned purchased items with a value of 100 or more. The following is the sample event in JSON format:

{
   "event-type":"RETURN_PURCHASE",
   "value":100
}

Then, in the event pattern section, I can define the pattern by referring to the Content filtering in Amazon EventBridge event patterns documentation. I define the event pattern as follows:

{
   "event-type": ["RETURN_PURCHASE"],
   "value": [{
      "numeric": [">=", 100]
   }]
}

I can also test by selecting test pattern to make sure this event pattern will match the custom event I’m going to use. Once I’m confident that this is the event pattern that I want, I select Next.

Defining and testing an event pattern for filtering

In the next optional step, I can use an Enrichment that will augment, transform, or expand the event before sending the event to the target destination. This enrichment is useful when I need to enrich the event using an existing AWS Lambda function, or external SaaS API using the Destination API. Additionally, I can shape the event using the Enrichment Input Transformer.

The final step is to define a target for processing the events delivered by this pipe.

Defining target destination service

Here, I can select various AWS services supported by EventBridge Pipes.

I select my existing AWS Step Functions state machine, named pipes-statemachine.

In addition, I can also use Target Input Transformer by referring to the Transforming Amazon EventBridge target input documentation. For my case, I need to define a high priority for events going into this target. To do that, I define a sample custom event in Sample events/Event Payload and add the priority: HIGH in the Transformer section. Then in the Output section, I can see the final event to be passed to the target destination service. Then, I select Create pipe.

In less than a minute, my pipe was successfully created.

Pipe successfully created

To test this pipe, I need to put an event into the Amaon SQS queue.

Sending a message into Amazon SQS Queue

To check if my event is successfully processed by Step Functions, I can look into my state machine in Step Functions. On this page, I see my event is successfully processed.

I can also go to Amazon CloudWatch Logs to get more detailed logs.

Things to Know
Event Sources
– At launch, Amazon EventBridge Pipes supports the following services as event sources: Amazon DynamoDB, Amazon Kinesis, Amazon Managed Streaming for Apache Kafka (Amazon MSK) alongside self-managed Apache Kafka, Amazon SQS (standard and FIFO), and Amazon MQ (both for ActiveMQ and RabbitMQ).

Event Targets – Amazon EventBridge Pipes supports 15 Amazon EventBridge targets, including AWS Lambda, Amazon API Gateway, Amazon SNS, Amazon SQS, and AWS Step Functions. To deliver events to any HTTPS endpoint, developers can use API destinations as the target.

Event Ordering – EventBridge Pipes maintains the ordering of events received from an event sources that support ordering when sending those events to a destination service.

Programmatic Access – You can also interact with Amazon EventBridge Pipes and create a pipe using AWS Command Line Interface (CLI), AWS CloudFormation, and AWS Cloud Development Kit (AWS CDK).

Independent Usage – EventBridge Pipes can be used separately from Amazon EventBridge bus and Amazon EventBridge Scheduler. This flexibility helps developers to define source events from supported AWS and self-managed services as event sources without Amazon EventBridge Event Bus.

Availability – Amazon EventBridge Pipes is now generally available in all AWS commercial Regions, with the exception of Asia Pacific (Hyderabad) and Europe (Zurich).

Visit the Amazon EventBridge Pipes page to learn more about this feature and understand the pricing. You can also visit the documentation page to learn more about how to get started.

Happy building!

— Donnie

Step Functions Distributed Map – A Serverless Solution for Large-Scale Parallel Data Processing

I am excited to announce the availability of a distributed map for AWS Step Functions. This flow extends support for orchestrating large-scale parallel workloads such as the on-demand processing of semi-structured data.

Step Function’s map state executes the same processing steps for multiple entries in a dataset. The existing map state is limited to 40 parallel iterations at a time. This limit makes it challenging to scale data processing workloads to process thousands of items (or even more) in parallel. In order to achieve higher parallel processing prior to today, you had to implement complex workarounds to the existing map state component.

The new distributed map state allows you to write Step Functions to coordinate large-scale parallel workloads within your serverless applications. You can now iterate over millions of objects such as logs, images, or .csv files stored in Amazon Simple Storage Service (Amazon S3). The new distributed map state can launch up to ten thousand parallel workflows to process data.

You can process data by composing any service API supported by Step Functions, but typically, you will invoke Lambda functions to process the data with code written in your favorite programming language.

Step Functions distributed map supports a maximum concurrency of up to 10,000 executions in parallel, which is well above the concurrency supported by many other AWS services. You can use the maximum concurrency feature of the distributed map to ensure that you do not exceed the concurrency of a downstream service. There are two factors to consider when working with other services. First, the maximum concurrency supported by the service for your account. Second, the burst and ramping rates, which determine how quickly you can achieve the maximum concurrency.

Let’s use Lambda as an example. Your functions’ concurrency is the number of instances that serve requests at a given time. The default maximum concurrency quota for Lambda is 1,000 per AWS Region. You can ask for an increase at any time. For an initial burst of traffic, your functions’ cumulative concurrency in a Region can reach an initial level of between 500 and 3000, which varies per Region. The burst concurrency quota applies to all your functions in the Region.

When using a distributed map, be sure to verify the quota on downstream services. Limit the distributed map maximum concurrency during your development, and plan for service quota increases accordingly.

To compare the new distributed map with the original map state flow, I created this table.

Original map state flow New distributed map flow
Sub workflows
  • Runs a sub-workflow for each item in an array. The array must be passed from the previous state.
  • Each iteration of the sub-workflow is called a map iteration, and its events are added to the state machine’s execution history.
  • Runs a sub-workflow for each item in an array or Amazon S3 dataset.
  • Each sub-workflow is run as a totally separate child execution, with its own event history.
Parallel branches Map iterations run in parallel, with an effective maximum concurrency of around 40 at a time. Can pass millions of items to multiple child executions, with concurrency of up to 10,000 executions at a time.
Input source Accepts only a JSON array as input. Accepts input as Amazon S3 object list, JSON arrays or files, csv files, or Amazon S3 inventory.
Payload 256 KB Each iteration receives a reference to a file (Amazon S3) or a single record from a file (state input). Actual file processing capability is limited by Lambda storage and memory.
Execution history 25,000 events Each iteration of the map state is a child execution, with up to 25,000 events each (express mode has no limit on execution history).

Sub-workflows within a distributed map work with both Standard workflows and the low-latency, short-duration Express Workflows.

This new capability is optimized to work with S3. I can configure the bucket and prefix where my data are stored directly from the distributed map configuration. The distributed map stops reading after 100 million items and supports JSON or csv files of up to 10GB.

When processing large files, think about downstream service capabilities. Let’s take Lambda again as an example. Each input—a file on S3, for example—must fit within the Lambda function execution environment in terms of temporary storage and memory. To make it easier to handle large files, Lambda Powertools for Python introduced a new streaming feature to fetch, transform, and process S3 objects with minimal memory footprint. This allows your Lambda functions to handle files larger than the size of their execution environment. To learn more about this new capability, check the Lambda Powertools documentation.

Let’s See It in Action
For this demo, I will create a workflow that processes one thousand dog images stored on S3. The images are already stored on S3.

➜  ~ aws s3 ls awsnewsblog-distributed-map/images/
2022-11-08 15:03:36      27034 n02085620_10074.jpg
2022-11-08 15:03:36      34458 n02085620_10131.jpg
2022-11-08 15:03:36      12883 n02085620_10621.jpg
2022-11-08 15:03:36      34910 n02085620_1073.jpg
...

➜  ~ aws s3 ls awsnewsblog-distributed-map/images/ | wc -l
    1000

The workflow and the S3 bucket must be in the same Region.

To get started, I navigate to the Step Functions page of the AWS Management Console and select Create state machine. On the next page, I choose to design my workflow using the visual editor. The distributed map works with Standard workflows, and I keep the default selection as-is. I select Next to enter the visual editor.

Distributed Map - create a workflowIn the visual editor, I search and select the Map component on the left-side pane, and I drag it to the workflow area. On the right side, I configure the component. I choose Distributed as Processing mode and Amazon S3 as Item Source.

Distributed maps are natively integrated with S3. I enter the name of the bucket (awsnewsblog-distributed-map) and the prefix (images) where my images are stored.

On the Runtime Settings section, I choose Express for Child workflow type. I also may decide to restrict the Concurrency limit. It helps to ensure we operate within the concurrency quotas of the downstream services (Lambda in this demo) for a particular account or Region.

By default, the output of my sub-workflows will be aggregated as state output, up to 256KB. To process larger outputs, I may choose to Export map state results to Amazon S3.

Distributed Map - add a Lambda invocation

Finally, I define what to do for each file. In this demo, I want to invoke a Lambda function for each file in the S3 bucket. The function exists already. I search for and select the Lambda invocation action on the left-side pane. I drag it to the distributed map component. Then, I use the right-side configuration panel to select the actual Lambda function to invoke: AWSNewsBlogDistributedMap in this example.

Distributed Map - add a Lambda invocation

When I am done, I select Next. I select Next again on the Review generated code page (not shown here).

On the Specify state machine settings page, I enter a Name for my state machine and the IAM Permissions to run. Then, I select Create state machine.

Create State Machine - Final ScreenNow I am ready to start the execution. On the State machine page, I select the new workflow and select Start execution. I can optionally enter a JSON document to pass to the workflow. In this demo, the workflow does not handle the input data. I leave it as-is, and I select Start execution.

Start workflow execution Start workflow execution - pass input data

During the execution of the workflow, I can monitor the progress. I observe the number of iterations, and the number of items successfully processed or in error.

I can drill down on one specific execution to see the details.

Distributed Map - monitor execution details

With just a few clicks, I created a large-scale and heavily parallel workflow able to handle a very large quantity of data.

Which AWS Service Should I Use
As often happens on AWS, you might observe an overlap between this new capability and existing services such as AWS Glue, Amazon EMR, or Amazon S3 Batch Operations. Let’s try to differentiate the use cases.

In my mental model, data scientists and data engineers use AWS Glue and EMR to process large amounts of data. On the other hand, application developers will use Step Functions to add serverless data processing into their applications. Step Functions is able to scale from zero quickly, which makes it a good fit for interactive workloads where customers may be waiting for the results. Finally, system administrators and IT operation teams are likely to use Amazon S3 Batch Operations for single-step IT automation operations such as copying, tagging, or changing permissions on billions of S3 objects.

Pricing and Availability
AWS Step Functions’ distributed map is generally available in the following ten AWS Regions: US East (Ohio, N. Virginia), US West (Oregon), Asia Pacific (Singapore, Sydney, Tokyo), Canada (Central), and Europe (Frankfurt, Ireland, Stockholm).

The pricing model for the existing inline map state does not change. For the new distributed map state, we charge one state transition per iteration. Pricing varies between Regions, and it starts at $0.025 per 1,000 state transitions. When you process your data using express workflows, you are also charged based on the number of requests for your workflow and its duration. Again, prices vary between Regions, but they start at $1.00 per 1 million requests and $0.06 per GB-hour (prorated to 100ms).

For the same amount of iterations, you will observe a cost reduction when using the combination of the distributed map and standard workflows compared to the existing inline map. When you use express workflows, expect the costs to stay the same for more value with the distributed map.

I am really excited to discover what you will build using this new capability and how it will unlock innovation. Go start to build highly parallel serverless data processing workflows today!

— seb

AWS Marketplace Vendor Insights – Simplify Third-Party Software Risk Assessments

AWS Marketplace Vendor Insights is a new capability of AWS Marketplace. It simplifies third-party software risk assessments when procuring solutions from the AWS Marketplace.

It helps you to ensure that the third-party software continuously meets your industry standards by compiling security and compliance information, such as data privacy and residency, application security, and access control, in one consolidated dashboard.

As a security engineer, you may now complete third-party software risk assessment in a few days instead of months. You can now:

  • Quickly discover products in AWS Marketplace that meet your security and certification standards by searching for and accessing Vendor Insights profiles.
  • Access and download current and validated information, with evidence gathered from the vendors’ security tools and audit reports. Reports are available for download on AWS Artifact third-party reports (now available in preview).
  • Monitor your software’s security posture post-procurement and receive notifications for security and compliance events.

As a software vendor, you can now reduce the operational burden of responding to buyer requests for risk assessment information. It gives your customers a self-service access experience. You can now:

  • Build your product’s security profile by uploading your ISO 27001 or SOC2 Type 2 report and completing a software risk assessment with AWS Audit Manager.
  • Store and share your compliance reports such as ISO 27001 and SOC2 Type 2, using AWS Artifact third-party reports (preview).
  • View and approve your buyer requests for viewing security controls and compliance artifacts stored in Vendor Insights.

Let’s See It in Action
I want to procure a solution on the AWS Marketplace. But before purchasing the product, as a security engineer, I want to review its compliance. I navigate to the AWS Marketplace page of the AWS Management Console. I use the faceted search on the left side to select vendors that are ISO 27001 compliant.

AWS MArketplace vendor insights - faceted searchI select a product. On the Product Overview page, I select View assessment data on the top right side (not shown on the screenshot). Then, I can see the overview page, which shows the Security certification received and the Expiration date.

AWS MArketplace vendor insights - certification receivedI select the Security and compliance tab and see that I need to request access to see the detailed security and compliance information. I select the Request access button on the top right side to ask the vendor for access to their compliance documents.

AWS MArketplace vendor insights - request access part 1

On the next page, I fill in the Your information form with my details, and I select Request access.

AWS MArketplace vendor insights - request access part 2The Next Steps section details what will happen next. The seller will contact me to sign a nondisclosure agreement (NDA). The seller will notify AWS Marketplace when the NDA is signed. Then, I will be granted access to Vendor Insights data.

The process can take a few days. For this demo, I switch to a fictional product—Everest—for which I have access to the compliance data. Here is the Security and compliance tab when my request for access is accepted.

The Summary section shows how many controls are available. It reports how many have been validated with evidence and how many have been self-reported by the seller. It also shows how many noncompliant controls are reported.

I can scroll down the page to see the details for multiple categories: Audit, compliance and security policy, Data security, Access management, Application security, Risk management and incident response, Business resiliency and continuity, End user device security, Infrastructure security, Human resources, and Security and configuration policy. The screenshot does not show all of them.

AWS Marketplace vendor insights - security and complianceI select the detail for Access control and see the list under Control name. For each of them, I can see the compliance for SOC2 Type 2, ISO 27001, and the Vendor self-assessment.

AWS Marketplace vendor insights - access controlI select the noncompliant one to get the details and the explanation the vendor provided.

AWS Marketplace vendor insights - non compliant details

If needed, I might also use AWS Artifact third-party reports (preview) to download the compliance reports.

For Software Vendors
As a software vendor, you can create a security profile for your SaaS products on AWS Marketplace and share this profile with your prospective and existing buyers. It helps you to reduce the manual work for engineering and security teams to respond to your customer questionnaires.

To create a security profile, you will need to complete a self-assessment using AWS Audit Manager on your marketplace management AWS account, share the current SOC2 Type II and ISO27001 compliance artifacts, if available, and turn on automated assessment using Audit Manager and AWS Config on your production AWS accounts.

Our team has created an AWS CloudFormation template to automate the onboarding steps. You can find the technical resources, such as the setup guide and the onboarding templates, on our GitHub repository. Once the profile is created, Vendor Insights will keep your security profile up to date by using automated evidence from Audit Manager and AWS Config. The updates to your profile are sent as notifications. Your security and compliance team can review the updates before they are shared with buyers.

With Vendor Insights, you manage access to your product’s security profile by approving the buyer’s subscription requests. When a buyer requests access, Vendor Insights shares their contact information over email to your compliance or deal-desk operations team. They can complete the NDA with the buyer and notify AWS Marketplace to grant the buyer access to your security profile. You can also request AWS Marketplace to revoke the buyer’s subscription on a later day if you don’t want to share your product’s security and compliance posture information with the buyer anymore.

The entire process is documented in the AWS Marketplace Vendor Insights seller guide.

Pricing and Availability
Vendor Insights is now available in all AWS Regions where AWS Marketplace is available.

The pricing model is very simple; there is no charge involved for using AWS Marketplace Vendor Insights.

For buyers, you can access and download assets during your procurement phase. You lose access to the Vendor Insights profile if you have not purchased the product after 60 days. When you purchase the product, you keep access to the product’s security profile for continuous monitoring of its compliance status.

For sellers, AWS Marketplace doesn’t charge to activate and use Vendor Insights. You will incur fees for using Audit Manager and AWS Config.

Go and start your risk assessments on the AWS Marketplace today.

— seb

New for Amazon SageMaker – Perform Shadow Tests to Compare Inference Performance Between ML Model Variants

As you move your machine learning (ML) workloads into production, you need to continuously monitor your deployed models and iterate when you observe a deviation in your model performance. When you build a new model, you typically start validating the model offline using historical inference request data. But this data sometimes fails to account for current, real-world conditions. For example, new products might become trending that your product recommendation model hasn’t seen yet. Or, you experience a sudden spike in the volume of inference requests in production that you never exposed your model to before.

Today, I’m excited to announce Amazon SageMaker support for shadow testing!

Deploying a model in shadow mode lets you conduct a more holistic test by routing a copy of the live inference requests for a production model to the new (shadow) model. Yet, only the responses from the production model are returned to the calling application. Shadow testing helps you build further confidence in your model and catch potential configuration errors and performance issues before they impact end users. Once you complete a shadow test, you can use the deployment guardrails for SageMaker inference endpoints to safely update your model in production.

Get Started with Amazon SageMaker Shadow Testing
You can create shadow tests using the new SageMaker Inference Console and APIs. Shadow testing gives you a fully managed experience for setup, monitoring, viewing, and acting on the results of shadow tests. If you have existing workflows built around SageMaker endpoints, you can also deploy a model in shadow mode using the existing SageMaker Inference APIs.

On the SageMaker console, select Inference and Shadow tests to create, monitor, and deploy shadow tests.

Amazon SageMaker Shadow Tests

To create a shadow test, select an existing (or create a new) SageMaker endpoint and production variant you want to test against.

Amazon SageMaker - Create Shadow Test

Next, configure the proportion of traffic to send to the shadow variant, the comparison metrics you want to evaluate, and the duration of the test. You can also enable data capture for your production and shadow variant.

Amazon SagMaker - Create Shadow Test

That’s it. SageMaker now automatically deploys the new variant in shadow mode and routes a copy of the inference requests to it in real time, all within the same endpoint. The following diagram illustrates this workflow.

Amazon SageMaker - Shadow Testing

Note that only the responses of the production variant are returned to the calling application. You can choose to either discard or log the responses of the shadow variant for offline comparison.

You can also use shadow testing to validate changes you made to any component in your production variant, including the serving container or ML instance. This can be useful when you’re upgrading to a new framework version of your serving container, applying patches, or if you want to make sure that there is no impact to latency or error rate due to this change. Similarly, if you consider moving to another ML instance type, for example, Amazon EC2 C7g instances based on AWS Graviton processors, or EC2 G5 instances powered by NVIDIA A10G Tensor Core GPUs, you can use shadow testing to evaluate the performance on production traffic prior to rollout.

You can monitor the progress of the shadow test and performance metrics such as latency and error rate through a live dashboard. On the SageMaker console, select Inference and Shadow tests, then select the shadow test you want to monitor.

Amazon SageMaker - Monitor Shadow Test

Amazon SageMaker - Monitor Shadow Test

If you decide to promote the shadow model to production, select Deploy shadow variant and define the infrastructure configuration to deploy the shadow variant.

Amazon SageMaker - Deploy Shadow Variant

Amazon SageMaker - Deploy Shadow Variant

You can also use the SageMaker deployment guardrails if you want to add linear or canary traffic shifting modes and auto rollbacks to your update.

Availability and Pricing
SageMaker support for shadow testing is available today in all AWS Regions where SageMaker hosting is available except for the AWS GovCloud (US) Regions and AWS China Regions.

There is no additional charge for SageMaker shadow testing other than usage charges for the ML instances and ML storage provisioned to host the shadow variant. The pricing for ML instances and ML storage dimensions is the same as the real-time inference option. There is no additional charge for data processed in and out of shadow deployments. The SageMaker pricing page has all the details.

To learn more, visit Amazon SageMaker shadow testing.

Start validating your new ML models with SageMaker shadow tests today!

— Antje

Next Generation SageMaker Notebooks – Now with Built-in Data Preparation, Real-Time Collaboration, and Notebook Automation

In 2019, we introduced Amazon SageMaker Studio, the first fully integrated development environment (IDE) for data science and machine learning (ML). SageMaker Studio gives you access to fully managed Jupyter Notebooks that integrate with purpose-built tools to perform all ML steps, from preparing data to training and debugging models, tracking experiments, deploying and monitoring models, and managing pipelines.

Today, I’m excited to announce the next generation of Amazon SageMaker Notebooks to increase efficiency across the ML development workflow. You can now improve data quality in minutes with the built-in data preparation capability, edit the same notebooks with your teams in real time, and automatically convert notebook code to production-ready jobs.

Let me show you what’s new!

New Notebook Capability for Simplified Data Preparation
The new built-in data preparation capability is powered by Amazon SageMaker Data Wrangler and is available in SageMaker Studio notebooks.  SageMaker Studio notebooks automatically generate key visualizations on top of Pandas data frames to help you understand data distribution and identify data quality issues, like missing values, invalid data, and outliers. You can also select the target column for ML models and generate ML-specific insights such as imbalanced class or high correlation columns. You then receive recommendations for data transformations to resolve the issues. You can apply the data transformations right in the UI, and SageMaker Studio notebooks automatically generate the corresponding transformation code in the notebook cells that you can use to replay your data preparation pipeline.

Using the Built-in Data Preparation Capability
To get started, pip install and import sagemaker_datawrangler along with the pandas Python package. Then, download the dataset you want to analyze to the notebook working directory, and read the dataset with pandas.

import pandas as pd 
import sagemaker_datawrangler 

!aws s3 cp s3://<YOUR_S3_BUCKET>/data.csv . 

df = pd.read_csv("data.csv")

Now, when you display the data frame, it automatically shows key data visualizations at the top of each column, surfaces data insights, detects data quality issues, and suggests solutions to improve data quality. When you select a column as the target column for ML predictions, you get target-specific insights and warnings, such as mixed data types in target (for regression use cases) or too few instances per class (for classification use cases).

In this example, I’m using the Women’s E-Commerce Clothing Reviews dataset that contains customer reviews and ratings for women’s clothing. This dataset was obtained from Kaggle and has been modified by Amazon to add synthetic data quality issues.

Amazon SageMaker Studio notebooks with built-in data preparation

You can review the suggested data transformations to improve the data quality and apply them right in the UI. For a list of all supported data transformations, have a look at the documentation. Once you apply a data transformation, SageMaker Studio notebooks automatically generate the code to reproduce those data preparation steps in another notebook cell.

For my example, I select Rating as my target column. Target column insights tells me in a high-priority warning that this column has too few instances per class and with a medium-priority warning that classes are too imbalanced. Let’s follow the suggestions and drop rare target values and drop missing values. I will also follow the suggestions for some of the feature columns and drop missing values in the Review Text column and drop the Division Name column.

Once I apply the transformations, the notebook generates this code for me:

# Pandas code generated by sagemaker_datawrangler
output_df = df.copy(deep=True)


# Code to Drop rare target values for column: Rating to resolve warning: Too few instances per class 
rare_target_labels_to_drop = ['-100', '100']
output_df = output_df[~output_df['Rating'].isin(rare_target_labels_to_drop)]


# Code to Drop missing for column: Rating to resolve warning: Missing values 
output_df = output_df[output_df['Rating'].notnull()]


# Code to Drop missing for column: Review Text to resolve warning: Missing values 
output_df = output_df[output_df['Review Text'].notnull()]


# Code to Drop column for column: Division Name to resolve warning: Missing values 
output_df=output_df.drop(columns=['Division Name'])

I can now review and modify the code if needed or start integrating the data transformations as part of my ML development workflow.

Introducing Shared Spaces for Team-Based Sharing and Real-Time Collaboration
SageMaker Studio now offers shared spaces that give data science and ML teams a workspace where they can read, edit, and run notebooks together in real time to streamline collaboration and communication during the development process. Shared spaces provide a shared Amazon EFS directory that you can utilize to share files within a shared space. All taggable SageMaker resources that you create in a shared space are automatically tagged to help you organize and have a filtered view of your ML resources, such as training jobs, experiments, and models, that are relevant to the business problem you work on in the space. This also helps you monitor costs and plan budgets using tools such as AWS Budgets and AWS Cost Explorer.

And that’s not all. You can now also create multiple SageMaker domains within the same AWS account to scope access and isolate resources to different teams or business units in your organization. Now, let me show you how to create a shared space for users within a SageMaker domain.

Using Shared Spaces
You can use the SageMaker console or the AWS CLI to create shared spaces for a SageMaker domain. To get started in the SageMaker console, go to Domains, select or create a new domain, and select Space management on the Domain details page. Then, select Create and give the shared space a name.

Amazon SageMaker Spaces - Create Space

Users in this SageMaker domain can now launch and join the shared space through their SageMaker domain user profiles.

Amazon SageMaker Spaces - Launch Spaces

In a shared space, select the new Collaborators icon in the left navigation menu. You can now see who else is currently active in this space. The following screenshot shows user tom on the left, editing a notebook file. On the right, user antje sees the edits in real time, together with an annotation of the user name that currently edits that notebook cell.

Amazon SageMaker Spaces

New Notebook Capability to Automatically Convert Notebook Code to Production-Ready Jobs
You can now select a notebook and automate it as a job that can run in a production environment without the need to manage the underlying infrastructure. When you create a SageMaker Notebook Job, SageMaker Studio takes a snapshot of the entire notebook, packages its dependencies in a container, builds the infrastructure, runs the notebook as an automated job on a schedule you define, and deprovisions the infrastructure upon job completion. This notebook capability is now also available in SageMaker Studio Lab, our free ML development environment that provides the compute, storage, and security to learn and experiment with ML.

Using the Notebook Capability to Automate Notebooks
To get started, open a notebook file in SageMaker Studio. Then, right-click your notebook file and select Create Notebook Job or select the Create Notebook Job icon, as highlighted in the following screenshot.

Amazon SageMaker Studio - Automate your notebooks

Define a name for the Notebook Job, review the input file location, specify the compute type to use, and whether to run the job immediately or on a schedule. Then, select Create.

Amazon SageMaker Studio - Create Notebook Job

The Notebook Job has been created, and you can review all Notebook Job Definitions in the UI.

Amazon SageMaker Studio - Notebook Job Definitions

Now Available
The new Amazon SageMaker Studio notebook capabilities are now available in all AWS Regions where Amazon SageMaker Studio is available except for the AWS China Regions.

At launch, the built-in data preparation capability powered by SageMaker Data Wrangler is supported for SageMaker Studio notebooks and the following notebook kernel images:

  • Python 3 (Data Science) with Python 3.7
  • Python 3 (Data Science 2.0) with Python 3.8
  • Python 3 (Data Science 3.0) with Python 3.10
  • Spark Analytics 1.0 and 2.0

For more information, visit Amazon SageMaker Notebooks.

Start building your ML projects with the next generation of Amazon SageMaker Notebooks today!

— Antje

New – Share ML Models and Notebooks More Easily Within Your Organization with Amazon SageMaker JumpStart

Amazon SageMaker JumpStart is a machine learning (ML) hub that can help you accelerate your ML journey. SageMaker JumpStart gives you access to built-in algorithms with pre-trained models from popular model hubs, pre-trained foundation models to help you perform tasks such as article summarization and image generation, and end-to-end solutions to solve common use cases.

Today, I’m happy to announce that you can now share ML artifacts, such as models and notebooks, more easily with other users that share your AWS account using SageMaker JumpStart.

Using SageMaker JumpStart to Share ML Artifacts
Machine learning is a team sport. You might want to share your models and notebooks with other data scientists in your team to collaborate and increase productivity. Or, you might want to share your models with operations teams to put your models into production. Let me show you how to share ML artifacts using SageMaker JumpStart.

In SageMaker Studio, select Models in the left navigation menu. Then, select Shared models and Shared by my organization. You can now discover and search ML artifacts that other users shared within your AWS account. Note that you can add and share ML artifacts developed with SageMaker as well as those developed outside of SageMaker.

To share a model or notebook, select Add. For models, provide basic information, such as title, description, data type, ML task, framework, and any additional metadata. This information helps other users to find the right models for their use cases. You can also enable training and deployment for your model. This allows users to fine-tune your shared model and deploy the model in just a few clicks through SageMaker JumpStart.

Amazon SageMaker Jumpstart - Add model to private ML hub

To enable model training, you can select an existing SageMaker training job that will autopopulate all relevant information. This information includes the container framework, training script location, model artifact location, instance type, default training and validation datasets, and target column. You can also provide custom model training information by selecting a prebuilt SageMaker Deep Learning Container or selecting a custom Docker container in Amazon ECR. You can also specify default hyperparameters and metrics for model training.

To enable model deployment, you also need to define the container image to use, the inference script and model artifact location, and the default instance type. Have a look at the SageMaker Developer Guide to learn more about model training and model deployment options.

Sharing a notebook works similarly. You need to provide basic information about your notebook and the Amazon S3 location of the notebook file.

Amazon SageMaker JumpStart - Add a notebook to private ML hub

Users that share your AWS account can now browse and select shared models to fine-tune, deploy endpoints, or run notebooks directly in SageMaker JumpStart.

In SageMaker Studio, select Quick start solutions in the left navigation menu, then select Solutions, models, example notebooks to access all shared ML artifacts, together with pre-trained models from popular model hubs and end-to-end solutions.

Amazon SageMaker JumpStart

Now Available
The new ML artifact-sharing capability within Amazon SageMaker JumpStart is available today in all AWS Regions where Amazon SageMaker JumpStart is available. To learn more, visit Amazon SageMaker JumpStart and the SageMaker JumpStart documentation.

Start sharing your models and notebooks with Amazon SageMaker JumpStart today!

— Antje