Category: <span>AWS re:InventNews</span>

New – Process PDFs, Word Documents, and Images with Amazon Comprehend for IDP

Today we are announcing a new Amazon Comprehend feature for intelligent document processing (IDP). This feature allows you to classify and extract entities from PDF documents, Microsoft Word files, and images directly from Amazon Comprehend without you needing to extract the text first.

Many customers need to process documents that have a semi-structured format, like images of receipts that were scanned or tax statements in PDF format. Until today, those customers first needed to preprocess those documents to flatten them into machine-readable text, which can reduce the quality of the document context. Then they could use Amazon Comprehend to classify and extract entities from those preprocessed files.

Now with Amazon Comprehend for IDP, customers can process their semi-structured documents, such as PDFs, docx, PNG, JPG, or TIFF images, as well as plain-text documents, with a single API call. This new feature combines OCR and Amazon Comprehend’s existing natural language processing (NLP) capabilities to classify and extract entities from the documents. The custom document classification API allows you to organize documents into categories or classes, and the custom-named entity recognition API allows you to extract entities from documents like product codes or business-specific entities. For example, an insurance company can now process scanned customers’ claims with fewer API calls. Using the Amazon Comprehend entity recognition API, they can extract the customer number from the claims and use the custom classifier API to sort the claim into the different insurance categories—home, car, or personal.

Starting today, Amazon Comprehend for IDP APIs are available for real-time inferencing of files, as well as for asynchronous batch processing on large document sets. This feature simplifies the document processing pipeline and reduces development effort.

Getting Started
You can use Amazon Comprehend for IDP from the AWS Management Console, AWS SDKs, or AWS Command Line Interface (CLI).

In this demo, you will see how to asynchronously process a semi-structured file with a custom classifier. For extracting entities, the steps are different, and you can learn how to do it by checking the documentation.

In order to process a file with a classifier, you will first need to train a custom classifier. You can follow the steps in the Amazon Comprehend Developer Guide. You need to train this classifier with plain text data.

After you train your custom classifier, you can classify documents using either asynchronous or synchronous operations. For using the synchronous operation to analyze a single document, you need to create an endpoint to run real-time analysis using a custom model. You can find more information about real-time analysis in the documentation. For this demo, you are going to use the asynchronous operation, placing the documents to classify in an Amazon Simple Storage Service (Amazon S3) bucket and running an analysis batch job.

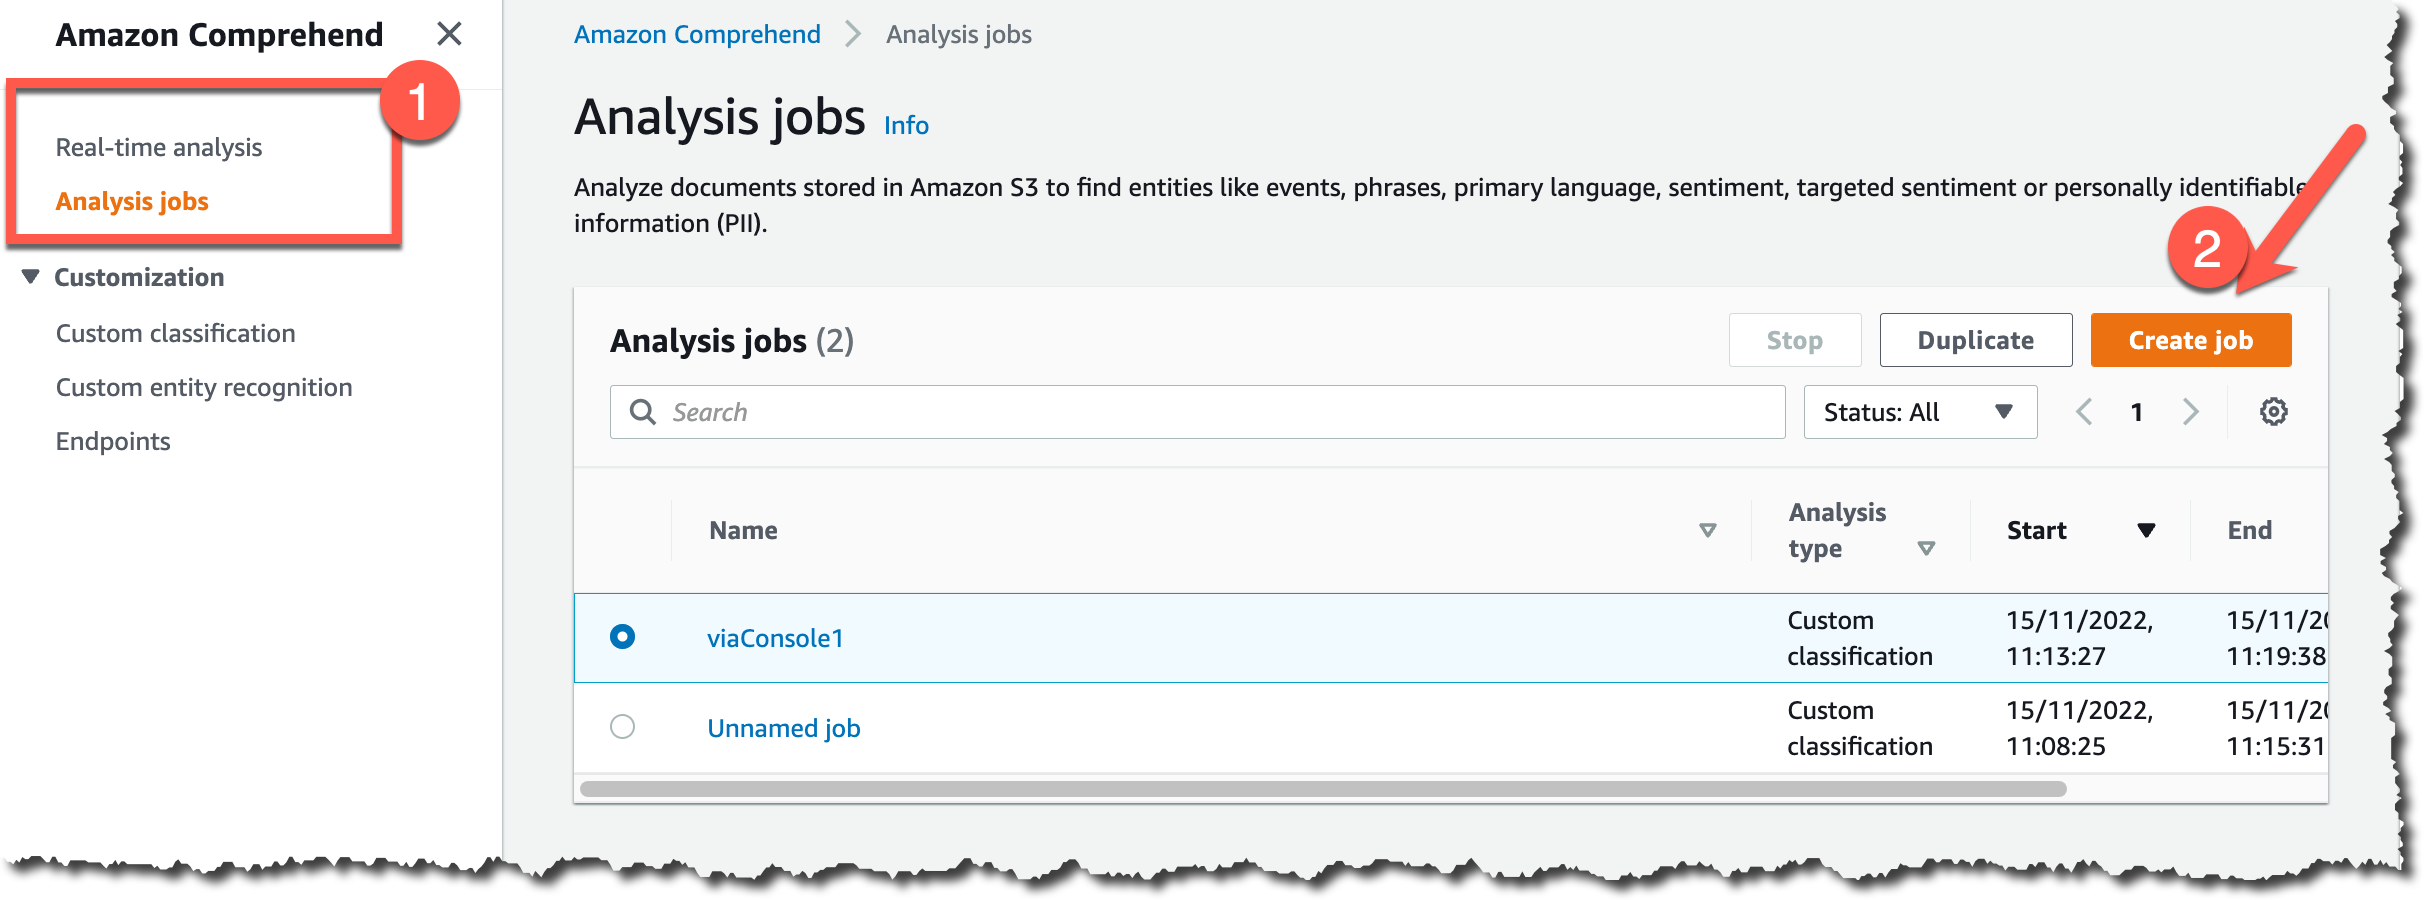
To get started classifying documents in batch from the console, on the Amazon Comprehend page, go to Analysis jobs and then Create job.

Create new job

Then you can configure the new analysis job. First, input a name and pick Custom classification and the custom classifier you created earlier.

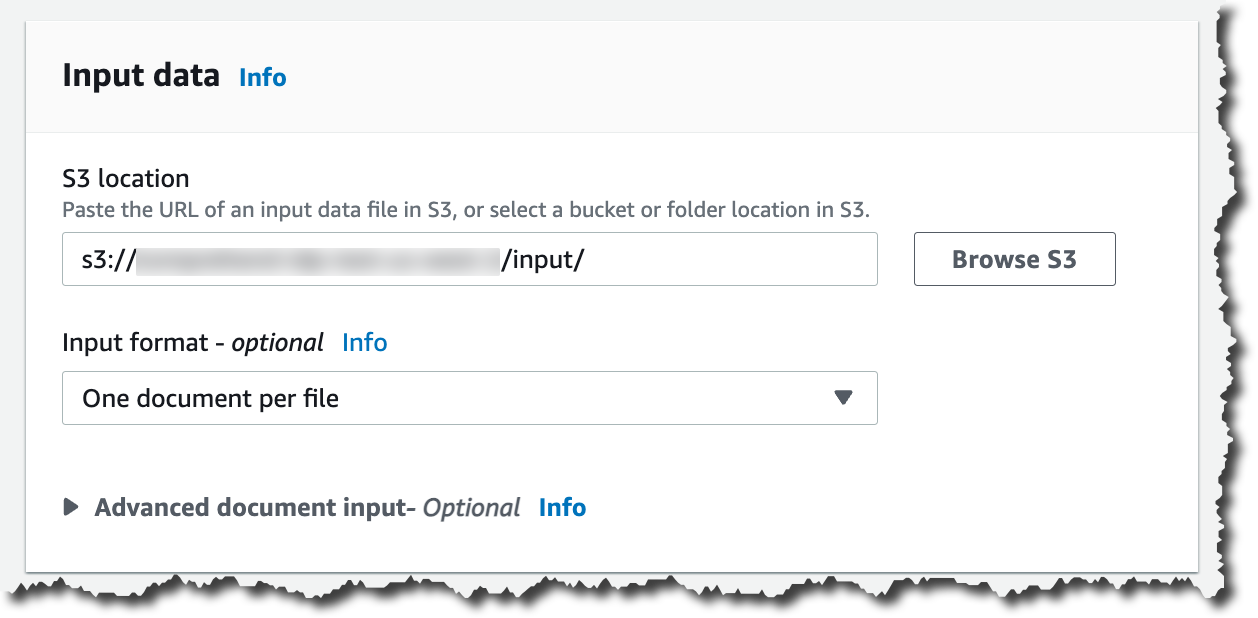
Then you can configure the input data. First, select the S3 location for that data. In that location, you can place your PDFs, images, and Word Documents. Because you are processing semi-structured documents, you need to choose One document per file. If you want to override Amazon Comprehend settings for extracting and parsing the document, you can configure the Advanced document input options.

Input data for analysis job

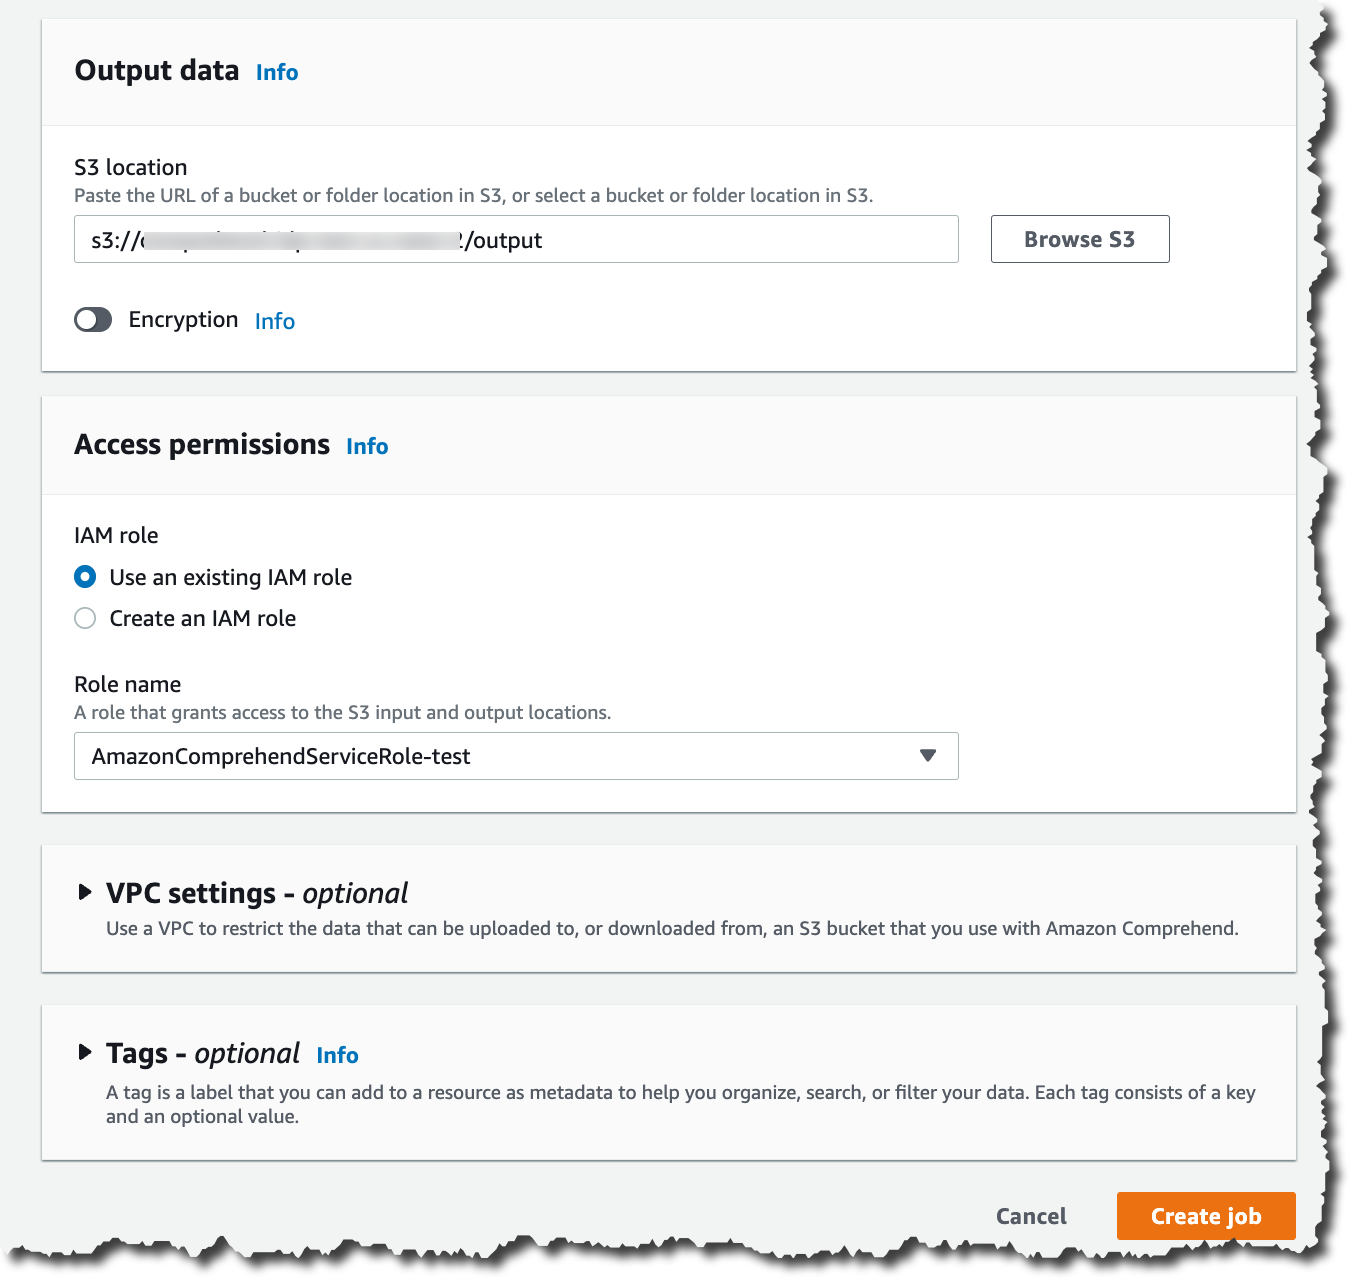
After configuring the input data, you can select where the output of this analysis should be stored. Also, you need to give access permissions for this analysis job to read and write on the specified Amazon S3 locations, and then you are ready to create the job.

Configuring the classification job

The job takes a few minutes to run, depending on the size of the input. When the job is ready, you can check the output results. You can find the results in the Amazon S3 location you specified when you created the job.

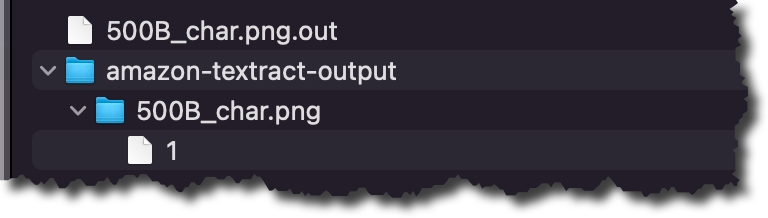
In the results folder, you will find a .out file for each of the semi-structured files Amazon Comprehend classified. The .out file is a JSON, in which each line represents a page of the document. In the amazon-textract-output directory, you will find a folder for each classified file, and inside that folder, there is one file per page from the original file. Those page files contain the classification results. To learn more about the outputs of the classifications, check the documentation page.

Job output

Available Now
You can get started classifying and extracting entities from semi-structured files like PDFs, images, and Word Documents asynchronously and synchronously today from Amazon Comprehend in all the Regions where Amazon Comprehend is available. Learn more about this new launch in the Amazon Comprehend Developer Guide.

Marcia

New — Create Point-to-Point Integrations Between Event Producers and Consumers with Amazon EventBridge Pipes

It is increasingly common to use multiple cloud services as building blocks to assemble a modern event-driven application. Using purpose-built services to accomplish a particular task ensures developers get the best capabilities for their use case. However, communication between services can be difficult if they use different technologies to communicate, meaning that you need to learn the nuances of each service and how to integrate them with each other. We usually need to create integration code (or “glue” code) to connect and bridge communication between services. Writing glue code slows our velocity, increases the risk of bugs, and means we spend our time writing undifferentiated code rather than building better experiences for our customers.

Introducing Amazon EventBridge Pipes
Today, I’m excited to announce Amazon EventBridge Pipes, a new feature of Amazon EventBridge that makes it easier for you to build event-driven applications by providing a simple, consistent, and cost-effective way to create point-to-point integrations between event producers and consumers, removing the need to write undifferentiated glue code.

The simplest pipe consists of a source and a target. An optional filtering step allows only specific source events to flow into the Pipe and an optional enrichment step using AWS Lambda, AWS Step Functions, Amazon EventBridge API Destinations, or Amazon API Gateway enriches or transforms events before they reach the target. With Amazon EventBridge Pipes, you can integrate supported AWS and self-managed services as event producers and event consumers into your application in a simple, reliable, consistent and cost-effective way.

Amazon EventBridge Pipes bring the most popular features of Amazon EventBridge Event Bus, such as event filtering, integration with more than 14 AWS services, and automatic delivery retries.

How Amazon EventBridge Pipes Works
Amazon EventBridge Pipes provides you a seamless means of integrating supported AWS and self-managed services, favouring configuration over code. To start integrating services with EventBridge Pipes, you need to take the following steps:

  1. Choose a source that is producing your events. Supported sources include: Amazon DynamoDB, Amazon Kinesis Data Streams, Amazon SQS, Amazon Managed Streaming for Apache Kafka, and Amazon MQ (both ActiveMQ and RabbitMQ).
  2. (Optional) Specify an event filter to only process events that match your filter (you’re not charged for events that are filtered out).
  3. (Optional) Transform and enrich your events using built-in free transformations, or AWS Lambda, AWS Step Functions, Amazon API Gateway, or EventBridge API Destinations to perform more advanced transformations and enrichments.
  4. Choose a target destination from more than 14 AWS services, including Amazon Step Functions, Kinesis Data Streams, AWS Lambda, and third-party APIs using EventBridge API destinations.

Amazon EventBridge Pipes provides simplicity to accelerate development velocity by reducing the time needed to learn the services and write integration code, to get reliable and consistent integration.

EventBridge Pipes also comes with additional features that can help in building event-driven applications. For example, with event filtering, Pipes helps event-driven applications become more cost-effective by only processing the events of interest.

Get Started with Amazon EventBridge Pipes
Let’s see how to get started with Amazon EventBridge Pipes. In this post, I will show how to integrate an Amazon SQS queue with AWS Step Functions using Amazon EventBridge Pipes.

The following screenshot is my existing Amazon SQS queue and AWS Step Functions state machine. In my case, I need to run the state machine for every event in the queue. To do so, I need to connect my SQS queue and Step Functions state machine with EventBridge Pipes.

Existing Amazon SQS queue and AWS Step Functions state machine

First, I open the Amazon EventBridge console. In the navigation section, I select Pipes. Then I select Create pipe.

On this page, I can start configuring a pipe and set the AWS Identity and Access Management (IAM) permission, and I can navigate to the Pipe settings tab.

Navigate to Pipe Settings

In the Permissions section, I can define a new IAM role for this pipe or use an existing role. To improve developer experience, the EventBridge Pipes console will figure out the IAM role for me, so I don’t need to manually configure required permissions and let EventBridge Pipes configures least-privilege permissions for IAM role. Since this is my first time creating a pipe, I select Create a new role for this specific resource.

Setting IAM Permission for pipe

Then, I go back to the Build pipe section. On this page, I can see the available event sources supported by EventBridge Pipes.

List of available services as the event source

I select SQS and select my existing SQS queue. If I need to do batch processing, I can select Additional settings to start defining Batch size and Batch window. Then, I select Next.

Select SQS Queue as event source

On the next page, things get even more interesting because I can define Event filtering from the event source that I just selected. This step is optional, but the event filtering feature makes it easy for me to process events that only need to be processed by my event-driven application. In addition, this event filtering feature also helps me to be more cost-effective, as this pipe won’t process unnecessary events. For example, if I use Step Functions as the target, the event filtering will only execute events that match the filter.

Event filtering in Amazon EventBridge Pipes

I can use sample events from AWS events or define custom events. For example, I want to process events for returned purchased items with a value of 100 or more. The following is the sample event in JSON format:

{
   "event-type":"RETURN_PURCHASE",
   "value":100
}

Then, in the event pattern section, I can define the pattern by referring to the Content filtering in Amazon EventBridge event patterns documentation. I define the event pattern as follows:

{
   "event-type": ["RETURN_PURCHASE"],
   "value": [{
      "numeric": [">=", 100]
   }]
}

I can also test by selecting test pattern to make sure this event pattern will match the custom event I’m going to use. Once I’m confident that this is the event pattern that I want, I select Next.

Defining and testing an event pattern for filtering

In the next optional step, I can use an Enrichment that will augment, transform, or expand the event before sending the event to the target destination. This enrichment is useful when I need to enrich the event using an existing AWS Lambda function, or external SaaS API using the Destination API. Additionally, I can shape the event using the Enrichment Input Transformer.

The final step is to define a target for processing the events delivered by this pipe.

Defining target destination service

Here, I can select various AWS services supported by EventBridge Pipes.

I select my existing AWS Step Functions state machine, named pipes-statemachine.

In addition, I can also use Target Input Transformer by referring to the Transforming Amazon EventBridge target input documentation. For my case, I need to define a high priority for events going into this target. To do that, I define a sample custom event in Sample events/Event Payload and add the priority: HIGH in the Transformer section. Then in the Output section, I can see the final event to be passed to the target destination service. Then, I select Create pipe.

In less than a minute, my pipe was successfully created.

Pipe successfully created

To test this pipe, I need to put an event into the Amaon SQS queue.

Sending a message into Amazon SQS Queue

To check if my event is successfully processed by Step Functions, I can look into my state machine in Step Functions. On this page, I see my event is successfully processed.

I can also go to Amazon CloudWatch Logs to get more detailed logs.

Things to Know
Event Sources
– At launch, Amazon EventBridge Pipes supports the following services as event sources: Amazon DynamoDB, Amazon Kinesis, Amazon Managed Streaming for Apache Kafka (Amazon MSK) alongside self-managed Apache Kafka, Amazon SQS (standard and FIFO), and Amazon MQ (both for ActiveMQ and RabbitMQ).

Event Targets – Amazon EventBridge Pipes supports 15 Amazon EventBridge targets, including AWS Lambda, Amazon API Gateway, Amazon SNS, Amazon SQS, and AWS Step Functions. To deliver events to any HTTPS endpoint, developers can use API destinations as the target.

Event Ordering – EventBridge Pipes maintains the ordering of events received from an event sources that support ordering when sending those events to a destination service.

Programmatic Access – You can also interact with Amazon EventBridge Pipes and create a pipe using AWS Command Line Interface (CLI), AWS CloudFormation, and AWS Cloud Development Kit (AWS CDK).

Independent Usage – EventBridge Pipes can be used separately from Amazon EventBridge bus and Amazon EventBridge Scheduler. This flexibility helps developers to define source events from supported AWS and self-managed services as event sources without Amazon EventBridge Event Bus.

Availability – Amazon EventBridge Pipes is now generally available in all AWS commercial Regions, with the exception of Asia Pacific (Hyderabad) and Europe (Zurich).

Visit the Amazon EventBridge Pipes page to learn more about this feature and understand the pricing. You can also visit the documentation page to learn more about how to get started.

Happy building!

— Donnie

New — Introducing Support for Real-Time and Batch Inference in Amazon SageMaker Data Wrangler

To build machine learning models, machine learning engineers need to develop a data transformation pipeline to prepare the data. The process of designing this pipeline is time-consuming and requires a cross-team collaboration between machine learning engineers, data engineers, and data scientists to implement the data preparation pipeline into a production environment.

The main objective of Amazon SageMaker Data Wrangler is to make it easy to do data preparation and data processing workloads. With SageMaker Data Wrangler, customers can simplify the process of data preparation and all of the necessary steps of data preparation workflow on a single visual interface. SageMaker Data Wrangler reduces the time to rapidly prototype and deploy data processing workloads to production, so customers can easily integrate with MLOps production environments.

However, the transformations applied to the customer data for model training need to be applied to new data during real-time inference. Without support for SageMaker Data Wrangler in a real-time inference endpoint, customers need to write code to replicate the transformations from their flow in a preprocessing script.

Introducing Support for Real-Time and Batch Inference in Amazon SageMaker Data Wrangler
I’m pleased to share that you can now deploy data preparation flows from SageMaker Data Wrangler for real-time and batch inference. This feature allows you to reuse the data transformation flow which you created in SageMaker Data Wrangler as a step in Amazon SageMaker inference pipelines.

SageMaker Data Wrangler support for real-time and batch inference speeds up your production deployment because there is no need to repeat the implementation of the data transformation flow. You can now integrate SageMaker Data Wrangler with SageMaker inference. The same data transformation flows created with the easy-to-use, point-and-click interface of SageMaker Data Wrangler, containing operations such as Principal Component Analysis and one-hot encoding, will be used to process your data during inference. This means that you don’t have to rebuild the data pipeline for a real-time and batch inference application, and you can get to production faster.

Get Started with Real-Time and Batch Inference
Let’s see how to use the deployment supports of SageMaker Data Wrangler. In this scenario, I have a flow inside SageMaker Data Wrangler. What I need to do is to integrate this flow into real-time and batch inference using the SageMaker inference pipeline.

First, I will apply some transformations to the dataset to prepare it for training.

I add one-hot encoding on the categorical columns to create new features.

Then, I drop any remaining string columns that cannot be used during training.

My resulting flow now has these two transform steps in it.

After I’m satisfied with the steps I have added, I can expand the Export to menu, and I have the option to export to SageMaker Inference Pipeline (via Jupyter Notebook).

I select Export to SageMaker Inference Pipeline, and SageMaker Data Wrangler will prepare a fully customized Jupyter notebook to integrate the SageMaker Data Wrangler flow with inference. This generated Jupyter notebook performs a few important actions. First, define data processing and model training steps in a SageMaker pipeline. The next step is to run the pipeline to process my data with Data Wrangler and use the processed data to train a model that will be used to generate real-time predictions. Then, deploy my Data Wrangler flow and trained model to a real-time endpoint as an inference pipeline. Last, invoke my endpoint to make a prediction.

This feature uses Amazon SageMaker Autopilot, which makes it easy for me to build ML models. I just need to provide the transformed dataset which is the output of the SageMaker Data Wrangler step and select the target column to predict. The rest will be handled by Amazon SageMaker Autopilot to explore various solutions to find the best model.

Using AutoML as a training step from SageMaker Autopilot is enabled by default in the notebook with the use_automl_step variable. When using the AutoML step, I need to define the value of target_attribute_name, which is the column of my data I want to predict during inference. Alternatively, I can set use_automl_step to False if I want to use the XGBoost algorithm to train a model instead.

On the other hand, if I would like to instead use a model I trained outside of this notebook, then I can skip directly to the Create SageMaker Inference Pipeline section of the notebook. Here, I would need to set the value of the byo_model variable to True. I also need to provide the value of algo_model_uri, which is the Amazon Simple Storage Service (Amazon S3) URI where my model is located. When training a model with the notebook, these values will be auto-populated.

In addition, this feature also saves a tarball inside the data_wrangler_inference_flows folder on my SageMaker Studio instance. This file is a modified version of the SageMaker Data Wrangler flow, containing the data transformation steps to be applied at the time of inference. It will be uploaded to S3 from the notebook so that it can be used to create a SageMaker Data Wrangler preprocessing step in the inference pipeline.

The next step is that this notebook will create two SageMaker model objects. The first object model is the SageMaker Data Wrangler model object with the variable data_wrangler_model, and the second is the model object for the algorithm, with the variable algo_model. Object data_wrangler_model will be used to provide input in the form of data that has been processed into algo_model for prediction.

The final step inside this notebook is to create a SageMaker inference pipeline model, and deploy it to an endpoint.

Once the deployment is complete, I will get an inference endpoint that I can use for prediction. With this feature, the inference pipeline uses the SageMaker Data Wrangler flow to transform the data from your inference request into a format that the trained model can use.

In the next section, I can run individual notebook cells in Make a Sample Inference Request. This is helpful if I need to do a quick check to see if the endpoint is working by invoking the endpoint with a single data point from my unprocessed data. Data Wrangler automatically places this data point into the notebook, so I don’t have to provide one manually.

Things to Know
Enhanced Apache Spark configuration — In this release of SageMaker Data Wrangler, you can now easily configure how Apache Spark partitions the output of your SageMaker Data Wrangler jobs when saving data to Amazon S3. When adding a destination node, you can set the number of partitions, corresponding to the number of files that will be written to Amazon S3, and you can specify column names to partition by, to write records with different values of those columns to different subdirectories in Amazon S3. Moreover, you can also define the configuration in the provided notebook.

You can also define memory configurations for SageMaker Data Wrangler processing jobs as part of the Create job workflow. You will find similar configuration as part of your notebook.

Availability — SageMaker Data Wrangler supports for real-time and batch inference as well as enhanced Apache Spark configuration for data processing workloads are generally available in all AWS Regions that Data Wrangler currently supports.

To get started with Amazon SageMaker Data Wrangler supports for real-time and batch inference deployment, visit AWS documentation.

Happy building
— Donnie