Category: <span>Amazon SageMaker</span>

New for Amazon SageMaker – Perform Shadow Tests to Compare Inference Performance Between ML Model Variants

As you move your machine learning (ML) workloads into production, you need to continuously monitor your deployed models and iterate when you observe a deviation in your model performance. When you build a new model, you typically start validating the model offline using historical inference request data. But this data sometimes fails to account for current, real-world conditions. For example, new products might become trending that your product recommendation model hasn’t seen yet. Or, you experience a sudden spike in the volume of inference requests in production that you never exposed your model to before.

Today, I’m excited to announce Amazon SageMaker support for shadow testing!

Deploying a model in shadow mode lets you conduct a more holistic test by routing a copy of the live inference requests for a production model to the new (shadow) model. Yet, only the responses from the production model are returned to the calling application. Shadow testing helps you build further confidence in your model and catch potential configuration errors and performance issues before they impact end users. Once you complete a shadow test, you can use the deployment guardrails for SageMaker inference endpoints to safely update your model in production.

Get Started with Amazon SageMaker Shadow Testing
You can create shadow tests using the new SageMaker Inference Console and APIs. Shadow testing gives you a fully managed experience for setup, monitoring, viewing, and acting on the results of shadow tests. If you have existing workflows built around SageMaker endpoints, you can also deploy a model in shadow mode using the existing SageMaker Inference APIs.

On the SageMaker console, select Inference and Shadow tests to create, monitor, and deploy shadow tests.

Amazon SageMaker Shadow Tests

To create a shadow test, select an existing (or create a new) SageMaker endpoint and production variant you want to test against.

Amazon SageMaker - Create Shadow Test

Next, configure the proportion of traffic to send to the shadow variant, the comparison metrics you want to evaluate, and the duration of the test. You can also enable data capture for your production and shadow variant.

Amazon SagMaker - Create Shadow Test

That’s it. SageMaker now automatically deploys the new variant in shadow mode and routes a copy of the inference requests to it in real time, all within the same endpoint. The following diagram illustrates this workflow.

Amazon SageMaker - Shadow Testing

Note that only the responses of the production variant are returned to the calling application. You can choose to either discard or log the responses of the shadow variant for offline comparison.

You can also use shadow testing to validate changes you made to any component in your production variant, including the serving container or ML instance. This can be useful when you’re upgrading to a new framework version of your serving container, applying patches, or if you want to make sure that there is no impact to latency or error rate due to this change. Similarly, if you consider moving to another ML instance type, for example, Amazon EC2 C7g instances based on AWS Graviton processors, or EC2 G5 instances powered by NVIDIA A10G Tensor Core GPUs, you can use shadow testing to evaluate the performance on production traffic prior to rollout.

You can monitor the progress of the shadow test and performance metrics such as latency and error rate through a live dashboard. On the SageMaker console, select Inference and Shadow tests, then select the shadow test you want to monitor.

Amazon SageMaker - Monitor Shadow Test

Amazon SageMaker - Monitor Shadow Test

If you decide to promote the shadow model to production, select Deploy shadow variant and define the infrastructure configuration to deploy the shadow variant.

Amazon SageMaker - Deploy Shadow Variant

Amazon SageMaker - Deploy Shadow Variant

You can also use the SageMaker deployment guardrails if you want to add linear or canary traffic shifting modes and auto rollbacks to your update.

Availability and Pricing
SageMaker support for shadow testing is available today in all AWS Regions where SageMaker hosting is available except for the AWS GovCloud (US) Regions and AWS China Regions.

There is no additional charge for SageMaker shadow testing other than usage charges for the ML instances and ML storage provisioned to host the shadow variant. The pricing for ML instances and ML storage dimensions is the same as the real-time inference option. There is no additional charge for data processed in and out of shadow deployments. The SageMaker pricing page has all the details.

To learn more, visit Amazon SageMaker shadow testing.

Start validating your new ML models with SageMaker shadow tests today!

— Antje

Next Generation SageMaker Notebooks – Now with Built-in Data Preparation, Real-Time Collaboration, and Notebook Automation

In 2019, we introduced Amazon SageMaker Studio, the first fully integrated development environment (IDE) for data science and machine learning (ML). SageMaker Studio gives you access to fully managed Jupyter Notebooks that integrate with purpose-built tools to perform all ML steps, from preparing data to training and debugging models, tracking experiments, deploying and monitoring models, and managing pipelines.

Today, I’m excited to announce the next generation of Amazon SageMaker Notebooks to increase efficiency across the ML development workflow. You can now improve data quality in minutes with the built-in data preparation capability, edit the same notebooks with your teams in real time, and automatically convert notebook code to production-ready jobs.

Let me show you what’s new!

New Notebook Capability for Simplified Data Preparation
The new built-in data preparation capability is powered by Amazon SageMaker Data Wrangler and is available in SageMaker Studio notebooks.  SageMaker Studio notebooks automatically generate key visualizations on top of Pandas data frames to help you understand data distribution and identify data quality issues, like missing values, invalid data, and outliers. You can also select the target column for ML models and generate ML-specific insights such as imbalanced class or high correlation columns. You then receive recommendations for data transformations to resolve the issues. You can apply the data transformations right in the UI, and SageMaker Studio notebooks automatically generate the corresponding transformation code in the notebook cells that you can use to replay your data preparation pipeline.

Using the Built-in Data Preparation Capability
To get started, pip install and import sagemaker_datawrangler along with the pandas Python package. Then, download the dataset you want to analyze to the notebook working directory, and read the dataset with pandas.

import pandas as pd 
import sagemaker_datawrangler 

!aws s3 cp s3://<YOUR_S3_BUCKET>/data.csv . 

df = pd.read_csv("data.csv")

Now, when you display the data frame, it automatically shows key data visualizations at the top of each column, surfaces data insights, detects data quality issues, and suggests solutions to improve data quality. When you select a column as the target column for ML predictions, you get target-specific insights and warnings, such as mixed data types in target (for regression use cases) or too few instances per class (for classification use cases).

In this example, I’m using the Women’s E-Commerce Clothing Reviews dataset that contains customer reviews and ratings for women’s clothing. This dataset was obtained from Kaggle and has been modified by Amazon to add synthetic data quality issues.

Amazon SageMaker Studio notebooks with built-in data preparation

You can review the suggested data transformations to improve the data quality and apply them right in the UI. For a list of all supported data transformations, have a look at the documentation. Once you apply a data transformation, SageMaker Studio notebooks automatically generate the code to reproduce those data preparation steps in another notebook cell.

For my example, I select Rating as my target column. Target column insights tells me in a high-priority warning that this column has too few instances per class and with a medium-priority warning that classes are too imbalanced. Let’s follow the suggestions and drop rare target values and drop missing values. I will also follow the suggestions for some of the feature columns and drop missing values in the Review Text column and drop the Division Name column.

Once I apply the transformations, the notebook generates this code for me:

# Pandas code generated by sagemaker_datawrangler
output_df = df.copy(deep=True)


# Code to Drop rare target values for column: Rating to resolve warning: Too few instances per class 
rare_target_labels_to_drop = ['-100', '100']
output_df = output_df[~output_df['Rating'].isin(rare_target_labels_to_drop)]


# Code to Drop missing for column: Rating to resolve warning: Missing values 
output_df = output_df[output_df['Rating'].notnull()]


# Code to Drop missing for column: Review Text to resolve warning: Missing values 
output_df = output_df[output_df['Review Text'].notnull()]


# Code to Drop column for column: Division Name to resolve warning: Missing values 
output_df=output_df.drop(columns=['Division Name'])

I can now review and modify the code if needed or start integrating the data transformations as part of my ML development workflow.

Introducing Shared Spaces for Team-Based Sharing and Real-Time Collaboration
SageMaker Studio now offers shared spaces that give data science and ML teams a workspace where they can read, edit, and run notebooks together in real time to streamline collaboration and communication during the development process. Shared spaces provide a shared Amazon EFS directory that you can utilize to share files within a shared space. All taggable SageMaker resources that you create in a shared space are automatically tagged to help you organize and have a filtered view of your ML resources, such as training jobs, experiments, and models, that are relevant to the business problem you work on in the space. This also helps you monitor costs and plan budgets using tools such as AWS Budgets and AWS Cost Explorer.

And that’s not all. You can now also create multiple SageMaker domains within the same AWS account to scope access and isolate resources to different teams or business units in your organization. Now, let me show you how to create a shared space for users within a SageMaker domain.

Using Shared Spaces
You can use the SageMaker console or the AWS CLI to create shared spaces for a SageMaker domain. To get started in the SageMaker console, go to Domains, select or create a new domain, and select Space management on the Domain details page. Then, select Create and give the shared space a name.

Amazon SageMaker Spaces - Create Space

Users in this SageMaker domain can now launch and join the shared space through their SageMaker domain user profiles.

Amazon SageMaker Spaces - Launch Spaces

In a shared space, select the new Collaborators icon in the left navigation menu. You can now see who else is currently active in this space. The following screenshot shows user tom on the left, editing a notebook file. On the right, user antje sees the edits in real time, together with an annotation of the user name that currently edits that notebook cell.

Amazon SageMaker Spaces

New Notebook Capability to Automatically Convert Notebook Code to Production-Ready Jobs
You can now select a notebook and automate it as a job that can run in a production environment without the need to manage the underlying infrastructure. When you create a SageMaker Notebook Job, SageMaker Studio takes a snapshot of the entire notebook, packages its dependencies in a container, builds the infrastructure, runs the notebook as an automated job on a schedule you define, and deprovisions the infrastructure upon job completion. This notebook capability is now also available in SageMaker Studio Lab, our free ML development environment that provides the compute, storage, and security to learn and experiment with ML.

Using the Notebook Capability to Automate Notebooks
To get started, open a notebook file in SageMaker Studio. Then, right-click your notebook file and select Create Notebook Job or select the Create Notebook Job icon, as highlighted in the following screenshot.

Amazon SageMaker Studio - Automate your notebooks

Define a name for the Notebook Job, review the input file location, specify the compute type to use, and whether to run the job immediately or on a schedule. Then, select Create.

Amazon SageMaker Studio - Create Notebook Job

The Notebook Job has been created, and you can review all Notebook Job Definitions in the UI.

Amazon SageMaker Studio - Notebook Job Definitions

Now Available
The new Amazon SageMaker Studio notebook capabilities are now available in all AWS Regions where Amazon SageMaker Studio is available except for the AWS China Regions.

At launch, the built-in data preparation capability powered by SageMaker Data Wrangler is supported for SageMaker Studio notebooks and the following notebook kernel images:

  • Python 3 (Data Science) with Python 3.7
  • Python 3 (Data Science 2.0) with Python 3.8
  • Python 3 (Data Science 3.0) with Python 3.10
  • Spark Analytics 1.0 and 2.0

For more information, visit Amazon SageMaker Notebooks.

Start building your ML projects with the next generation of Amazon SageMaker Notebooks today!

— Antje

AWS Machine Learning University New Educator Enablement Program to Build Diverse Talent for ML/AI Jobs

AWS Machine Learning University is now providing a free educator enablement program. This program provides faculty at community colleges, minority-serving institutions (MSIs), and historically Black colleges and universities (HBCUs) with the skills and resources to teach data analytics, artificial intelligence (AI), and machine learning (ML) concepts to build a diverse pipeline for in-demand jobs of today and tomorrow.

According to the National Science Foundation, Black and Hispanic or Latino students earn bachelor’s degrees in Computer Science—the dominant pathway to AI/ML—at a much lower rate than their white peers, earning less than 11 percent of computer science degrees awarded. However, research shows that having diverse perspectives among skilled practitioners and across the AI/ML lifecycle contributes to the development of AI/ML systems that are safe, trustworthy, and have less bias. 

In 2018, we announced the Machine Learning University (MLU) to share with all developers the same courses that we used to train engineers at Amazon and AWS. This platform offers self-service, self-paced, AI/ML digital courses.

Machine Learning University home page

And today, we add this new program to our AI/ML training offering. Although anyone could access the MLU self-paced learning, it places the burden on the learner to source prerequisite work and solutions. This educator enablement program takes the concepts and lessons developed by MLU and makes them more accessible to educators. It offers a year-round educator enablement program with lesson planning, course playbooks, and access to free compute resources.

Program Details
Educators are onboarded in small-group cohorts into bootcamps where they will learn the material and deep dive into how to teach it via instructor-led lectures and hands-on projects. Educators who complete the bootcamp can take part in different year-round development opportunities, such as a dedicated Slack channel to share teaching best practices, education topic series and virtual study sessions moderated by MLU instructors, and regional events for continued professional development. Also, they will receive continuing education credits and AWS-provided stipends.

Faculty and students get access to instructional material through Amazon SageMaker Studio Lab. SageMaker Studio Lab was announced last year and is AWS’s free (no credit card required) ML development environment. It provides computing and storage for anybody that wants to learn and experiment with ML. Institutions can unlock additional resources to support their ML programs by registering for AWS Academy. AWS Academy unlocks all the AWS services for a complete AI/ML program.

Community colleges and universities can integrate this educator enablement program into their computer science, information technology, and business curricula to create an AI/ML course, certificate, or degree. We have worked with educators and education boards such as Houston Community College to create content that is vetted for credit-worthy and degree-earning curricula.

In August 2022, we launched our first educator bootcamp in partnership with The Coding School. The bootcamp was delivered over two weeks, offering lectures, case studies, and hands-on projects. 25 educators completed the Educator Machine Learning Bootcamp, representing 22 US community colleges and universities.

Learn More and Join The Program
During 2023, AWS Machine Learning University will run six educator-enablement cohorts starting in January. The program will give priority consideration to educators at community colleges, MSIs, and HBCUs, in alignment with this program mission to increase access to AI/ML technology to historically underserved and underrepresented students.

If you are a computer science educator or part of a board of educators interested in fostering more depth in your computer science coursework, you should sign up for the educator enablement program.

Marcia

New — Introducing Support for Real-Time and Batch Inference in Amazon SageMaker Data Wrangler

To build machine learning models, machine learning engineers need to develop a data transformation pipeline to prepare the data. The process of designing this pipeline is time-consuming and requires a cross-team collaboration between machine learning engineers, data engineers, and data scientists to implement the data preparation pipeline into a production environment.

The main objective of Amazon SageMaker Data Wrangler is to make it easy to do data preparation and data processing workloads. With SageMaker Data Wrangler, customers can simplify the process of data preparation and all of the necessary steps of data preparation workflow on a single visual interface. SageMaker Data Wrangler reduces the time to rapidly prototype and deploy data processing workloads to production, so customers can easily integrate with MLOps production environments.

However, the transformations applied to the customer data for model training need to be applied to new data during real-time inference. Without support for SageMaker Data Wrangler in a real-time inference endpoint, customers need to write code to replicate the transformations from their flow in a preprocessing script.

Introducing Support for Real-Time and Batch Inference in Amazon SageMaker Data Wrangler
I’m pleased to share that you can now deploy data preparation flows from SageMaker Data Wrangler for real-time and batch inference. This feature allows you to reuse the data transformation flow which you created in SageMaker Data Wrangler as a step in Amazon SageMaker inference pipelines.

SageMaker Data Wrangler support for real-time and batch inference speeds up your production deployment because there is no need to repeat the implementation of the data transformation flow. You can now integrate SageMaker Data Wrangler with SageMaker inference. The same data transformation flows created with the easy-to-use, point-and-click interface of SageMaker Data Wrangler, containing operations such as Principal Component Analysis and one-hot encoding, will be used to process your data during inference. This means that you don’t have to rebuild the data pipeline for a real-time and batch inference application, and you can get to production faster.

Get Started with Real-Time and Batch Inference
Let’s see how to use the deployment supports of SageMaker Data Wrangler. In this scenario, I have a flow inside SageMaker Data Wrangler. What I need to do is to integrate this flow into real-time and batch inference using the SageMaker inference pipeline.

First, I will apply some transformations to the dataset to prepare it for training.

I add one-hot encoding on the categorical columns to create new features.

Then, I drop any remaining string columns that cannot be used during training.

My resulting flow now has these two transform steps in it.

After I’m satisfied with the steps I have added, I can expand the Export to menu, and I have the option to export to SageMaker Inference Pipeline (via Jupyter Notebook).

I select Export to SageMaker Inference Pipeline, and SageMaker Data Wrangler will prepare a fully customized Jupyter notebook to integrate the SageMaker Data Wrangler flow with inference. This generated Jupyter notebook performs a few important actions. First, define data processing and model training steps in a SageMaker pipeline. The next step is to run the pipeline to process my data with Data Wrangler and use the processed data to train a model that will be used to generate real-time predictions. Then, deploy my Data Wrangler flow and trained model to a real-time endpoint as an inference pipeline. Last, invoke my endpoint to make a prediction.

This feature uses Amazon SageMaker Autopilot, which makes it easy for me to build ML models. I just need to provide the transformed dataset which is the output of the SageMaker Data Wrangler step and select the target column to predict. The rest will be handled by Amazon SageMaker Autopilot to explore various solutions to find the best model.

Using AutoML as a training step from SageMaker Autopilot is enabled by default in the notebook with the use_automl_step variable. When using the AutoML step, I need to define the value of target_attribute_name, which is the column of my data I want to predict during inference. Alternatively, I can set use_automl_step to False if I want to use the XGBoost algorithm to train a model instead.

On the other hand, if I would like to instead use a model I trained outside of this notebook, then I can skip directly to the Create SageMaker Inference Pipeline section of the notebook. Here, I would need to set the value of the byo_model variable to True. I also need to provide the value of algo_model_uri, which is the Amazon Simple Storage Service (Amazon S3) URI where my model is located. When training a model with the notebook, these values will be auto-populated.

In addition, this feature also saves a tarball inside the data_wrangler_inference_flows folder on my SageMaker Studio instance. This file is a modified version of the SageMaker Data Wrangler flow, containing the data transformation steps to be applied at the time of inference. It will be uploaded to S3 from the notebook so that it can be used to create a SageMaker Data Wrangler preprocessing step in the inference pipeline.

The next step is that this notebook will create two SageMaker model objects. The first object model is the SageMaker Data Wrangler model object with the variable data_wrangler_model, and the second is the model object for the algorithm, with the variable algo_model. Object data_wrangler_model will be used to provide input in the form of data that has been processed into algo_model for prediction.

The final step inside this notebook is to create a SageMaker inference pipeline model, and deploy it to an endpoint.

Once the deployment is complete, I will get an inference endpoint that I can use for prediction. With this feature, the inference pipeline uses the SageMaker Data Wrangler flow to transform the data from your inference request into a format that the trained model can use.

In the next section, I can run individual notebook cells in Make a Sample Inference Request. This is helpful if I need to do a quick check to see if the endpoint is working by invoking the endpoint with a single data point from my unprocessed data. Data Wrangler automatically places this data point into the notebook, so I don’t have to provide one manually.

Things to Know
Enhanced Apache Spark configuration — In this release of SageMaker Data Wrangler, you can now easily configure how Apache Spark partitions the output of your SageMaker Data Wrangler jobs when saving data to Amazon S3. When adding a destination node, you can set the number of partitions, corresponding to the number of files that will be written to Amazon S3, and you can specify column names to partition by, to write records with different values of those columns to different subdirectories in Amazon S3. Moreover, you can also define the configuration in the provided notebook.

You can also define memory configurations for SageMaker Data Wrangler processing jobs as part of the Create job workflow. You will find similar configuration as part of your notebook.

Availability — SageMaker Data Wrangler supports for real-time and batch inference as well as enhanced Apache Spark configuration for data processing workloads are generally available in all AWS Regions that Data Wrangler currently supports.

To get started with Amazon SageMaker Data Wrangler supports for real-time and batch inference deployment, visit AWS documentation.

Happy building
— Donnie

New — Amazon SageMaker Data Wrangler Supports SaaS Applications as Data Sources

Data fuels machine learning. In machine learning, data preparation is the process of transforming raw data into a format that is suitable for further processing and analysis. The common process for data preparation starts with collecting data, then cleaning it, labeling it, and finally validating and visualizing it. Getting the data right with high quality can often be a complex and time-consuming process.

This is why customers who build machine learning (ML) workloads on AWS appreciate the ability of Amazon SageMaker Data Wrangler. With SageMaker Data Wrangler, customers can simplify the process of data preparation and complete the required processes of the data preparation workflow on a single visual interface. Amazon SageMaker Data Wrangler helps to reduce the time it takes to aggregate and prepare data for ML.

However, due to the proliferation of data, customers generally have data spread out into multiple systems, including external software-as-a-service (SaaS) applications like SAP OData for manufacturing data, Salesforce for customer pipeline, and Google Analytics for web application data. To solve business problems using ML, customers have to bring all of these data sources together. They currently have to build their own solution or use third-party solutions to ingest data into Amazon S3 or Amazon Redshift. These solutions can be complex to set up and not cost-effective.

Introducing Amazon SageMaker Data Wrangler Supports SaaS Applications as Data Sources
I’m happy to share that starting today, you can aggregate external SaaS application data for ML in Amazon SageMaker Data Wrangler to prepare data for ML. With this feature, you can use more than 40 SaaS applications as data sources via Amazon AppFlow and have these data available on Amazon SageMaker Data Wrangler. Once the data sources are registered in AWS Glue Data Catalog by AppFlow, you can browse tables and schemas from these data sources using Data Wrangler SQL explorer. This feature provides seamless data integration between SaaS applications and SageMaker Data Wrangler using Amazon AppFlow.

Here is a quick preview of this new feature:

This new feature of Amazon SageMaker Data Wrangler works by using integration with Amazon AppFlow, a fully managed integration service that enables you to securely exchange data between SaaS applications and AWS services. With Amazon AppFlow, you can establish bidirectional data integration between SaaS applications, such as Salesforce, SAP, and Amplitude and all supported services, into your Amazon S3 or Amazon Redshift.

Then, with Amazon AppFlow, you can catalog the data in AWS Glue Data Catalog. This is a new feature where with Amazon AppFlow, you can create an integration with AWS Glue Data Catalog for Amazon S3 destination connector. With this new integration, customers can catalog SaaS data applications into AWS Glue Data Catalog with a few clicks, directly from the Amazon AppFlow Flow configuration, without the need to run any crawlers.

Once you’ve established a flow and inserted it into the AWS Glue Data Catalog, you can use this data inside the Amazon SageMaker Data Wrangler. Then, you can do the data preparation as you usually do. You can write Amazon Athena queries to preview data, join data from multiple sources, or import data to prepare for ML model training.

With this feature, you need to do a few simple steps to perform seamless data integration between SaaS applications into Amazon SageMaker Data Wrangler via Amazon AppFlow. This integration supports more than 40 SaaS applications, and for a complete list of supported applications, please check the Supported source and destination applications documentation.

Get Started with Amazon SageMaker Data Wrangler Support for Amazon AppFlow
Let’s see how this feature works in detail. In my scenario, I need to get data from Salesforce, and do the data preparation using Amazon SageMaker Data Wrangler.

To start using this feature, the first thing I need to do is to create a flow in Amazon AppFlow that registers the data source into the AWS Glue Data Catalog. I already have an existing connection with my Salesforce account, and all I need now is to create a flow.

One important thing to note is that to make SaaS application data available in Amazon SageMaker Data Wrangler, I need to create a flow with Amazon S3 as the destination. Then, I need to enable Create a Data Catalog table in the AWS Glue Data Catalog settings. This option will automatically catalog my Salesforce data into AWS Glue Data Catalog.

On this page, I need to select a user role with the required AWS Glue Data Catalog permissions and define the database name and the table name prefix. In addition, in this section, I can define the data format preference, be it in JSON, CSV, or Apache Parquet formats, and filename preference if I want to add a timestamp into the file name section.

To learn more about how to register SaaS data in Amazon AppFlow and AWS Glue Data Catalog, you can read Cataloging the data output from an Amazon AppFlow flow documentation page.

Once I’ve finished registering SaaS data, I need to make sure the IAM role can view the data sources in Data Wrangler from AppFlow. Here is an example of a policy in the IAM role:

{
    "Version": "2012-10-17",
    "Statement": [
        {
            "Effect": "Allow",
            "Action": "glue:SearchTables",
            "Resource": [
                "arn:aws:glue:*:*:table/*/*",
                "arn:aws:glue:*:*:database/*",
                "arn:aws:glue:*:*:catalog"
            ]
        }
    ]
} 

By enabling data cataloging with AWS Glue Data Catalog, from this point on, Amazon SageMaker Data Wrangler will be able to automatically discover this new data source and I can browse tables and schema using the Data Wrangler SQL Explorer.

Now it’s time to switch to the Amazon SageMaker Data Wrangler dashboard then select Connect to data sources.

On the following page, I need to Create connection and select the data source I want to import. In this section, I can see all the available connections for me to use. Here I see the Salesforce connection is already available for me to use.

If I would like to add additional data sources, I can see a list of external SaaS applications that I can integrate into the Set up new data sources section. To learn how to recognize external SaaS applications as data sources, I can learn more with the select How to enable access.

Now I will import datasets and select the Salesforce connection.

On the next page, I can define connection settings and import data from Salesforce. When I’m done with this configuration, I select Connect.

On the following page, I see my Salesforce data that I already configured with Amazon AppFlow and AWS Glue Data Catalog called appflowdatasourcedb. I can also see a table preview and schema for me to review if this is the data I need.

Then, I start building my dataset using this data by performing SQL queries inside the SageMaker Data Wrangler SQL Explorer. Then, I select Import query.

Then, I define a name for my dataset.

At this point, I can start doing the data preparation process. I can navigate to the Analysis tab to run the data insight report. The analysis will provide me with a report on the data quality issues and what transform I need to use next to fix the issues based on the ML problem I want to predict. To learn more about how to use the data analysis feature, see Accelerate data preparation with data quality and insights in the Amazon SageMaker Data Wrangler blog post.

In my case, there are several columns I don’t need, and I need to drop these columns. I select Add step.

One feature I like is that Amazon SageMaker Data Wrangler provides numerous ML data transforms. It helps me to streamline the process of cleaning, transforming and feature engineering my data in one dashboard. For more about what SageMaker Data Wrangler provides for transformation data, please read this Transform Data documentation page.

In this list, I select Manage columns.

Then, in the Transform section, I select the Drop column option. Then, I select a few columns that I don’t need.

Once I’m done, the columns I don’t need are removed and the Drop column data preparation step I just created is listed in the Add step section.

I can also see the visual of my data flow inside the Amazon SageMaker Data Wrangler. In this example, my data flow is quite basic. But when my data preparation process becomes complex, this visual view makes it easy for me to see all the data preparation steps.

From this point on, I can do what I require with my Salesforce data. For example, I can export data directly to Amazon S3 by selecting Export to and choosing Amazon S3 from the Add destination menu. In my case, I specify Data Wrangler to store the data in Amazon S3 after it has processed it by selecting Add destination and then Amazon S3.

Amazon SageMaker Data Wrangler provides me flexibility to automate the same data preparation flow using scheduled jobs. I can also automate feature engineering with SageMaker Pipelines (via Jupyter Notebook) and SageMaker Feature Store (via Jupyter Notebook), and deploy to Inference end point with SageMaker Inference Pipeline (via Jupyter Notebook).

Things to Know
Related news – This feature will make it easy for you to do data aggregation and preparation with Amazon SageMaker Data Wrangler. As this feature is an integration with Amazon AppFlow and also AWS Glue Data Catalog, you might want to learn more on Amazon AppFlow now supports AWS Glue Data Catalog integration and provides enhanced data preparation page.

Availability – Amazon SageMaker Data Wrangler supports SaaS applications as data sources available in all the Regions currently supported by Amazon AppFlow.

Pricing – There is no additional cost to use SaaS applications supports in Amazon SageMaker Data Wrangler, but there is a cost to running Amazon AppFlow to get the data in Amazon SageMaker Data Wrangler.

Visit Import Data From Software as a Service (SaaS) Platforms documentation page to learn more about this feature, and follow the getting started guide to start data aggregating and preparing SaaS applications data with Amazon SageMaker Data Wrangler.

Happy building!
Donnie

Amazon Redshift ML Is Now Generally Available – Use SQL to Create Machine Learning Models and Make Predictions from Your Data

With Amazon Redshift, you can use SQL to query and combine exabytes of structured and semi-structured data across your data warehouse, operational databases, and data lake. Now that AQUA (Advanced Query Accelerator) is generally available, you can improve the performance of your queries by up to 10 times with no additional costs and no code changes. In fact, Amazon Redshift provides up to three times better price/performance than other cloud data warehouses.

But what if you want to go a step further and process this data to train machine learning (ML) models and use these models to generate insights from data in your warehouse? For example, to implement use cases such as forecasting revenue, predicting customer churn, and detecting anomalies? In the past, you would need to export the training data from Amazon Redshift to an Amazon Simple Storage Service (Amazon S3) bucket, and then configure and start a machine learning training process (for example, using Amazon SageMaker). This process required many different skills and usually more than one person to complete. Can we make it easier?

Today, Amazon Redshift ML is generally available to help you create, train, and deploy machine learning models directly from your Amazon Redshift cluster. To create a machine learning model, you use a simple SQL query to specify the data you want to use to train your model, and the output value you want to predict. For example, to create a model that predicts the success rate for your marketing activities, you define your inputs by selecting the columns (in one or more tables) that include customer profiles and results from previous marketing campaigns, and the output column you want to predict. In this example, the output column could be one that shows whether a customer has shown interest in a campaign.

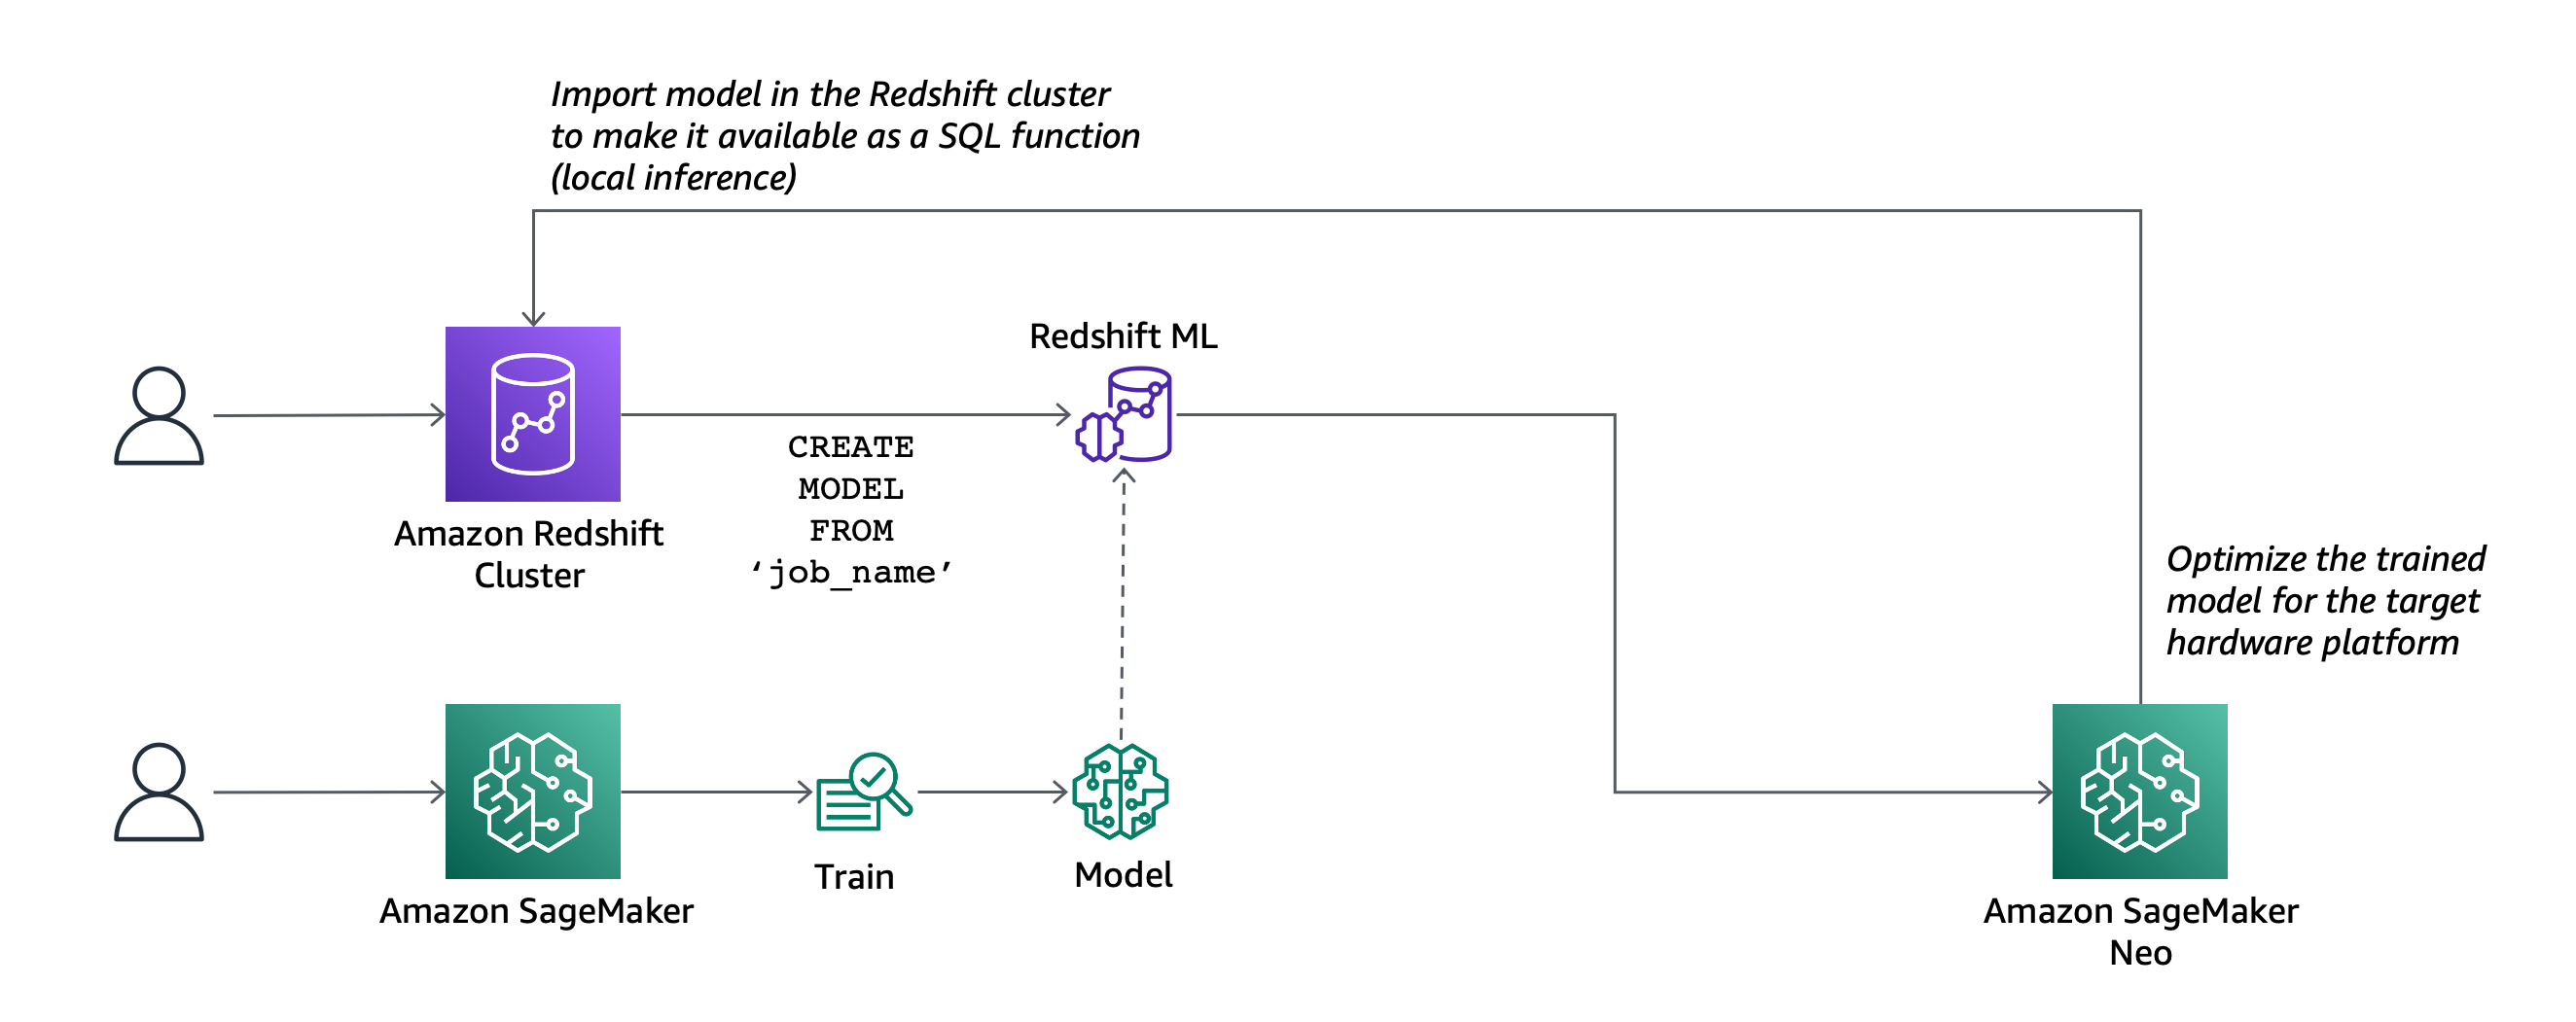
After you run the SQL command to create the model, Redshift ML securely exports the specified data from Amazon Redshift to your S3 bucket and calls Amazon SageMaker Autopilot to prepare the data (pre-processing and feature engineering), select the appropriate pre-built algorithm, and apply the algorithm for model training. You can optionally specify the algorithm to use, for example XGBoost.

Architectural diagram.

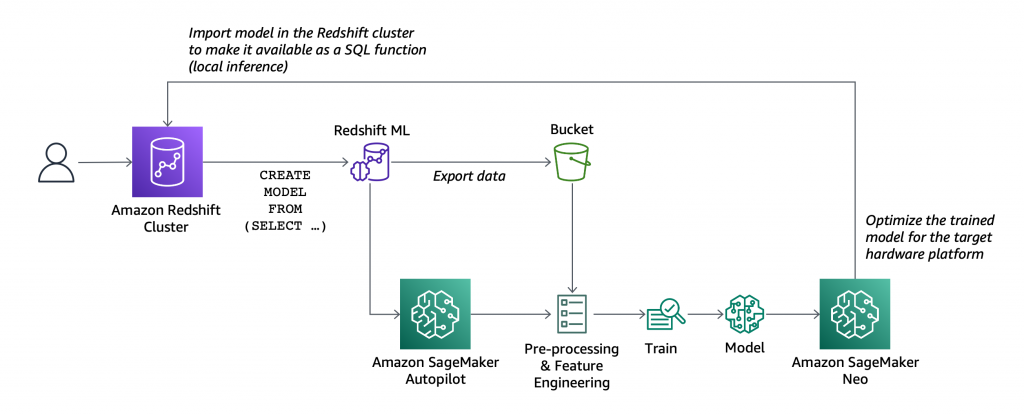
Redshift ML handles all of the interactions between Amazon Redshift, S3, and SageMaker, including all the steps involved in training and compilation. When the model has been trained, Redshift ML uses Amazon SageMaker Neo to optimize the model for deployment and makes it available as a SQL function. You can use the SQL function to apply the machine learning model to your data in queries, reports, and dashboards.

Redshift ML now includes many new features that were not available during the preview, including Amazon Virtual Private Cloud (VPC) support. For example:

Architectural diagram.

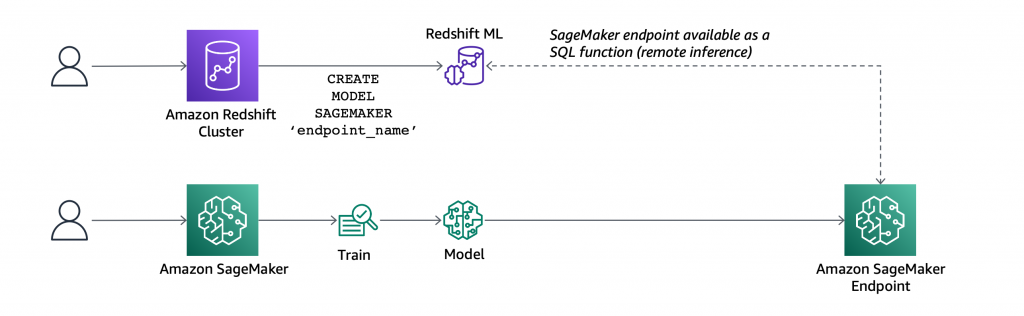
  • You can also create SQL functions that use existing SageMaker endpoints to make predictions (remote inference). In this case, Redshift ML is batching calls to the endpoint to speed up processing.

Before looking into how to use these new capabilities in practice, let’s see the difference between Redshift ML and similar features in AWS databases and analytics services.

ML Feature Data Training
from SQL
Predictions
using SQL Functions
Amazon Redshift ML

Data warehouse

Federated relational databases

S3 data lake (with Redshift Spectrum)

Yes, using
Amazon SageMaker Autopilot
Yes, a model can be imported and executed inside the Amazon Redshift cluster, or invoked using a SageMaker endpoint.
Amazon Aurora ML Relational database
(compatible with MySQL or PostgreSQL)
No

Yes, using a SageMaker endpoint.

A native integration with Amazon Comprehend for sentiment analysis is also available.

Amazon Athena ML

S3 data lake

Other data sources can be used through Athena Federated Query.

No Yes, using a SageMaker endpoint.

Building a Machine Learning Model with Redshift ML
Let’s build a model that predicts if customers will accept or decline a marketing offer.

To manage the interactions with S3 and SageMaker, Redshift ML needs permissions to access those resources. I create an AWS Identity and Access Management (IAM) role as described in the documentation. I use RedshiftML for the role name. Note that the trust policy of the role allows both Amazon Redshift and SageMaker to assume the role to interact with other AWS services.

From the Amazon Redshift console, I create a cluster. In the cluster permissions, I associate the RedshiftML IAM role. When the cluster is available, I load the same dataset used in this super interesting blog post that my colleague Julien wrote when SageMaker Autopilot was announced.

The file I am using (bank-additional-full.csv) is in CSV format. Each line describes a direct marketing activity with a customer. The last column (y) describes the outcome of the activity (if the customer subscribed to a service that was marketed to them).

Here are the first few lines of the file. The first line contains the headers.

age,job,marital,education,default,housing,loan,contact,month,day_of_week,duration,campaign,pdays,previous,poutcome,emp.var.rate,cons.price.idx,cons.conf.idx,euribor3m,nr.employed,y 56,housemaid,married,basic.4y,no,no,no,telephone,may,mon,261,1,999,0,nonexistent,1.1,93.994,-36.4,4.857,5191.0,no
57,services,married,high.school,unknown,no,no,telephone,may,mon,149,1,999,0,nonexistent,1.1,93.994,-36.4,4.857,5191.0,no
37,services,married,high.school,no,yes,no,telephone,may,mon,226,1,999,0,nonexistent,1.1,93.994,-36.4,4.857,5191.0,no
40,admin.,married,basic.6y,no,no,no,telephone,may,mon,151,1,999,0,nonexistent,1.1,93.994,-36.4,4.857,5191.0,no

I store the file in one of my S3 buckets. The S3 bucket is used to unload data and store SageMaker training artifacts.

Then, using the Amazon Redshift query editor in the console, I create a table to load the data.

CREATE TABLE direct_marketing (
	age DECIMAL NOT NULL, 
	job VARCHAR NOT NULL, 
	marital VARCHAR NOT NULL, 
	education VARCHAR NOT NULL, 
	credit_default VARCHAR NOT NULL, 
	housing VARCHAR NOT NULL, 
	loan VARCHAR NOT NULL, 
	contact VARCHAR NOT NULL, 
	month VARCHAR NOT NULL, 
	day_of_week VARCHAR NOT NULL, 
	duration DECIMAL NOT NULL, 
	campaign DECIMAL NOT NULL, 
	pdays DECIMAL NOT NULL, 
	previous DECIMAL NOT NULL, 
	poutcome VARCHAR NOT NULL, 
	emp_var_rate DECIMAL NOT NULL, 
	cons_price_idx DECIMAL NOT NULL, 
	cons_conf_idx DECIMAL NOT NULL, 
	euribor3m DECIMAL NOT NULL, 
	nr_employed DECIMAL NOT NULL, 
	y BOOLEAN NOT NULL
);

I load the data into the table using the COPY command. I can use the same IAM role I created earlier (RedshiftML) because I am using the same S3 bucket to import and export the data.

COPY direct_marketing 
FROM 's3://my-bucket/direct_marketing/bank-additional-full.csv' 
DELIMITER ',' IGNOREHEADER 1
IAM_ROLE 'arn:aws:iam::123412341234:role/RedshiftML'
REGION 'us-east-1';

Now, I create the model straight form the SQL interface using the new CREATE MODEL statement:

CREATE MODEL direct_marketing
FROM direct_marketing
TARGET y
FUNCTION predict_direct_marketing
IAM_ROLE 'arn:aws:iam::123412341234:role/RedshiftML'
SETTINGS (
  S3_BUCKET 'my-bucket'
);

In this SQL command, I specify the parameters required to create the model:

  • FROM – I select all the rows in the direct_marketing table, but I can replace the name of the table with a nested query (see example below).
  • TARGET – This is the column that I want to predict (in this case, y).
  • FUNCTION – The name of the SQL function to make predictions.
  • IAM_ROLE – The IAM role assumed by Amazon Redshift and SageMaker to create, train, and deploy the model.
  • S3_BUCKET – The S3 bucket where the training data is temporarily stored, and where model artifacts are stored if you choose to retain a copy of them.

Here I am using a simple syntax for the CREATE MODEL statement. For more advanced users, other options are available, such as:

  • MODEL_TYPE – To use a specific model type for training, such as XGBoost or multilayer perceptron (MLP). If I don’t specify this parameter, SageMaker Autopilot selects the appropriate model class to use.
  • PROBLEM_TYPE – To define the type of problem to solve: regression, binary classification, or multiclass classification. If I don’t specify this parameter, the problem type is discovered during training, based on my data.
  • OBJECTIVE – The objective metric used to measure the quality of the model. This metric is optimized during training to provide the best estimate from data. If I don’t specify a metric, the default behavior is to use mean squared error (MSE) for regression, the F1 score for binary classification, and accuracy for multiclass classification. Other available options are F1Macro (to apply F1 scoring to multiclass classification) and area under the curve (AUC). More information on objective metrics is available in the SageMaker documentation.

Depending on the complexity of the model and the amount of data, it can take some time for the model to be available. I use the SHOW MODEL command to see when it is available:

SHOW MODEL direct_marketing

When I execute this command using the query editor in the console, I get the following output:

Console screenshot.

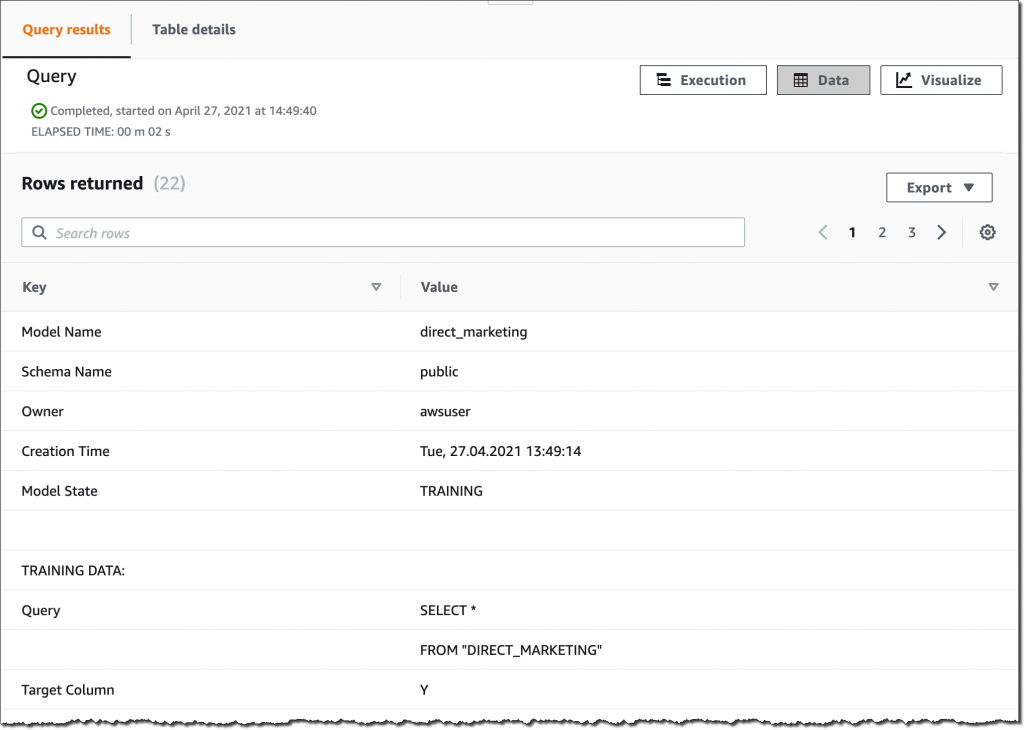
As expected, the model is currently in the TRAINING state.

When I created this model, I selected all the columns in the table as input parameters. I wonder what happens if I create a model that uses fewer input parameters? I am in the cloud and I am not slowed down by limited resources, so I create another model using a subset of the columns in the table:

CREATE MODEL simple_direct_marketing
FROM (
        SELECT age, job, marital, education, housing, contact, month, day_of_week, y
 	  FROM direct_marketing
)
TARGET y
FUNCTION predict_simple_direct_marketing
IAM_ROLE 'arn:aws:iam::123412341234:role/RedshiftML'
SETTINGS (
  S3_BUCKET 'my-bucket'
);

After some time, my first model is ready, and I get this output from SHOW MODEL. The actual output in the console is in multiple pages, I merged the results here to make it easier to follow:

Console screenshot.

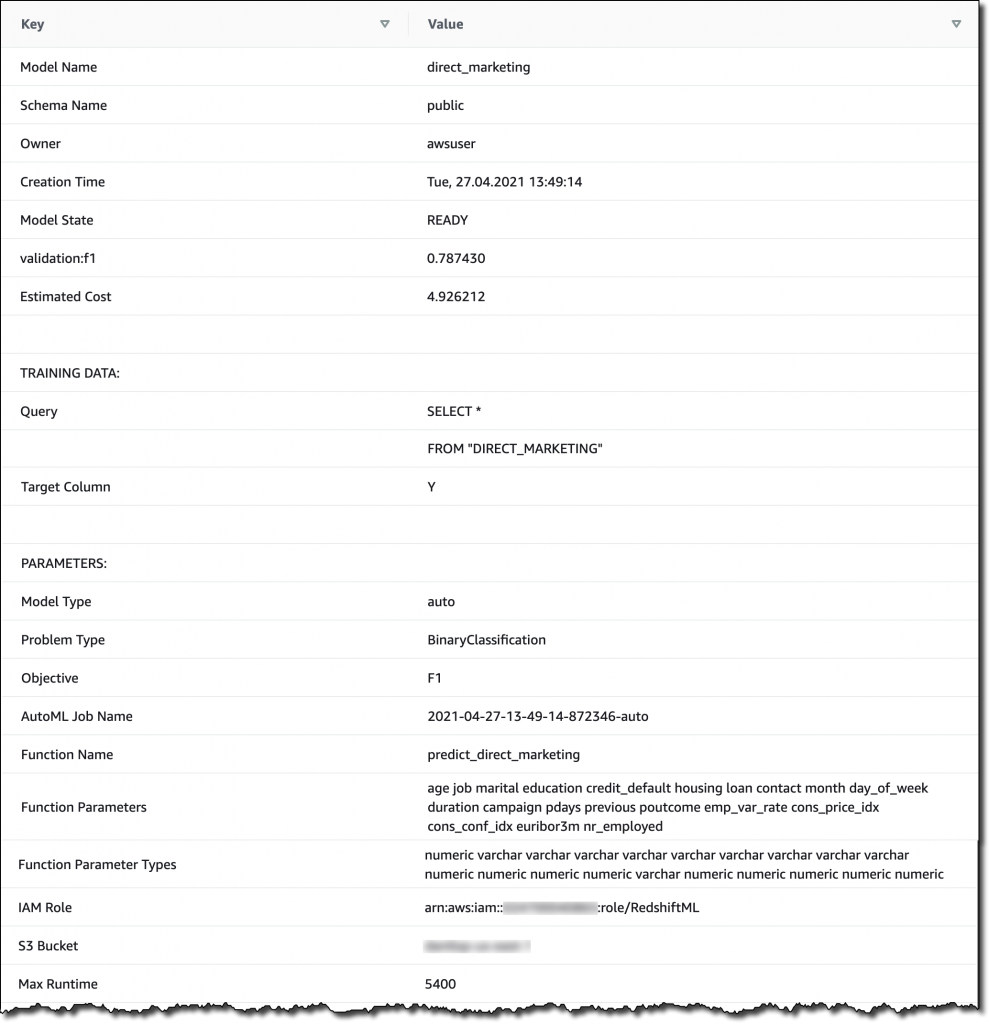
From the output, I see that the model has been correctly recognized as BinaryClassification, and F1 has been selected as the objective. The F1 score is a metrics that considers both precision and recall. It returns a value between 1 (perfect precision and recall) and 0 (lowest possible score). The final score for the model (validation:f1) is 0.79. In this table I also find the name of the SQL function (predict_direct_marketing) that has been created for the model, its parameters and their types, and an estimation of the training costs.

When the second model is ready, I compare the F1 scores. The F1 score of the second model is lower (0.66) than the first one. However, with fewer parameters the SQL function is easier to apply to new data. As is often the case with machine learning, I have to find the right balance between complexity and usability.

Using Redshift ML to Make Predictions
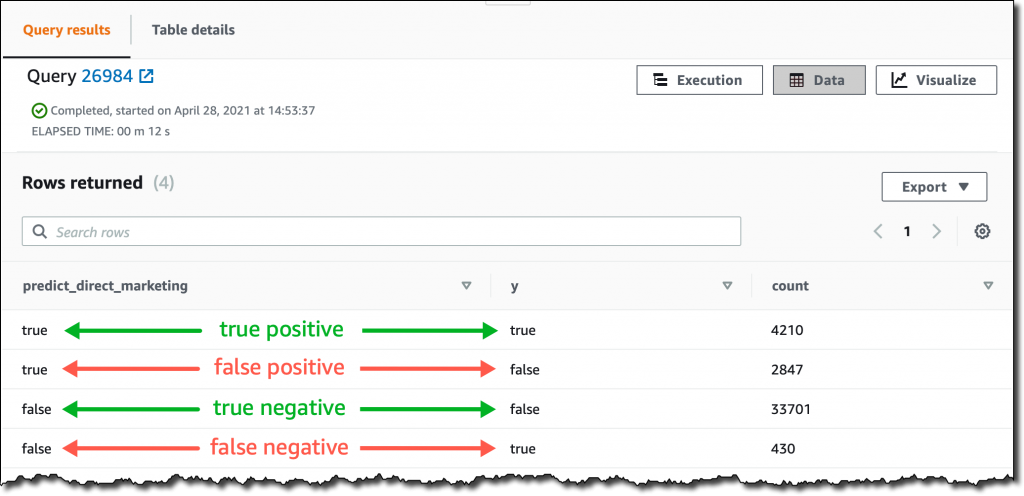
Now that the two models are ready, I can make predictions using SQL functions. Using the first model, I check how many false positives (wrong positive predictions) and false negatives (wrong negative predictions) I get when applying the model on the same data used for training:

SELECT predict_direct_marketing, y, COUNT(*)
  FROM (SELECT predict_direct_marketing(
                   age, job, marital, education, credit_default, housing,
                   loan, contact, month, day_of_week, duration, campaign,
                   pdays, previous, poutcome, emp_var_rate, cons_price_idx,
                   cons_conf_idx, euribor3m, nr_employed), y
          FROM direct_marketing)
 GROUP BY predict_direct_marketing, y;

The result of the query shows that the model is better at predicting negative rather than positive outcomes. In fact, even if the number of true negatives is much bigger than true positives, there are much more false positives than false negatives. I added some comments in green and red to the following screenshot to clarify the meaning of the results.

Console screenshot.

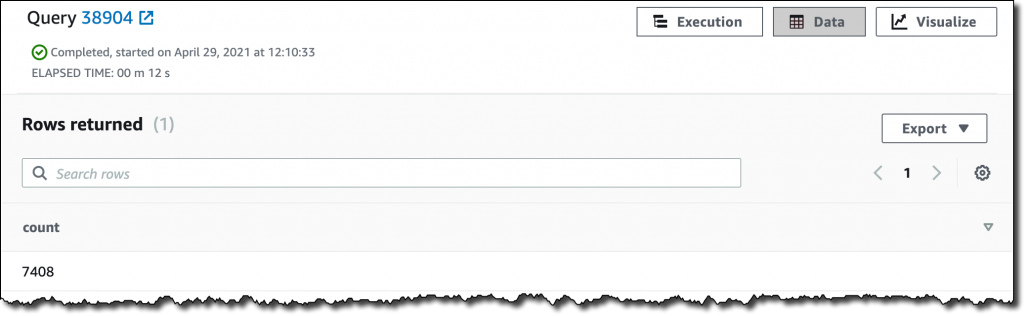
Using the second model, I see how many customers might be interested in a marketing campaign. Ideally, I should run this query on new customer data, not the same data I used for training.

SELECT COUNT(*)
  FROM direct_marketing
 WHERE predict_simple_direct_marketing(
           age, job, marital, education, housing,
           contact, month, day_of_week) = true;

Wow, looking at the results, there are more than 7,000 prospects!

Console screenshot.

Availability and Pricing
Redshift ML is available today in the following AWS Regions: US East (Ohio), US East (N Virginia), US West (Oregon), US West (San Francisco), Canada (Central), Europe (Frankfurt), Europe (Ireland), Europe (Paris), Europe (Stockholm), Asia Pacific (Hong Kong) Asia Pacific (Tokyo), Asia Pacific (Singapore), Asia Pacific (Sydney), and South America (São Paulo). For more information, see the AWS Regional Services list.

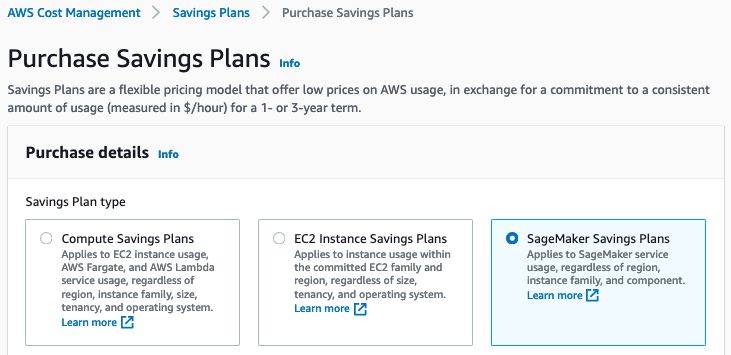
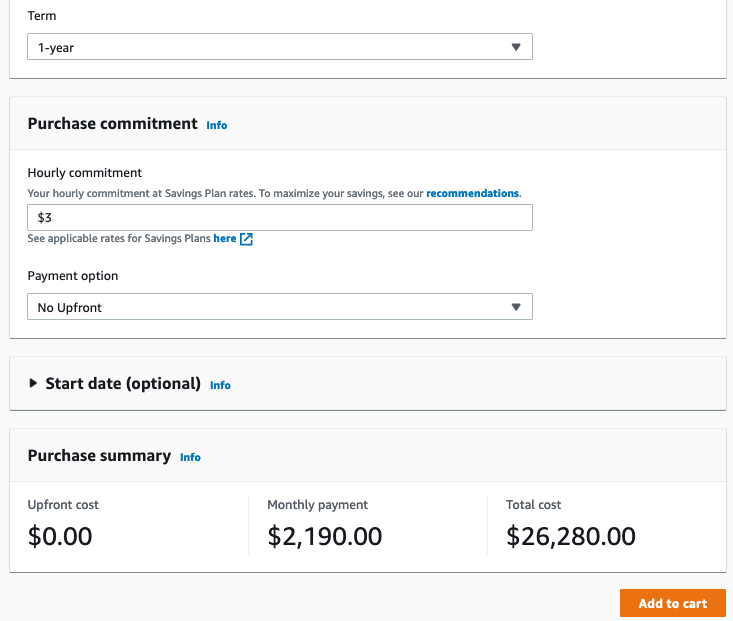
With Redshift ML, you pay only for what you use. When training a new model, you pay for the Amazon SageMaker Autopilot and S3 resources used by Redshift ML. When making predictions, there is no additional cost for models imported into your Amazon Redshift cluster, as in the example I used in this post.

Redshift ML also allows you to use existing Amazon SageMaker endpoints for inference. In that case, the usual SageMaker pricing for real-time inference applies. Here you can find a few tips on how to control your costs with Redshift ML.

To learn more, you can see this blog post from when Redshift ML was announced in preview and the documentation.

Start getting better insights from your data with Redshift ML.

Danilo

Decrease Your Machine Learning Costs with Instance Price Reductions and Savings Plans for Amazon SageMaker

Launched at AWS re:Invent 2017, Amazon SageMaker is a fully-managed service that has already helped tens of thousands of customers quickly build and deploy their machine learning (ML) workflows on AWS.

To help them get the most ML bang for their buck, we’ve added a string of cost-optimization services and capabilities, such as Managed Spot Training, Multi-Model Endpoints, Amazon Elastic Inference, and AWS Inferentia. In fact, customers find that the Total Cost of Ownership (TCO) for SageMaker over a three-year horizon is 54% lower compared to other cloud-based options, such as self-managed Amazon EC2 and AWS-managed Amazon EKS.

Since there’s nothing we like more than making customers happy by saving them money, I’m delighted to announce:

  • A price reduction for CPU and GPU instances in Amazon SageMaker,
  • The availability of Savings Plans for Amazon SageMaker.

Reducing Instance Prices in Amazon SageMaker
Effective today, we are dropping the price of several instance families in Amazon SageMaker by up to 14.2%.

This applies to:

Detailed pricing information is available on the Amazon SageMaker pricing page.

As welcome as price reductions are, many customers have also asked us for a simple and flexible way to optimize SageMaker costs for all instance-related activities, from data preparation to model training to model deployment. In fact, as a lot of customers are already optimizing their compute costs with Savings Plans, they told us that they’d love to do the same for their Amazon SageMaker costs.

Introducing SageMaker Savings Plans
Savings Plans for AWS Compute Services were launched in November 2019 to help customers optimize their compute costs. They offer up to 72% savings over the on-demand price, in exchange for your commitment to use a specific amount of compute power (measured in $ per hour) for a one- or three-year period. In the spirit of self-service, you have full control on setting up your plans, thanks to recommendations based on your past consumption, to usage reports, and to budget coverage and utilization alerts.

SageMaker Savings Plans follow in these footsteps, and you can create plans that cover ML workloads based on:

Savings Plans don’t distinguish between instance families, instance types, or AWS regions. This makes it easy for you to maximize savings regardless of how your use cases and consumption evolve over time, and you can save up to 64% compared to the on-demand price.

For example, you could start with small instances in order to experiment with different algorithms on a fraction of your dataset. Then, you could move on to preparing data and training at scale with larger instances on your full dataset. Finally, you could deploy your models in several AWS regions to serve low-latency predictions to your users. All these activities would be covered by the same Savings Plan, without any management required on your side.

Understanding Savings Plans Recommendations
Savings Plans provides you with recommendations that make it easy to find the right plan. These recommendations are based on:

  • Your SageMaker usage in the last 7, 30 or 60 days. You should select the time period that best represents your future usage.
  • The term of your plan: 1-year or 3-year.
  • Your payment option: no upfront, partial upfront (50% or more), or all upfront. Some customers prefer (or must use) this last option, as it gives them a clear and predictable view of their SageMaker bill.

Instantly, you’ll see what your optimized spend would be, and how much you could start saving per month. Savings Plans also suggest an hourly commitment that maximizes your savings. Of course, you’re completely free to use a different commitment, starting as low as $0.001 per hour!

Once you’ve made up your mind, you can add the plan to your cart, submit it, and start enjoying your savings.

Now, let’s do a quick demo, and see how I could optimize my own SageMaker spend.

Recommending Savings Plans for Amazon SageMaker
Opening the AWS Cost Management Console, I see a Savings Plans menu on the left.

Cost management console

Clicking on Recommendations, I select SageMaker Savings Plans.

Looking at the available options, I select Payer to optimize cost at the Organizations level, a 1-year term, a No upfront payment, and 7 days of past usage (as I’ve just ramped up my SageMaker usage).

SageMaker Savings Plan

Immediately, I see that I could reduce my SageMaker costs by 20%, saving $897.63 every month. This would only require a 1-year commitment of $3.804 per hour.

SageMaker Savings Plan

The monthly charge on my AWS bill would be $2,776 ($3.804 * 24 hours * 365 days / 12 months), plus any additional on-demand costs should my actual usage exceed the commitment. Pretty tempting, especially with no upfront required at all.

Moving to a 3-year plan (still no upfront), I could save $1,790.19 per month, and enjoy 41% savings thanks to a $2.765 per hour commitment.

SageMaker Savings Plan

I could add this plan to the cart as is, and complete my purchase. Every month for 3 years, I would be charged $2,018 ($2.765 * 24 * 365 / 12), plus additional on-demand cost.

As mentioned earlier, I can also create my own plan in just a few clicks. Let me show you how.

Creating Savings Plans for Amazon SageMaker
In the left-hand menu, I click on Purchase Savings Plans and I select SageMaker Savings Plans.

SageMaker Savings Plan

I pick a 1-year term without any upfront. As I expect to rationalize my SageMaker usage a bit in the coming months, I go for a commitment of $3 per hour, instead of the $3.804 recommendation. Then, I add the plan to the cart.

SageMaker Savings Plan

Confirming that I’m fine with an optimized monthly payment of $2,190, I submit my order.

SageMaker Savings Plan

The plan is now active, and I’ll see the savings on my next AWS bill. Thanks to utilization reports available in the Savings Plans console, I’ll also see the percentage of my commitment that I’ve actually used. Likewise, coverage reports will show me how much of my eligible spend has been covered by the plan.

Getting Started
Thanks to price reductions for CPU and GPU instances and to SageMaker Savings Plans, you can now further optimize your SageMaker costs in an easy and predictable way. ML on AWS has never been more cost effective.

Price reductions and SageMaker Savings Plans are available today in the following AWS regions:

  • Americas: US East (N. Virginia), US East (Ohio), US West (Oregon), US West (N. California), AWS GovCloud (US-West), Canada (Central), South America (São Paulo).
  • Europe, Middle East and Africa: Europe (Ireland), Europe (Frankfurt), Europe (London), Europe (Paris), Europe (Stockholm), Europe (Milan), Africa (Cape Town), Middle East (Bahrain).
  • Asia Pacific: Asia Pacific (Singapore), Asia Pacific (Tokyo), Asia Pacific (Sydney), Asia Pacific (Seoul), Asia Pacific (Mumbai), and Asia Pacific (Hong Kong).

Give them a try, and let us know what you think. As always, we’re looking forward to your feedback. You can send it to your usual AWS Support contacts, or on the AWS Forum for Amazon SageMaker.

– Julien