Category: <span>Launch</span>

Simplify Service-to-Service Connectivity, Security, and Monitoring with Amazon VPC Lattice – Now Generally Available

At AWS re:Invent 2022, we introduced in preview Amazon VPC Lattice, a new capability of Amazon Virtual Private Cloud (Amazon VPC) that gives you a consistent way to connect, secure, and monitor communication between your services. With VPC Lattice, you can define policies for network access, traffic management, and monitoring to connect compute services across instances, containers, and serverless applications.

Today, I am happy to share that VPC Lattice is now generally available. Compared to the preview, you have access to new capabilities:

  • Services can use a custom domain name in addition to the domain name automatically generated by VPC Lattice. When using HTTPS, you can configure an SSL/TLS certificate that matches the custom domain name.
  • You can deploy the open-source AWS Gateway API Controller to use VPC Lattice with a Kubernetes-native experience. It uses the Kubernetes Gateway API to let you connect services across multiple Kubernetes clusters and services running on EC2 instances, containers, and serverless functions.
  • You can use an Application Load Balancer (ALB) or a Network Load Balancer (NLB) as a target for a service.
  • The IP address target type now supports IPv6 connectivity.

Let’s see some of these new features in practice.

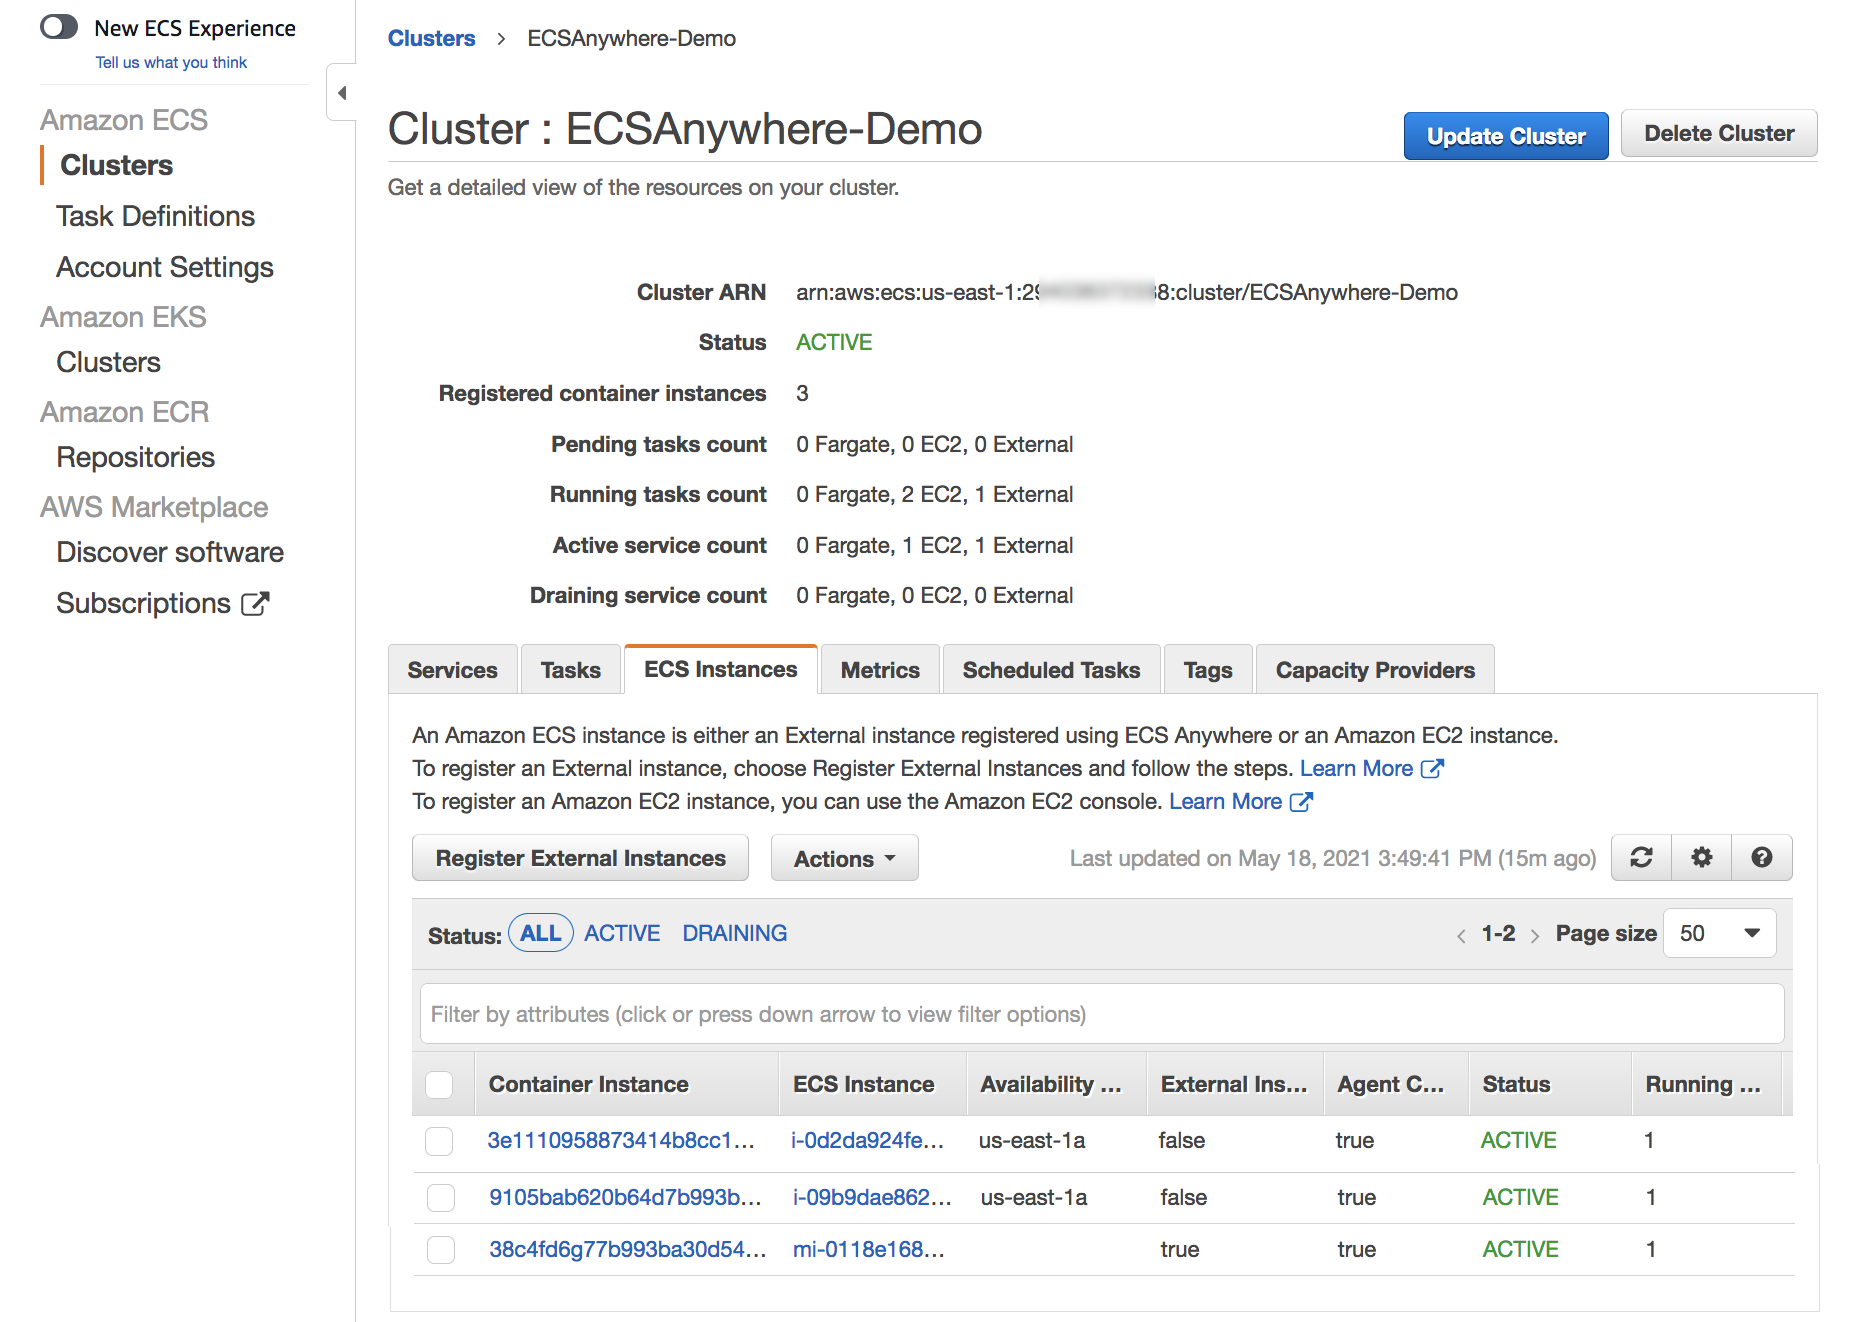
Using Amazon VPC Lattice for Service-to-Service Connectivity
In my previous post introducing VPC Lattice, I show how to create a service network, associate multiple VPCs and services, and configure target groups for EC2 instances and Lambda functions. There, I also show how to route traffic based on request characteristics and how to use weighted routing. Weighted routing is really handy for blue/green and canary-style deployments or for migrating from one compute platform to another.

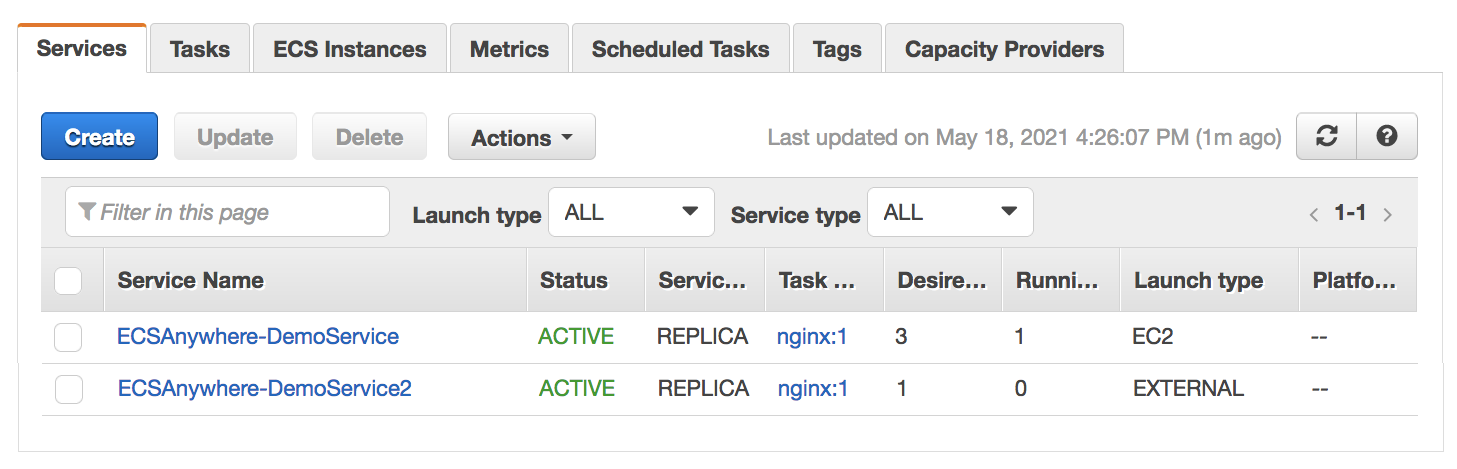
Now, let’s see how to use VPC Lattice to allow the services of an e-commerce application to communicate with each other. For simplicity, I only consider four services:

  • The Order service, running as a Lambda function.
  • The Inventory service, deployed as an Amazon Elastic Container Service (Amazon ECS) service in a dual-stack VPC supporting IPv6.
  • The Delivery service, deployed as an ECS service using an ALB to distribute traffic to the service tasks.
  • The Payment service, running on an EC2 instance.

First, I create a service network. The Order service needs to call the Inventory service (to check if an item is available for purchase), the Delivery service (to organize the delivery of the item), and the Payment service (to transfer the funds). The following diagram shows the service-to-service communication from the perspective of the service network.

Diagram describing the service network view of the e-commerce services.

These services run in different AWS accounts and multiple VPCs. VPC Lattice handles the complexity of setting up connectivity across VPC boundaries and permission across accounts so that service-to-service communication is as simple as an HTTP/HTTPS call.

The following diagram shows how the communication flows from an implementation point of view.

Diagram describing the implementation view of the e-commerce services.

The Order service runs in a Lambda function connected to a VPC. Because all the VPCs in the diagram are associated with the service network, the Order service is able to call the other services (Inventory, Delivery, and Payment) even if they are deployed in different AWS accounts and in VPCs with overlapping IP addresses.

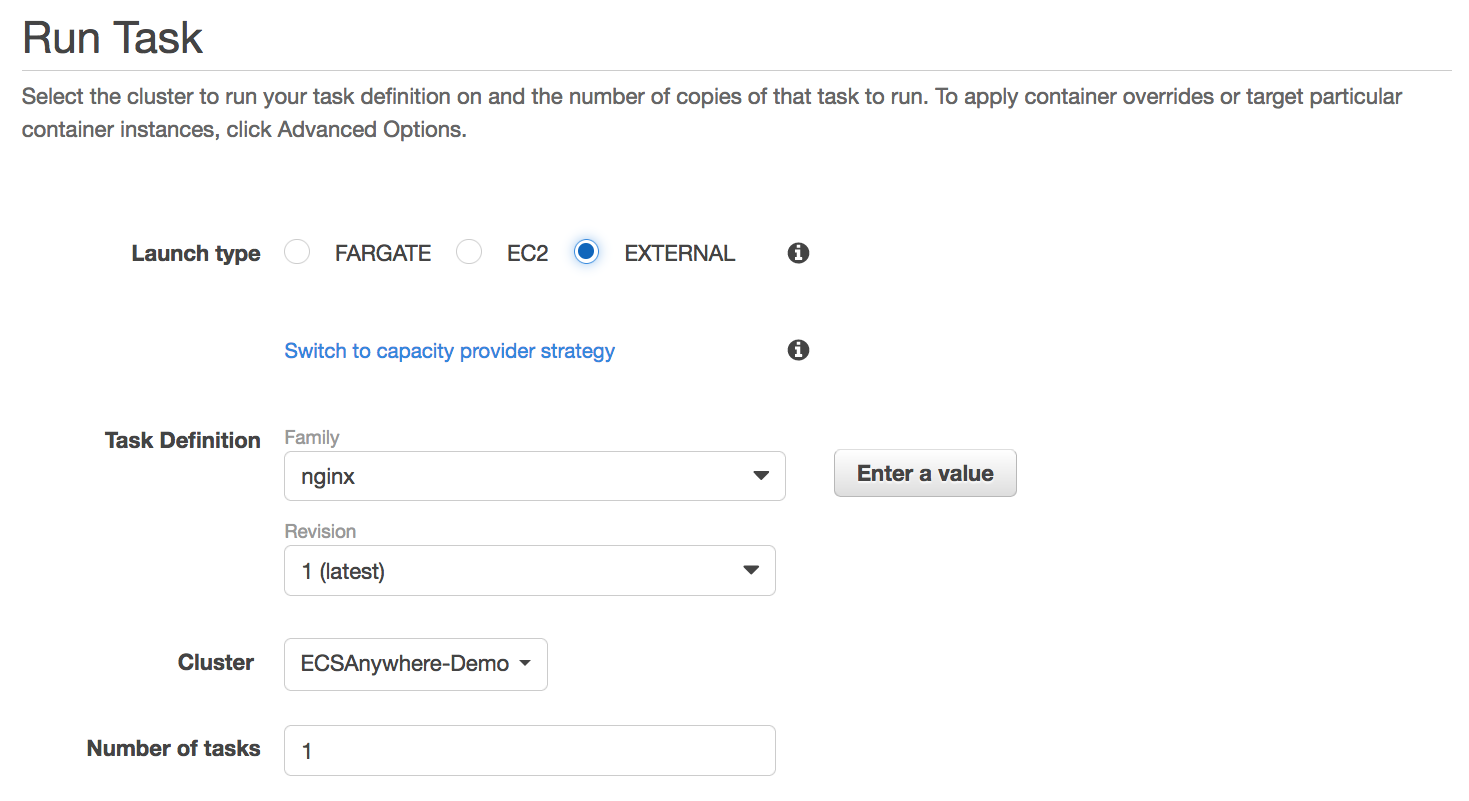
Using a Network Load Balancer (NLB) as Target
The Inventory service runs in a dual-stack VPC. It’s deployed as an ECS service with an NLB to distribute traffic to the tasks in the service. To get the IPv6 addresses of the NLB, I look for the network interfaces used by the NLB in the EC2 console.

Console screenshot.

When creating the target group for the Inventory service, under Basic configuration, I choose IP addresses as the target type. Then, I select IPv6 for the IP Address type.

Console screenshot.

In the next step, I enter the IPv6 addresses of the NLB as targets. After the target group is created, the health checks test the targets to see if they are responding as expected.

Console screenshot.

Using an Application Load Balancer (ALB) as Target
Using an ALB as a target is even easier. When creating a target group for the Delivery service, under Basic configuration, I choose the new Application Load Balancer target type.

Console screenshot.

I select the VPC in which to look for the ALB and choose the Protocol version.

Console screenshot.

In the next step, I choose Register now and select the ALB from the dropdown. I use the default port used by the target group. VPC Lattice does not provide additional health checks for ALBs. However, load balancers already have their own health checks configured.

Console screenshot.

Using Custom Domain Names for Services
To call these services, I use custom domain names. For example, when I create the Payment service in the VPC console, I choose to Specify a custom domain configuration, enter a Custom domain name, and select an SSL/TLS certificate for the HTTPS listener. The Custom SSL/TLS certificate dropdown shows available certificates from AWS Certificate Manager (ACM).

Console screenshot.

Securing Service-to-Service Communications
Now that the target groups have been created, let’s see how I can secure the way services communicate with each other. To implement zero-trust authentication and authorization, I use AWS Identity and Access Management (IAM). When creating a service, I select the AWS IAM as Auth type.

I select the Allow only authenticated access policy template so that requests to services need to be signed using Signature Version 4, the same signing protocol used by AWS APIs. In this way, requests between services are authenticated by their IAM credentials, and I don’t have to manage secrets to secure their communications.

Console screenshot.

Optionally, I can be more precise and use an auth policy that only gives access to some services or specific URL paths of a service. For example, I can apply the following auth policy to the Order service to give to the Lambda function these permissions:

  • Read-only access (GET method) to the Inventory service /stock URL path.
  • Full access (any HTTP method) to the Delivery service /delivery URL path.
{
    "Version": "2012-10-17",
    "Statement": [
        {
            "Effect": "Allow",
            "Principal": {
                "AWS": "<Order Service Lambda Function IAM Role ARN>"
            },
            "Action": "vpc-lattice-svcs:Invoke",
            "Resource": "<Inventory Service ARN>/stock",
            "Condition": {
                "StringEquals": {
                    "vpc-lattice-svcs:RequestMethod": "GET"
                }
            }
        },
        {
            "Effect": "Allow",
            "Principal": {
                "AWS": "<Order Service Lambda Function IAM Role ARN>"
            },
            "Action": "vpc-lattice-svcs:Invoke",
            "Resource": "<Delivery Service ARN>/delivery"
        }
    ]
}

Using VPC Lattice, I quickly configured the communication between the services of my e-commerce application, including security and monitoring. Now, I can focus on the business logic instead of managing how services communicate with each other.

Availability and Pricing
Amazon VPC Lattice is available today in the following AWS Regions: US East (Ohio), US East (N. Virginia), US West (Oregon), Asia Pacific (Singapore), Asia Pacific (Sydney), Asia Pacific (Tokyo), and Europe (Ireland).

With VPC Lattice, you pay for the time a service is provisioned, the amount of data transferred through each service, and the number of requests. There is no charge for the first 300,000 requests every hour, and you only pay for requests above this threshold. For more information, see VPC Lattice pricing.

We designed VPC Lattice to allow incremental opt-in over time. Each team in your organization can choose if and when to use VPC Lattice. Other applications can connect to VPC Lattice services using standard protocols such as HTTP and HTTPS. By using VPC Lattice, you can focus on your application logic and improve productivity and deployment flexibility with consistent support for instances, containers, and serverless computing.

Simplify the way you connect, secure, and monitor your services with VPC Lattice.

Danilo

AWS Application Migration Service Major Updates: Import and Export Feature, Source Server Migration Metrics Dashboard, and Additional Post-Launch Actions

AWS Application Migration Service (AWS MGN) can simplify and expedite your migration to AWS by automatically converting your source servers from physical, virtual, or cloud infrastructure to run natively on AWS. In the post, How to Use the New AWS Application Migration Server for Lift-and-Shift Migrations, Channy introduced us to Application Migration Service and how to get started.

By using Application Migration Service for migration, you can minimize time-intensive, error-prone manual processes by automating replication and conversion of your source servers from physical, virtual, or cloud infrastructure to run natively on AWS. Last year, we introduced major improvements such as new migration servers grouping, an account-level launch template, and a post-launch actions template.

Today, I’m pleased to announce three major updates of Application Migration Service. Here’s the quick summary for each feature release:

  • Import and export – You can now use Application Migration Service to import your source environment inventory list to the service from a CSV file. You can also export your source server inventory for reporting purposes, offline reviews and updates, integration with other tools and AWS services, and performing bulk configuration changes by reimporting the inventory list.
  • Server migration metrics dashboard – This new dashboard can help simplify migration project management by providing an aggregated view of the migration lifecycle status of your source servers
  • Additional post-launch modernization actions – In this update, Application Migration Service added eight additional predefined post-launch actions. These actions are applied to your migrated applications when you launch them on AWS.

Let me share how you can use these features for your migration.

Import and Export
Before we go further into the import and export features, let’s discuss two concepts within Application Migration Service: applications and waves, which you can define when migrating with Application Migration Service. Applications represent a group of servers. By using applications, you can define groups of servers and identify them as an application. Within your application, you can perform various activities with Application Migration Service, such as monitoring, specifying tags, and performing bulk operations, for example, launching test instances. Additionally, you can group your applications into waves, which represent a group of servers that are migrated together, as part of your migration plan.

With the import feature, you can now import your inventory list in CSV form into Application Migration Service. This makes it easy for you to manage large scale-migrations, and ingest your inventory of source servers, applications and waves, including their attributes.

To start using the import feature, I need to identify my servers and application inventory. I can do this manually, or using discovery tools. The next thing I need to do is download the import template which I can access from the console. 

After I downloaded the import template, I can start mapping from my inventory list into this template. While mapping my inventory, I can group related servers into applications and waves. I can also perform configurations, such as defining Amazon Elastic Compute Cloud (Amazon EC2) launch template settings, and specifying tags for each wave.

The following screenshot is an example of the results of my import template:

The next step is to upload my CSV file to an Amazon Simple Storage Service (Amazon S3) bucket. Then, I can start the import process from the Application Migration Service console by referencing the CSV file containing my inventory list that I’ve uploaded to the S3 bucket.

When the import process is complete, I can see the details of the import results.

I can import inventory for servers that don’t have an agent installed, or haven’t yet been discovered by agentless replication. However, to replicate data, I need to use agentless replication, or install the AWS Replication Agent on my source servers.

Now I can view all my inventory inside the Source servers, Applications and Waves pages on the Application Migration Service console. The following is a screenshot for recently imported waves.

In addition, with the export feature, I can export my source servers, applications, and waves along with all configurations that I’ve defined into a CSV file.

This is helpful if you want to do reporting or offline reviews, or for bulk editing before reimporting the CSV file into Application Migration Service.

Server Migration Metrics Dashboard
We previously supported a migration metrics dashboard for applications and waves. In this release, we have specifically added a migration metrics dashboard for servers. Now you can view aggregated overviews of your server’s migration process on the Application Migration Service dashboard. Three topics are available in the migration metrics dashboard:

  • Alerts – Shows associated alerts for respective servers.
  • Data replication status – Shows the replication data overview status for source servers. Here, you get a quick overview of the lifecycle status of the replication data process.
  • Migration lifecycle – Shows an overview of the migration lifecycle from source servers.

Additional Predefined Post-launch Modernization Actions
Post-launch actions allow you to control and automate actions performed after your servers have been launched in AWS. You can use predefined or use custom post-launch actions.

Application Migration Service now has eight additional predefined post-launch actions to run in your EC2 instances on top of the existing four predefined post-launch actions. These additional post-launch actions provide you with flexibility to maximize your migration experience.

The new additional predefined post-launch actions are as follows:

  • Convert MS-SQL license – You can easily convert Windows MS-SQL BYOL to an AWS license using the Windows MS-SQL license conversion action. The launch process includes checking the SQL edition (Enterprise, Standard, or Web) and using the right AMI with the right billing code.
  • Create AMI from instance – You can create a new Amazon Machine Image (AMI) from your Application Migration Service launched instance.
  • Upgrade Windows version – This feature allows you to easily upgrade your migrated server to Windows Server 2012 R2, 2016, 2019, or 2022. You can see the full list of available OS versions on AWSEC2-CloneInstanceAndUpgradeWindows page.
  • Conduct EC2 connectivity checks – You can conduct network connectivity checks to a predefined list of ports and hosts using the EC2 connectivity check feature.
  • Validate volume integrity – You can use this feature to ensure that Amazon Elastic Block Store (Amazon EBS) volumes on the launched instance are the same size as the source, properly mounted on the EC2 instance, and accessible.
  • Verify process status – You can validate the process status to ensure that processes are in a running state after instance launch. You will need to provide a list of processes that you want to verify and specify how long the service should wait before testing begins. This feature lets you do the needed validations automatically and saves time by not having to do them manually.
  • CloudWatch agent installation – Use the Amazon CloudWatch agent installation feature to install and set up the CloudWatch agent and Application Insights features.
  • Join Directory Service domain – You can simplify the AWS join domain process by using this feature. If you choose to activate this action, your instance will be managed by the AWS Cloud Directory (instead of on premises).

Things to Know
Keep in mind the following:

  • Updated UI/UX – We have updated the user interface with card layout and table layout view for the action list on the Application Migration Service console. This update helps you to determine which post-launch actions are suitable for your use case . We have also added filter options to make it easy to find relevant actions by operating system, category, and more.
  • Support for additional OS versions – Application Migration Service now supports CentOS 5.5 and later and Red Hat Enterprise Linux (RHEL) 5.5 and later operating systems.
  • Availability – These features are available now, and you can start using them today in all Regions where Application Migration Service is supported.

Get Started Today

Visit the Application Migration Service User Guide page to learn more about these features and understand the pricing. You can also visit Getting started with AWS Application Migration Service to learn more about how to get started to migrate your workloads.

Happy migrating!

Donnie

New – Use Amazon S3 Object Lambda with Amazon CloudFront to Tailor Content for End Users

With S3 Object Lambda, you can use your own code to process data retrieved from Amazon S3 as it is returned to an application. Over time, we added new capabilities to S3 Object Lambda, like the ability to add your own code to S3 HEAD and LIST API requests, in addition to the support for S3 GET requests that was available at launch.

Today, we are launching aliases for S3 Object Lambda Access Points. Aliases are now automatically generated when S3 Object Lambda Access Points are created and are interchangeable with bucket names anywhere you use a bucket name to access data stored in Amazon S3. Therefore, your applications don’t need to know about S3 Object Lambda and can consider the alias to be a bucket name.

Architecture diagram.

You can now use an S3 Object Lambda Access Point alias as an origin for your Amazon CloudFront distribution to tailor or customize data for end users. You can use this to implement automatic image resizing or to tag or annotate content as it is downloaded. Many images still use older formats like JPEG or PNG, and you can use a transcoding function to deliver images in more efficient formats like WebP, BPG, or HEIC. Digital images contain metadata, and you can implement a function that strips metadata to help satisfy data privacy requirements.

Architecture diagram.

Let’s see how this works in practice. First, I’ll show a simple example using text that you can follow along by just using the AWS Management Console. After that, I’ll implement a more advanced use case processing images.

Using an S3 Object Lambda Access Point as the Origin of a CloudFront Distribution
For simplicity, I am using the same application in the launch post that changes all text in the original file to uppercase. This time, I use the S3 Object Lambda Access Point alias to set up a public distribution with CloudFront.

I follow the same steps as in the launch post to create the S3 Object Lambda Access Point and the Lambda function. Because the Lambda runtimes for Python 3.8 and later do not include the requests module, I update the function code to use urlopen from the Python Standard Library:

import boto3
from urllib.request import urlopen

s3 = boto3.client('s3')

def lambda_handler(event, context):
  print(event)

  object_get_context = event['getObjectContext']
  request_route = object_get_context['outputRoute']
  request_token = object_get_context['outputToken']
  s3_url = object_get_context['inputS3Url']

  # Get object from S3
  response = urlopen(s3_url)
  original_object = response.read().decode('utf-8')

  # Transform object
  transformed_object = original_object.upper()

  # Write object back to S3 Object Lambda
  s3.write_get_object_response(
    Body=transformed_object,
    RequestRoute=request_route,
    RequestToken=request_token)

  return

To test that this is working, I open the same file from the bucket and through the S3 Object Lambda Access Point. In the S3 console, I select the bucket and a sample file (called s3.txt) that I uploaded earlier and choose Open.

Console screenshot.

A new browser tab is opened (you might need to disable the pop-up blocker in your browser), and its content is the original file with mixed-case text:

Amazon Simple Storage Service (Amazon S3) is an object storage service that offers...

I choose Object Lambda Access Points from the navigation pane and select the AWS Region I used before from the dropdown. Then, I search for the S3 Object Lambda Access Point that I just created. I select the same file as before and choose Open.

Console screenshot.

In the new tab, the text has been processed by the Lambda function and is now all in uppercase:

AMAZON SIMPLE STORAGE SERVICE (AMAZON S3) IS AN OBJECT STORAGE SERVICE THAT OFFERS...

Now that the S3 Object Lambda Access Point is correctly configured, I can create the CloudFront distribution. Before I do that, in the list of S3 Object Lambda Access Points in the S3 console, I copy the Object Lambda Access Point alias that has been automatically created:

Console screenshot.

In the CloudFront console, I choose Distributions in the navigation pane and then Create distribution. In the Origin domain, I use the S3 Object Lambda Access Point alias and the Region. The full syntax of the domain is:

ALIAS.s3.REGION.amazonaws.com

Console screenshot.

S3 Object Lambda Access Points cannot be public, and I use CloudFront origin access control (OAC) to authenticate requests to the origin. For Origin access, I select Origin access control settings and choose Create control setting. I write a name for the control setting and select Sign requests and S3 in the Origin type dropdown.

Console screenshot.

Now, my Origin access control settings use the configuration I just created.

Console screenshot.

To reduce the number of requests going through S3 Object Lambda, I enable Origin Shield and choose the closest Origin Shield Region to the Region I am using. Then, I select the CachingOptimized cache policy and create the distribution. As the distribution is being deployed, I update permissions for the resources used by the distribution.

Setting Up Permissions to Use an S3 Object Lambda Access Point as the Origin of a CloudFront Distribution
First, the S3 Object Lambda Access Point needs to give access to the CloudFront distribution. In the S3 console, I select the S3 Object Lambda Access Point and, in the Permissions tab, I update the policy with the following:

{
    "Version": "2012-10-17",
    "Statement": [
        {
            "Effect": "Allow",
            "Principal": {
                "Service": "cloudfront.amazonaws.com"
            },
            "Action": "s3-object-lambda:Get*",
            "Resource": "arn:aws:s3-object-lambda:REGION:ACCOUNT:accesspoint/NAME",
            "Condition": {
                "StringEquals": {
                    "aws:SourceArn": "arn:aws:cloudfront::ACCOUNT:distribution/DISTRIBUTION-ID"
                }
            }
        }
    ]
}

The supporting access point also needs to allow access to CloudFront when called via S3 Object Lambda. I select the access point and update the policy in the Permissions tab:

{
    "Version": "2012-10-17",
    "Id": "default",
    "Statement": [
        {
            "Sid": "s3objlambda",
            "Effect": "Allow",
            "Principal": {
                "Service": "cloudfront.amazonaws.com"
            },
            "Action": "s3:*",
            "Resource": [
                "arn:aws:s3:REGION:ACCOUNT:accesspoint/NAME",
                "arn:aws:s3:REGION:ACCOUNT:accesspoint/NAME/object/*"
            ],
            "Condition": {
                "ForAnyValue:StringEquals": {
                    "aws:CalledVia": "s3-object-lambda.amazonaws.com"
                }
            }
        }
    ]
}

The S3 bucket needs to allow access to the supporting access point. I select the bucket and update the policy in the Permissions tab:

{
    "Version": "2012-10-17",
    "Statement": [
        {
            "Effect": "Allow",
            "Principal": {
                "AWS": "*"
            },
            "Action": "*",
            "Resource": [
                "arn:aws:s3:::BUCKET",
                "arn:aws:s3:::BUCKET/*"
            ],
            "Condition": {
                "StringEquals": {
                    "s3:DataAccessPointAccount": "ACCOUNT"
                }
            }
        }
    ]
}

Finally, CloudFront needs to be able to invoke the Lambda function. In the Lambda console, I choose the Lambda function used by S3 Object Lambda, and then, in the Configuration tab, I choose Permissions. In the Resource-based policy statements section, I choose Add permissions and select AWS Account. I enter a unique Statement ID. Then, I enter cloudfront.amazonaws.com as Principal and select lambda:InvokeFunction from the Action dropdown and Save. We are working to simplify this step in the future. I’ll update this post when that’s available.

Testing the CloudFront Distribution
When the distribution has been deployed, I test that the setup is working with the same sample file I used before. In the CloudFront console, I select the distribution and copy the Distribution domain name. I can use the browser and enter https://DISTRIBUTION_DOMAIN_NAME/s3.txt in the navigation bar to send a request to CloudFront and get the file processed by S3 Object Lambda. To quickly get all the info, I use curl with the -i option to see the HTTP status and the headers in the response:

curl -i https://DISTRIBUTION_DOMAIN_NAME/s3.txt

HTTP/2 200 
content-type: text/plain
content-length: 427
x-amzn-requestid: a85fe537-3502-4592-b2a9-a09261c8c00c
date: Mon, 06 Mar 2023 10:23:02 GMT
x-cache: Miss from cloudfront
via: 1.1 a2df4ad642d78d6dac65038e06ad10d2.cloudfront.net (CloudFront)
x-amz-cf-pop: DUB56-P1
x-amz-cf-id: KIiljCzYJBUVVxmNkl3EP2PMh96OBVoTyFSMYDupMd4muLGNm2AmgA==

AMAZON SIMPLE STORAGE SERVICE (AMAZON S3) IS AN OBJECT STORAGE SERVICE THAT OFFERS...

It works! As expected, the content processed by the Lambda function is all uppercase. Because this is the first invocation for the distribution, it has not been returned from the cache (x-cache: Miss from cloudfront). The request went through S3 Object Lambda to process the file using the Lambda function I provided.

Let’s try the same request again:

curl -i https://DISTRIBUTION_DOMAIN_NAME/s3.txt

HTTP/2 200 
content-type: text/plain
content-length: 427
x-amzn-requestid: a85fe537-3502-4592-b2a9-a09261c8c00c
date: Mon, 06 Mar 2023 10:23:02 GMT
x-cache: Hit from cloudfront
via: 1.1 145b7e87a6273078e52d178985ceaa5e.cloudfront.net (CloudFront)
x-amz-cf-pop: DUB56-P1
x-amz-cf-id: HEx9Fodp184mnxLQZuW62U11Fr1bA-W1aIkWjeqpC9yHbd0Rg4eM3A==
age: 3

AMAZON SIMPLE STORAGE SERVICE (AMAZON S3) IS AN OBJECT STORAGE SERVICE THAT OFFERS...

This time the content is returned from the CloudFront cache (x-cache: Hit from cloudfront), and there was no further processing by S3 Object Lambda. By using S3 Object Lambda as the origin, the CloudFront distribution serves content that has been processed by a Lambda function and can be cached to reduce latency and optimize costs.

Resizing Images Using S3 Object Lambda and CloudFront
As I mentioned at the beginning of this post, one of the use cases that can be implemented using S3 Object Lambda and CloudFront is image transformation. Let’s create a CloudFront distribution that can dynamically resize an image by passing the desired width and height as query parameters (w and h respectively). For example:

https://DISTRIBUTION_DOMAIN_NAME/image.jpg?w=200&h=150

For this setup to work, I need to make two changes to the CloudFront distribution. First, I create a new cache policy to include query parameters in the cache key. In the CloudFront console, I choose Policies in the navigation pane. In the Cache tab, I choose Create cache policy. Then, I enter a name for the cache policy.

Console screenshot.

In the Query settings of the Cache key settings, I select the option to Include the following query parameters and add w (for the width) and h (for the height).

Console screenshot.

Then, in the Behaviors tab of the distribution, I select the default behavior and choose Edit.

There, I update the Cache key and origin requests section:

  • In the Cache policy, I use the new cache policy to include the w and h query parameters in the cache key.
  • In the Origin request policy, use the AllViewerExceptHostHeader managed policy to forward query parameters to the origin.

Console screenshot.

Now I can update the Lambda function code. To resize images, this function uses the Pillow module that needs to be packaged with the function when it is uploaded to Lambda. You can deploy the function using a tool like the AWS SAM CLI or the AWS CDK. Compared to the previous example, this function also handles and returns HTTP errors, such as when content is not found in the bucket.

import io
import boto3
from urllib.request import urlopen, HTTPError
from PIL import Image

from urllib.parse import urlparse, parse_qs

s3 = boto3.client('s3')

def lambda_handler(event, context):
    print(event)

    object_get_context = event['getObjectContext']
    request_route = object_get_context['outputRoute']
    request_token = object_get_context['outputToken']
    s3_url = object_get_context['inputS3Url']

    # Get object from S3
    try:
        original_image = Image.open(urlopen(s3_url))
    except HTTPError as err:
        s3.write_get_object_response(
            StatusCode=err.code,
            ErrorCode='HTTPError',
            ErrorMessage=err.reason,
            RequestRoute=request_route,
            RequestToken=request_token)
        return

    # Get width and height from query parameters
    user_request = event['userRequest']
    url = user_request['url']
    parsed_url = urlparse(url)
    query_parameters = parse_qs(parsed_url.query)

    try:
        width, height = int(query_parameters['w'][0]), int(query_parameters['h'][0])
    except (KeyError, ValueError):
        width, height = 0, 0

    # Transform object
    if width > 0 and height > 0:
        transformed_image = original_image.resize((width, height), Image.ANTIALIAS)
    else:
        transformed_image = original_image

    transformed_bytes = io.BytesIO()
    transformed_image.save(transformed_bytes, format='JPEG')

    # Write object back to S3 Object Lambda
    s3.write_get_object_response(
        Body=transformed_bytes.getvalue(),
        RequestRoute=request_route,
        RequestToken=request_token)

    return

I upload a picture I took of the Trevi Fountain in the source bucket. To start, I generate a small thumbnail (200 by 150 pixels).

https://DISTRIBUTION_DOMAIN_NAME/trevi-fountain.jpeg?w=200&h=150

Picture of the Trevi Fountain with size 200x150 pixels.

Now, I ask for a slightly larger version (400 by 300 pixels):

https://DISTRIBUTION_DOMAIN_NAME/trevi-fountain.jpeg?w=400&h=300

Picture of the Trevi Fountain with size 400x300 pixels.

It works as expected. The first invocation with a specific size is processed by the Lambda function. Further requests with the same width and height are served from the CloudFront cache.

Availability and Pricing
Aliases for S3 Object Lambda Access Points are available today in all commercial AWS Regions. There is no additional cost for aliases. With S3 Object Lambda, you pay for the Lambda compute and request charges required to process the data, and for the data S3 Object Lambda returns to your application. You also pay for the S3 requests that are invoked by your Lambda function. For more information, see Amazon S3 Pricing.

Aliases are now automatically generated when an S3 Object Lambda Access Point is created. For existing S3 Object Lambda Access Points, aliases are automatically assigned and ready for use.

It’s now easier to use S3 Object Lambda with existing applications, and aliases open many new possibilities. For example, you can use aliases with CloudFront to create a website that converts content in Markdown to HTML, resizes and watermarks images, or masks personally identifiable information (PII) from text, images, and documents.

Customize content for your end users using S3 Object Lambda with CloudFront.

Danilo

AWS Application Composer Now Generally Available – Visually Build Serverless Applications Quickly

At AWS re:Invent 2022, we previewed AWS Application Composer, a visual builder for you to compose and configure serverless applications from AWS services backed by deployment-ready infrastructure as code (IaC).

In the keynote, Dr. Werner Vogels, CTO of Amazon.com said:

Developers that never used serverless before. How do they know where to start? Which services do they need? How do they work together? We really wanted to make this easier. AWS Application Composer simplifies and accelerates the architecting, configuring, and building of serverless applications.

During the preview, we had lots of interest and great feedback from customers. Today, I am happy to announce the general availability of AWS Application Composer with new improvements based on customer feedback. I want to quickly review its features and introduce some improvements.

Introduction to AWS Application Composer
To get started with AWS Application Composer, choose Open demo in the AWS Management Console. This demo shows a simple cart application with Amazon API Gateway, AWS Lambda, and Amazon DynamoDB resources.

You can easily browse and search for AWS services in the left Resources panel and drag and drop them onto the canvas to expand your architecture.

In the middle Canvas panel, you can connect resources together by clicking and dragging from one resource port to another. Permissions are automatically composed for these resources to interact with each other using policy template, environment variables, and event subscriptions. Grouping resources is very useful to select one visual organization. For above example, API Compute group is compsite of Lambda functions. When you double-click on a specific resource, you can name and configure your properties in the right Resource properties panel.

As well as featured resources available in the visual resource palette, you can use hidden and read-only resources will populate on the canvas when you load an existing template that includes them.

In this example, the MyHttpApi resource is a hidden resource. It is not available from the resource palette but does appear on the canvas in color. The resource named MyHttpApiRole (in this case, an AWS::IAM::Role resource) is read-only. It grayed out on the canvas greyed out. To learn more about all supported resources, see AWS Application Composer featured resources in the AWS documentation.

When you select the Template menu, you can view, edit or manually download your IaC, such as AWS Serverless Application Model (AWS SAM). Your changes are automatically synced with your canvas.

When you start Connected mode, you can use Application Composer with local tools such as an integrated development environment (IDE). Any changes activate the automatic synchronization of your project template and files between Application Composer and your local project directory.

It is useful to incorporate into your existing team processes, such as local testing with AWS SAM Command Line Interface (CLI), peer review through version control, or deployment through AWS CloudFormation and continuous integration and delivery (CI/CD) pipelines.

This mode is supported on Chrome and Edge browsers and requires you to grant temporary local file system access to your browser.

AWS Application Composer can be used in real-world scenarios such as:

  • Building a prototype of serverless applications
  • Reviewing and collaboratively evolving existing serverless projects
  • Generating diagrams for documentation or Wikis
  • Onboarding new team members to a project
  • Reducing the first steps to deploy something in an AWS account

To learn more real-world examples, see Visualize and create your serverless workloads with AWS Application Composer in the AWS Compute Blog, How I Used AWS Application Composer to Make Analyzing My Meetup Data Easy in BuildOn.AWS, or watch a breakout session video (SVS211) from AWS re:Invent 2022.

Improvements Since Preview Launch
Here is a new feature to improve how you work with Amazon Simple Queue Service (Amazon SQS) queues.

You can now directly connect Amazon API Gateway resources to Amazon SQS without routing requests through AWS Lambda function. You can remove the complexity of the Lambda function’s execution and increase the reliability while reducing lines of code.

For example, you can drag API Gateway and Amazon SQS onto the canvas and connect the two resources. When the user drags the connector from API route to SQS, Send message appears. You can connect the API route to the SQS queue via their choice of integration target.

The new Change Inspector provides a visual diff of template changes made when you connect two resources on the canvas. This information is available as a notification when you make the connection, which helps you understand how Composer manages integration configuration in your IaC template as you build.

Here are some more improvements to your experience in the user interface!

First, we reduced the size of resource cards. The larger cards made it difficult for the users to read and view their template on the canvas. Now, you can arrange more resource cards easily and save space on the canvas.

Also, we added zoom in and out and zoom to fit buttons so that users can quickly view the entire screen or zoom to the desired level. When you load a large template onto the canvas, you can easily see all the resource cards in any size.

Now Available
AWS Application Composer is now generally available in the US East (Ohio), US East (N. Virginia), US West (Oregon), Asia Pacific (Singapore), Asia Pacific (Sydney), Asia Pacific (Tokyo), Europe (Frankfurt), Europe (Ireland), and Europe (Stockholm) Regions, adding three more Regions to the six Regions available during preview. There is no additional cost, and you can start using it today.

To learn more, see the AWS Application Composer Developer Guide and send feedback to AWS re:Post for AWS Application Composer or through your usual AWS support contacts.

Channy

Subscribe to AWS Daily Feature Updates via Amazon SNS

Way back in 2015 I showed you how to Subscribe to AWS Public IP Address Changes via Amazon SNS. Today I am happy to tell you that you can now receive timely, detailed information about releases and updates to AWS via the same, simple mechanism.

Daily Feature Updates
Simply subscribe to topic arn:aws:sns:us-east-1:692768080016:aws-new-feature-updates using the email protocol and confirm the subscription in the usual way:

You will receive daily emails that start off like this, with an introduction and a summary of the update:

After the introduction, the email contains a JSON representation of the daily feature updates:

As noted in the message, the JSON content is also available online at URLs that look like https://aws-new-features.s3.us-east-1.amazonaws.com/update/2023-02-27.json . You can also edit the date in the URL to access historical data going back up to six months.

The email message also includes detailed information about changes and additions to managed policies that will be of particular interest to AWS customers who currently manually track and then verify the impact that these changes may have on their security profile. Here’s a sample list of changes (additional permissions) to existing managed policies:

And here’s a new managed policy:

Even More Information
The header of the email contains a link to a treasure trove of additional information. Here are some examples:

AWS Regions and AWS Services – A pair of tables. The first one includes a row for each AWS Region and a column for each service, and the second one contains the transposed version:

AWS Regions and EC2 Instance Types – Again, a pair of tables. The first one includes a row for each AWS Region and a column for each EC2 instance type, and the second one contains the transposed version:

The EC2 Instance Types Configuration link leads to detailed information about each instance type:

Each page also includes a link to the same information in JSON form. For example (EC2 Instance Types Configuration), starts like this:

{
    "a1.2xlarge": {
        "af-south-1": "-",
        "ap-east-1": "-",
        "ap-northeast-1": "a1.2xlarge",
        "ap-northeast-2": "-",
        "ap-northeast-3": "-",
        "ap-south-1": "a1.2xlarge",
        "ap-south-2": "-",
        "ap-southeast-1": "a1.2xlarge",
        "ap-southeast-2": "a1.2xlarge",
        "ap-southeast-3": "-",
        "ap-southeast-4": "-",
        "ca-central-1": "-",
        "eu-central-1": "a1.2xlarge",
        "eu-central-2": "-",
        "eu-north-1": "-",
        "eu-south-1": "-",
        "eu-south-2": "-",
        "eu-west-1": "a1.2xlarge",
        "eu-west-2": "-",
        "eu-west-3": "-",
        "me-central-1": "-",
        "me-south-1": "-",
        "sa-east-1": "-",
        "us-east-1": "a1.2xlarge",
        "us-east-2": "a1.2xlarge",
        "us-gov-east-1": "-",
        "us-gov-west-1": "-",
        "us-west-1": "-",
        "us-west-2": "a1.2xlarge"
    },

Other information includes:

  • VPC Endpoints
  • AWS Services Integrated with Service Quotas
  • Amazon SageMaker Instance Types
  • RDS DB Engine Versions
  • Amazon Nimble Instance Types
  • Amazon MSK Apache Kafka Versions

Information Sources
The information is pulled from multiple public sources, cross-checked, and then issued. Here are some of the things that we look for:

Things to Know
Here are a couple of things that you should keep in mind about the AWS Daily Feature Updates:

Content – The content provided in the Daily Feature Updates and in the treasure trove of additional information will continue to grow as new features are added to AWS.

Region Coverage – The Daily Feature Updates cover all AWS Regions in the public partition. Where possible, it also provides information about GovCloud regions; this currently includes EC2 Instance Types, SageMaker Instance Types, and Amazon Nimble Instance Types.

Region Mappings – The internal data that drives all of the information related to AWS Regions is updated once a day if there are applicable new features, and also when new AWS Regions are enabled.

Updates – On days when there are no updates, there will not be an email notification.

Usage – Similar to the updates on the What’s New page and the associated RSS feed, the updates are provided for informational purposes, and you still need to do your own evaluation and testing before deploying to production.

Command Line Subscription – If you have access to the AWS Command Line Interface (AWS CLI), you can subscribe from the command line:

$ aws sns subscribe --topic-arn arn:aws:sns:us-east-1:692768080016:aws-new-feature-updates --protocol email --notification-endpoint [email protected]
{
    "SubscriptionArn": "pending confirmation"
}

Jeff

In the Works – AWS Region in Malaysia

We launched an AWS Region in Australia earlier this year, four more (Switzerland, Spain, the United Arab Emirates, and India) in 2022, and are working on regions in Canada, Israel, New Zealand, and Thailand. All told, we now have 99 Availability Zones spread across 31 geographic regions.

Malaysia in the Works
Today I am happy to announce that we are working on an AWS region in Malaysia. This region will give AWS customers the ability to run workloads and store data that must remain in-country.

The region will include three Availability Zones (AZs), each one physically independent of the others in the region yet far enough apart to minimize the risk that an AZ-level event will have on business continuity. The AZs will be connected to each other by high-bandwidth, low-latency network connections over dedicated, fully-redundant fiber.

AWS in Malaysia
We are planning to invest at least $6 Billion (25.5 billion Malaysian ringgit) in Malaysia by 2037.

Many organizations in Malaysia are already making use of the existing AWS Regions. This includes enterprise and public sector organizations such as Axiata Group, Baba Products, Bank Islam Malaysia, Celcom Digi, PayNet, PETRONAS, Tenaga Nasional Berhad (TNB), Asia Pacific University of Technology & Innovation, Cybersecurity Malaysia, Department of Statistics Malaysia, Ministry of Higher Education Malaysia, and Pos Malaysia, and startups like Baba’s, BeEDucation Adventures, CARSOME, and StoreHub.

Here’s a small sample of some of the exciting and innovative work that our customers are doing in Malaysia:

Johor Corporation (JCorp) is the principal development institution that drives the growth of the state of Johor’s economy through its operations in the agribusiness, wellness, food and restaurants, and real estate and infrastructure sectors. To power JCorp’s digital transformation and achieve the JCorp 3.0 reinvention plan goals, the company is leveraging the AWS cloud to manage its data and applications, serving as a single source of truth for its business and operational knowledge, and paving the way for the company to tap on artificial intelligence, machine learning and blockchain technologies in the future.

Radio Televisyen Malaysia (RTM), established in 1946, is the national public broadcaster of Malaysia, bringing news, information, and entertainment programs through its six free-to-air channels and 34 radio stations to millions of Malaysians daily. Bringing cutting-edge AWS technologies closer to RTM in Malaysia will accelerate the time it takes to develop new media services, while delivering a better viewer experience with lower latency.

Bank Islam, Malaysia’s first listed Islamic banking institution, provides end-to-end financial solutions that meet the diverse needs of their customers. The bank taps AWS’ expertise to power its digital transformation and the development of Be U digital bank through its Centre of Digital Experience, a stand-alone division that creates cutting-edge financial services on AWS to enhance customer experiences.

Malaysian Administrative Modernization Management Planning Unit (MAMPU) encourages public sector agencies to adopt cloud in all ICT projects in order to accelerate emerging technologies application and increase the efficiency of public service. MAMPU believes the establishment of the AWS Region in Malaysia will further accelerate digitalization of the public sector, and bolster efforts for public sector agencies to deliver advanced citizen services seamlessly.

Malaysia is also home to both Independent Software Vendors (ISVs) and Systems Integrators that are members of the AWS Partner Network (APN). The ISV partners build innovative solutions on AWS and the SIs provide business, technical, marketing, and go-to-market support to customers. AWS Partners based in Malaysia include Axrail, eCloudvalley, Exabytes, G-AsiaPacific, GHL, Maxis, Radmik Solutions Sdn Bhd, Silverlake, Tapway, Fourtitude, and Wavelet.

New Explainer Video
To learn more about our global infrastructure, be sure to watch our new AWS Global Infrastructure Explainer video:

Stay Tuned
As usual, subscribe to this blog so that you will be among the first to know when the new region is open!

Jeff

Heads-Up: Amazon S3 Security Changes Are Coming in April of 2023

Starting in April of 2023 we will be making two changes to Amazon Simple Storage Service (Amazon S3) to put our latest best practices for bucket security into effect automatically. The changes will begin to go into effect in April and will be rolled out to all AWS Regions within weeks.

Once the changes are in effect for a target Region, all newly created buckets in the Region will by default have S3 Block Public Access enabled and access control lists (ACLs) disabled. Both of these options are already console defaults and have long been recommended as best practices. The options will become the default for buckets that are created using the S3 API, S3 CLI, the AWS SDKs, or AWS CloudFormation templates.

As a bit of history, S3 buckets and objects have always been private by default. We added Block Public Access in 2018 and the ability to disable ACLs in 2021 in order to give you more control, and have long been recommending the use of AWS Identity and Access Management (IAM) policies as a modern and more flexible alternative.

In light of this change, we recommend a deliberate and thoughtful approach to the creation of new buckets that rely on public buckets or ACLs, and believe that most applications do not need either one. If your application turns out to be one that does, then you will need to make the changes that I outline below (be sure to review your code, scripts, AWS CloudFormation templates, and any other automation).

What’s Changing
Let’s take a closer look at the changes that we are making:

S3 Block Public Access – All four of the bucket-level settings described in this post will be enabled for newly created buckets:

A subsequent attempt to set a bucket policy or an access point policy that grants public access will be rejected with a 403 Access Denied error. If you need public access for a new bucket you can create it as usual and then delete the public access block by calling DeletePublicAccessBlock (you will need s3:PutBucketPublicAccessBlock permission in order to call this function; read Block Public Access to learn more about the functions and the permissions).

ACLs Disabled – The Bucket owner enforced setting will be enabled for newly created buckets, making bucket ACLs and object ACLs ineffective, and ensuring that the bucket owner is the object owner no matter who uploads the object. If you want to enable ACLs for a bucket, you can set the ObjectOwnership parameter to ObjectWriter in your CreateBucket request or you can call DeleteBucketOwnershipControls after you create the bucket. You will need s3:PutBucketOwnershipControls permission in order to use the parameter or to call the function; read Controlling Ownership of Objects and Creating a Bucket to learn more.

Stay Tuned
We will publish an initial What’s New post when we start to deploy this change and another one when the deployment has reached all AWS Regions. You can also run your own tests to detect the change in behavior.

Jeff

New for Amazon Redshift – Simplify Data Ingestion and Make Your Data Warehouse More Secure and Reliable

When we talk with customers, we hear that they want to be able to harness insights from data in order to make timely, impactful, and actionable business decisions. A common pattern with data-driven organizations is that they have many different data sources they need to ingest into their analytics systems. This requires them to build manual data pipelines spanning across their operational databases, data lakes, streaming data, and data within their warehouse. As a consequence of this complex setup, it can take data engineers weeks or even months to build data ingestion pipelines. These data pipelines are costly, and the delays can lead to missed business opportunities. Additionally, data warehouses are increasingly becoming mission critical systems that require high availability, reliability, and security.

Amazon Redshift is a fully managed petabyte-scale data warehouse used by tens of thousands of customers to easily, quickly, securely, and cost-effectively analyze all their data at any scale. This year at re:Invent, Amazon Redshift has announced a number of features to help you simplify data ingestion and get to insights easily and quickly, within a secure, reliable environment.

In this blog, I introduce some of these new features that fit into two main categories:

  • Simplify data ingestion
    • Amazon Redshift now supports auto-copy from Amazon S3 (available in preview). With this new capability, Amazon Redshift automatically loads the files that arrive in an Amazon Simple Storage Service (Amazon S3) location that you specify into your data warehouse. The files can use any of the formats supported by the Amazon Redshift copy command, such as CSV, JSON, Parquet, and Avro. In this way, you don’t need to manually or repeatedly run copy procedures. Amazon Redshift automates file ingestion and takes care of data-loading steps under the hood.
    • With Amazon Aurora zero-ETL integration with Amazon Redshift, you can use Amazon Redshift for near real-time analytics and machine learning on petabytes of transactional data stored on Amazon Aurora MySQL databases (available in limited preview). With this capability, you can choose the Amazon Aurora databases containing the data you want to analyze with Amazon Redshift. Data is then replicated into your data warehouse within seconds after transactional data is written into Amazon Aurora, eliminating the need to build and maintain complex data pipelines. You can replicate data from multiple Amazon Aurora databases into the same Amazon Redshift instance to run analytics across multiple applications. With near real-time access to transactional data, you can leverage Amazon Redshift’s analytics and capabilities, such as built-in machine learning (ML), materialized views, data sharing, and federated access to multiple data stores and data lakes, to derive insights from transactional and other data.
    • With the general availability of Amazon Redshift Streaming Ingestion, you can now natively ingest hundreds of megabytes of data per second from Amazon Kinesis Data Streams and Amazon MSK into an Amazon Redshift materialized view and query it in seconds. Learn more in this post.
  • Make your data warehouse more secure and reliable
    • You can now improve the availability of your data warehouse by choosing multiple Availability Zone (AZ) deployments. Multi-AZ deployments for your Amazon Redshift clusters are available in preview and reduce recovery times to seconds through automatic recovery. In this way, you can build solutions that are more compliant with the recommendations of the Reliability Pillar of the AWS Well-Architected Framework.
    • With dynamic data masking (available in preview), you can protect sensitive information stored in your data warehouse and ensure that only the relevant data is accessible by users based on their roles. You can limit how much identifiable data is visible to users using multiple levels of policies so different users and groups can have different levels of data access without having to create multiple copies of data. Dynamic data masking complements other granular access control capabilities in Amazon Redshift including row-level and column-level security and role-based access controls. In this way, Dynamic Data Masking helps you meet requirements for GDPR, CCPA, and other privacy regulations.
    • Amazon Redshift now supports central access controls for data sharing with AWS Lake Formation (available in public preview). You can now use Lake Formation to simplify governance of data shared from Amazon Redshift and centrally manage granular access across all data-sharing consumers.

There have been other interesting news for Amazon Redshift at re:Invent you might have already heard about:

  • The general availability of Amazon Redshift integration for Apache Spark makes it easy to build and run Spark applications on Amazon Redshift and Redshift Serverless, opening up the data warehouse for a broader set of AWS analytics and machine learning solutions.
  • AWS Backup now supports Amazon Redshift. AWS Backup allows you to define a central backup policy to manage data protection of your applications and can also protect your Amazon Redshift clusters. In this way, you have a consistent experience when managing data protection across all supported services.

Availability and Pricing
Multi-AZ deployments, central access control for data sharing with AWS Lake Formation, auto-copy from Amazon S3, and dynamic data masking are available in preview in US East (Ohio), US East (N. Virginia), US West (Oregon), Asia Pacific (Tokyo), Europe (Ireland), and Europe (Stockholm).

There is no additional cost for using auto-copy from Amazon S3 and near real-time analytics on transactional data. There is no extra charge for dynamic data masking and central access control for data sharing. For more information, see Amazon Redshift pricing.

These new capabilities take you one step further in analyzing all your data across data sources with simple data ingestion capabilities, while improving the security and reliability of your data warehouse.

Danilo

Amazon Redshift ML Is Now Generally Available – Use SQL to Create Machine Learning Models and Make Predictions from Your Data

With Amazon Redshift, you can use SQL to query and combine exabytes of structured and semi-structured data across your data warehouse, operational databases, and data lake. Now that AQUA (Advanced Query Accelerator) is generally available, you can improve the performance of your queries by up to 10 times with no additional costs and no code changes. In fact, Amazon Redshift provides up to three times better price/performance than other cloud data warehouses.

But what if you want to go a step further and process this data to train machine learning (ML) models and use these models to generate insights from data in your warehouse? For example, to implement use cases such as forecasting revenue, predicting customer churn, and detecting anomalies? In the past, you would need to export the training data from Amazon Redshift to an Amazon Simple Storage Service (Amazon S3) bucket, and then configure and start a machine learning training process (for example, using Amazon SageMaker). This process required many different skills and usually more than one person to complete. Can we make it easier?

Today, Amazon Redshift ML is generally available to help you create, train, and deploy machine learning models directly from your Amazon Redshift cluster. To create a machine learning model, you use a simple SQL query to specify the data you want to use to train your model, and the output value you want to predict. For example, to create a model that predicts the success rate for your marketing activities, you define your inputs by selecting the columns (in one or more tables) that include customer profiles and results from previous marketing campaigns, and the output column you want to predict. In this example, the output column could be one that shows whether a customer has shown interest in a campaign.

After you run the SQL command to create the model, Redshift ML securely exports the specified data from Amazon Redshift to your S3 bucket and calls Amazon SageMaker Autopilot to prepare the data (pre-processing and feature engineering), select the appropriate pre-built algorithm, and apply the algorithm for model training. You can optionally specify the algorithm to use, for example XGBoost.

Architectural diagram.

Redshift ML handles all of the interactions between Amazon Redshift, S3, and SageMaker, including all the steps involved in training and compilation. When the model has been trained, Redshift ML uses Amazon SageMaker Neo to optimize the model for deployment and makes it available as a SQL function. You can use the SQL function to apply the machine learning model to your data in queries, reports, and dashboards.

Redshift ML now includes many new features that were not available during the preview, including Amazon Virtual Private Cloud (VPC) support. For example:

Architectural diagram.

  • You can also create SQL functions that use existing SageMaker endpoints to make predictions (remote inference). In this case, Redshift ML is batching calls to the endpoint to speed up processing.

Before looking into how to use these new capabilities in practice, let’s see the difference between Redshift ML and similar features in AWS databases and analytics services.

ML Feature Data Training
from SQL
Predictions
using SQL Functions
Amazon Redshift ML

Data warehouse

Federated relational databases

S3 data lake (with Redshift Spectrum)

Yes, using
Amazon SageMaker Autopilot
Yes, a model can be imported and executed inside the Amazon Redshift cluster, or invoked using a SageMaker endpoint.
Amazon Aurora ML Relational database
(compatible with MySQL or PostgreSQL)
No

Yes, using a SageMaker endpoint.

A native integration with Amazon Comprehend for sentiment analysis is also available.

Amazon Athena ML

S3 data lake

Other data sources can be used through Athena Federated Query.

No Yes, using a SageMaker endpoint.

Building a Machine Learning Model with Redshift ML
Let’s build a model that predicts if customers will accept or decline a marketing offer.

To manage the interactions with S3 and SageMaker, Redshift ML needs permissions to access those resources. I create an AWS Identity and Access Management (IAM) role as described in the documentation. I use RedshiftML for the role name. Note that the trust policy of the role allows both Amazon Redshift and SageMaker to assume the role to interact with other AWS services.

From the Amazon Redshift console, I create a cluster. In the cluster permissions, I associate the RedshiftML IAM role. When the cluster is available, I load the same dataset used in this super interesting blog post that my colleague Julien wrote when SageMaker Autopilot was announced.

The file I am using (bank-additional-full.csv) is in CSV format. Each line describes a direct marketing activity with a customer. The last column (y) describes the outcome of the activity (if the customer subscribed to a service that was marketed to them).

Here are the first few lines of the file. The first line contains the headers.

age,job,marital,education,default,housing,loan,contact,month,day_of_week,duration,campaign,pdays,previous,poutcome,emp.var.rate,cons.price.idx,cons.conf.idx,euribor3m,nr.employed,y 56,housemaid,married,basic.4y,no,no,no,telephone,may,mon,261,1,999,0,nonexistent,1.1,93.994,-36.4,4.857,5191.0,no
57,services,married,high.school,unknown,no,no,telephone,may,mon,149,1,999,0,nonexistent,1.1,93.994,-36.4,4.857,5191.0,no
37,services,married,high.school,no,yes,no,telephone,may,mon,226,1,999,0,nonexistent,1.1,93.994,-36.4,4.857,5191.0,no
40,admin.,married,basic.6y,no,no,no,telephone,may,mon,151,1,999,0,nonexistent,1.1,93.994,-36.4,4.857,5191.0,no

I store the file in one of my S3 buckets. The S3 bucket is used to unload data and store SageMaker training artifacts.

Then, using the Amazon Redshift query editor in the console, I create a table to load the data.

CREATE TABLE direct_marketing (
	age DECIMAL NOT NULL, 
	job VARCHAR NOT NULL, 
	marital VARCHAR NOT NULL, 
	education VARCHAR NOT NULL, 
	credit_default VARCHAR NOT NULL, 
	housing VARCHAR NOT NULL, 
	loan VARCHAR NOT NULL, 
	contact VARCHAR NOT NULL, 
	month VARCHAR NOT NULL, 
	day_of_week VARCHAR NOT NULL, 
	duration DECIMAL NOT NULL, 
	campaign DECIMAL NOT NULL, 
	pdays DECIMAL NOT NULL, 
	previous DECIMAL NOT NULL, 
	poutcome VARCHAR NOT NULL, 
	emp_var_rate DECIMAL NOT NULL, 
	cons_price_idx DECIMAL NOT NULL, 
	cons_conf_idx DECIMAL NOT NULL, 
	euribor3m DECIMAL NOT NULL, 
	nr_employed DECIMAL NOT NULL, 
	y BOOLEAN NOT NULL
);

I load the data into the table using the COPY command. I can use the same IAM role I created earlier (RedshiftML) because I am using the same S3 bucket to import and export the data.

COPY direct_marketing 
FROM 's3://my-bucket/direct_marketing/bank-additional-full.csv' 
DELIMITER ',' IGNOREHEADER 1
IAM_ROLE 'arn:aws:iam::123412341234:role/RedshiftML'
REGION 'us-east-1';

Now, I create the model straight form the SQL interface using the new CREATE MODEL statement:

CREATE MODEL direct_marketing
FROM direct_marketing
TARGET y
FUNCTION predict_direct_marketing
IAM_ROLE 'arn:aws:iam::123412341234:role/RedshiftML'
SETTINGS (
  S3_BUCKET 'my-bucket'
);

In this SQL command, I specify the parameters required to create the model:

  • FROM – I select all the rows in the direct_marketing table, but I can replace the name of the table with a nested query (see example below).
  • TARGET – This is the column that I want to predict (in this case, y).
  • FUNCTION – The name of the SQL function to make predictions.
  • IAM_ROLE – The IAM role assumed by Amazon Redshift and SageMaker to create, train, and deploy the model.
  • S3_BUCKET – The S3 bucket where the training data is temporarily stored, and where model artifacts are stored if you choose to retain a copy of them.

Here I am using a simple syntax for the CREATE MODEL statement. For more advanced users, other options are available, such as:

  • MODEL_TYPE – To use a specific model type for training, such as XGBoost or multilayer perceptron (MLP). If I don’t specify this parameter, SageMaker Autopilot selects the appropriate model class to use.
  • PROBLEM_TYPE – To define the type of problem to solve: regression, binary classification, or multiclass classification. If I don’t specify this parameter, the problem type is discovered during training, based on my data.
  • OBJECTIVE – The objective metric used to measure the quality of the model. This metric is optimized during training to provide the best estimate from data. If I don’t specify a metric, the default behavior is to use mean squared error (MSE) for regression, the F1 score for binary classification, and accuracy for multiclass classification. Other available options are F1Macro (to apply F1 scoring to multiclass classification) and area under the curve (AUC). More information on objective metrics is available in the SageMaker documentation.

Depending on the complexity of the model and the amount of data, it can take some time for the model to be available. I use the SHOW MODEL command to see when it is available:

SHOW MODEL direct_marketing

When I execute this command using the query editor in the console, I get the following output:

Console screenshot.

As expected, the model is currently in the TRAINING state.

When I created this model, I selected all the columns in the table as input parameters. I wonder what happens if I create a model that uses fewer input parameters? I am in the cloud and I am not slowed down by limited resources, so I create another model using a subset of the columns in the table:

CREATE MODEL simple_direct_marketing
FROM (
        SELECT age, job, marital, education, housing, contact, month, day_of_week, y
 	  FROM direct_marketing
)
TARGET y
FUNCTION predict_simple_direct_marketing
IAM_ROLE 'arn:aws:iam::123412341234:role/RedshiftML'
SETTINGS (
  S3_BUCKET 'my-bucket'
);

After some time, my first model is ready, and I get this output from SHOW MODEL. The actual output in the console is in multiple pages, I merged the results here to make it easier to follow:

Console screenshot.

From the output, I see that the model has been correctly recognized as BinaryClassification, and F1 has been selected as the objective. The F1 score is a metrics that considers both precision and recall. It returns a value between 1 (perfect precision and recall) and 0 (lowest possible score). The final score for the model (validation:f1) is 0.79. In this table I also find the name of the SQL function (predict_direct_marketing) that has been created for the model, its parameters and their types, and an estimation of the training costs.

When the second model is ready, I compare the F1 scores. The F1 score of the second model is lower (0.66) than the first one. However, with fewer parameters the SQL function is easier to apply to new data. As is often the case with machine learning, I have to find the right balance between complexity and usability.

Using Redshift ML to Make Predictions
Now that the two models are ready, I can make predictions using SQL functions. Using the first model, I check how many false positives (wrong positive predictions) and false negatives (wrong negative predictions) I get when applying the model on the same data used for training:

SELECT predict_direct_marketing, y, COUNT(*)
  FROM (SELECT predict_direct_marketing(
                   age, job, marital, education, credit_default, housing,
                   loan, contact, month, day_of_week, duration, campaign,
                   pdays, previous, poutcome, emp_var_rate, cons_price_idx,
                   cons_conf_idx, euribor3m, nr_employed), y
          FROM direct_marketing)
 GROUP BY predict_direct_marketing, y;

The result of the query shows that the model is better at predicting negative rather than positive outcomes. In fact, even if the number of true negatives is much bigger than true positives, there are much more false positives than false negatives. I added some comments in green and red to the following screenshot to clarify the meaning of the results.

Console screenshot.

Using the second model, I see how many customers might be interested in a marketing campaign. Ideally, I should run this query on new customer data, not the same data I used for training.

SELECT COUNT(*)
  FROM direct_marketing
 WHERE predict_simple_direct_marketing(
           age, job, marital, education, housing,
           contact, month, day_of_week) = true;

Wow, looking at the results, there are more than 7,000 prospects!

Console screenshot.

Availability and Pricing
Redshift ML is available today in the following AWS Regions: US East (Ohio), US East (N Virginia), US West (Oregon), US West (San Francisco), Canada (Central), Europe (Frankfurt), Europe (Ireland), Europe (Paris), Europe (Stockholm), Asia Pacific (Hong Kong) Asia Pacific (Tokyo), Asia Pacific (Singapore), Asia Pacific (Sydney), and South America (São Paulo). For more information, see the AWS Regional Services list.

With Redshift ML, you pay only for what you use. When training a new model, you pay for the Amazon SageMaker Autopilot and S3 resources used by Redshift ML. When making predictions, there is no additional cost for models imported into your Amazon Redshift cluster, as in the example I used in this post.

Redshift ML also allows you to use existing Amazon SageMaker endpoints for inference. In that case, the usual SageMaker pricing for real-time inference applies. Here you can find a few tips on how to control your costs with Redshift ML.

To learn more, you can see this blog post from when Redshift ML was announced in preview and the documentation.

Start getting better insights from your data with Redshift ML.

Danilo

Getting Started with Amazon ECS Anywhere – Now Generally Available

Since Amazon Elastic Container Service (Amazon ECS) was launched in 2014, AWS has released other options for running Amazon ECS tasks outside of an AWS Region such as AWS Wavelength, an offering for mobile edge devices or AWS Outposts, a service that extends to customers’ environments using hardware owned and fully managed by AWS.

But some customers have applications that need to run on premises due to regulatory, latency, and data residency requirements or the desire to leverage existing infrastructure investments. In these cases, customers have to install, operate, and manage separate container orchestration software and need to use disparate tooling across their AWS and on-premises environments. Customers asked us for a way to manage their on-premises containers without this added complexity and cost.

Following Jeff’s preannouncement last year, I am happy to announce the general availability of Amazon ECS Anywhere, a new capability in Amazon ECS that enables customers to easily run and manage container-based applications on premises, including virtual machines (VMs), bare metal servers, and other customer-managed infrastructure.

With ECS Anywhere, you can run and manage containers on any customer-managed infrastructure using the same cloud-based, fully managed, and highly scalable container orchestration service you use in AWS today. You no longer need to prepare, run, update, or maintain your own container orchestrators on premises, making it easier to manage your hybrid environment and leverage the cloud for your infrastructure by installing simple agents.

ECS Anywhere provides consistent tooling and APIs for all container-based applications and the same Amazon ECS experience for cluster management, workload scheduling, and monitoring both in the cloud and on customer-managed infrastructure. You can now enjoy the benefits of reduced cost and complexity by running container workloads such as data processing at edge locations on your own hardware maintaining reduced latency, and in the cloud using a single, consistent container orchestrator.

Amazon ECS Anywhere – Getting Started
To get started with ECS Anywhere, register your on-premises servers or VMs (also referred to as External instances) in the ECS cluster. The AWS Systems Manager Agent, Amazon ECS container agent, and Docker must be installed on these external instances. Your external instances require an IAM role that permits them to communicate with AWS APIs. For more information, see Required IAM permissions in the ECS Developer Guide.

To create a cluster for ECS Anywhere, on the Create Cluster page in the ECS console, choose the Networking Only template. This option is for use with either AWS Fargate or external instance capacity. We recommend that you use the AWS Region that is geographically closest to the on-premises servers you want to register.

This creates an empty cluster to register external instances. On the ECS Instances tab, choose Register External Instances to get activation codes and an installation script.

On the Step 1: External instances activation details page, in Activation key duration (in days), enter the number of days the activation key should remain active. The activation key can be used for up to 1,000 activations. In Number of instances, enter the number of external instances you want to register to your cluster. In Instance role, enter the IAM role to associate with your external instances.

Choose Next step to get a registration command.

On the Step 2: Register external instances page, copy the registration command. Run this command on the external instances you want to register to your cluster.

Paste the registration command in your on-premise servers or VMs. Each external instance is then registered as an AWS Systems Manager managed instance, which is then registered to your Amazon ECS clusters.

Both x86_64 and ARM64 CPU architectures are supported. The following is a list of supported operating systems:

  • CentOS 7, CentOS 8
  • RHEL 7
  • Fedora 32, Fedora 33
  • openSUSE Tumbleweed
  • Ubuntu 18, Ubuntu 20
  • Debian 9, Debian 10
  • SUSE Enterprise Server 15

When the ECS agent has started and completed the registration, your external instance will appear on the ECS Instances tab.

You can also add your external instances to the existing cluster. In this case, you can see both Amazon EC2 instances and external instances are prefixed with mi-* together.

Now that the external instances are registered to your cluster, you are ready to create a task definition. Amazon ECS provides the requiresCompatibilities parameter to validate that the task definition is compatible with the the EXTERNAL launch type when creating your service or running your standalone task. The following is an example task definition:

{
	"requiresCompatibilities": [
		"EXTERNAL"
	],
	"containerDefinitions": [{
		"name": "nginx",
		"image": "public.ecr.aws/nginx/nginx:latest",
		"memory": 256,
		"cpu": 256,
		"essential": true,
		"portMappings": [{
			"containerPort": 80,
			"hostPort": 8080,
			"protocol": "tcp"
		}]
	}],
	"networkMode": "bridge",
	"family": "nginx"
}

You can create a task definition in the ECS console. In Task Definition, choose Create new task definition. For Launch type, choose EXTERNAL and then configure the task and container definitions to use external instances.

On the Tasks tab, choose Run new task. On the Run Task page, for Cluster, choose the cluster to run your task definition on. In Number of tasks, enter the number of copies of that task to run with the EXTERNAL launch type.

Or, on the Services tab, choose Create. Configure service lets you specify copies of your task definition to run and maintain in a cluster. To run your task in the registered external instance, for Launch type, choose EXTERNAL. When you choose this launch type, load balancers, tag propagation, and service discovery integration are not supported.

The tasks you run on your external instances must use the bridge, host, or none network modes. The awsvpc network mode isn’t supported. For more information about each network mode, see Choosing a network mode in the Amazon ECS Best Practices Guide.

Now you can run your tasks and associate a mix of EXTERNAL, FARGATE, and EC2 capacity provider types with the same ECS service and specify how you would like your tasks to be split across them.

Things to Know
Here are a couple of things to keep in mind:

Connectivity: In the event of loss of network connectivity between the ECS agent running on the on-premises servers and the ECS control plane in the AWS Region, existing ECS tasks will continue to run as usual. If tasks still have connectivity with other AWS services, they will continue to communicate with them for as long as the task role credentials are active. If a task launched as part of a service crashes or exits on its own, ECS will be unable to replace it until connectivity is restored.

Monitoring: With ECS Anywhere, you can get Amazon CloudWatch metrics for your clusters and services, use the CloudWatch Logs driver (awslogs) to get your containers’ logs, and access the ECS CloudWatch event stream to monitor your clusters’ events.

Networking: ECS external instances are optimized for running applications that generate outbound traffic or process data. If your application requires inbound traffic, such as a web service, you will need to employ a workaround to place these workloads behind a load balancer until the feature is supported natively. For more information, see Networking with ECS Anywhere.

Data Security: To help customers maintain data security, ECS Anywhere only sends back to the AWS Region metadata related to the state of the tasks or the state of the containers (whether they are running or not running, performance counters, and so on). This communication is authenticated and encrypted in transit through Transport Layer Security (TLS).

ECS Anywhere Partners
ECS Anywhere integrates with a variety of ECS Anywhere partners to help customers take advantage of ECS Anywhere and provide additional functionality for the feature. Here are some of the blog posts that our partners wrote to share their experiences and offerings. (I am updating this article with links as they are published.)

Now Available
Amazon ECS Anywhere is now available in all commercial regions except AWS China Regions where ECS is supported. With ECS Anywhere, there are no minimum fees or upfront commitments. You pay per instance hour for each managed ECS Anywhere task. ECS Anywhere free tier includes 2200 instance hours per month for six months per account for all regions. For more information, see the pricing page.

To learn more, see ECS Anywhere in the Amazon ECS Developer Guide. Please send feedback to the AWS forum for Amazon ECS or through your usual AWS Support contacts.

Get started with the Amazon ECS Anywhere today.

Channy

Update. Watch a cool demo of ECS Anywhere to operate a Raspberry Pi cluster at home office and read its deep-dive blog post.