Category: <span>AWS re:Invent</span>

Introducing Amazon GameLift Anywhere – Run Your Game Servers on Your Own Infrastructure

In 2016, we launched Amazon GameLift, a dedicated hosting solution that securely deploys and automatically scales fleets of session-based multiplayer game servers to meet worldwide player demand.

With Amazon GameLift, you can create and upload a game server build once, replicate, and then deploy across multiple AWS Regions and AWS Local Zones to reach your players with low-latency experiences across the world. GameLift also includes standalone features for low-cost game fleets with GameLift FleetIQ and player matchmaking with GameLift FlexMatch.

Game developers asked us to reduce the wait time to deploy a candidate server build to the cloud each time they needed to test and iterate their game during the development phase. In addition, our customers told us that they often have ongoing bare-metal contracts or on-premises game servers and want the flexibility to use their existing infrastructure with cloud servers.

Today we are announcing the general availability of Amazon GameLift Anywhere, which decouples game session management from the underlying compute resources. With this new release, you can now register and deploy any hardware, including your own local workstations, under a logical construct called an Anywhere Fleet.

Because your local hardware can now be a GameLift-managed server, you can iterate on the server build in your familiar local desktop environment, and any server error can materialize in seconds. You can also set breakpoints in your environment’s debugger, thereby eliminating trial and error and further speeding up the iteration process.

Here are the major benefits for game developers to use GameLift Anywhere.

  • Faster game development – Instantly test and iterate on your local workstation while still leveraging GameLift FlexMatch and Queue services.
  • Hybrid server management – Deploy, operate, and scale dedicated game servers hosted in the cloud or on-premises, all from a single location.
  • Streamline server operations – Reduce cost and operational complexity by unifying server infrastructure under a single game server orchestration layer.

During the beta period of GameLift Anywhere, lots of customers gave feedback. For example, Nitro Games has been an Amazon GameLift customer since 2020 and have used the service for player matchmaking and managing dedicated game servers in the cloud. Daniel Liljeqvist, Senior DevOps Engineer at Nitro Games said “With GameLift Anywhere we can easily debug a game server on our local machine, saving us time and making the feedback loop much shorter when we are developing new games and features.”

GameLift Anywhere resources such as locations, fleets, and compute are managed through the same highly secure AWS API endpoints as all AWS services. This also applies to generating the authentication tokens for game server processes that are only valid for a limited amount of time for additional security. You can leverage AWS Identity and Access Management (AWS IAM) roles and policies to fully manage access to all the GameLift Anywhere endpoints.

Getting Started with GameLift Anywhere
Before creating your GameLift fleet in your local hardware, you can create custom locations to run your game builds or scripts. Choose Locations in the left navigation pane of the GameLift console and select Create location.

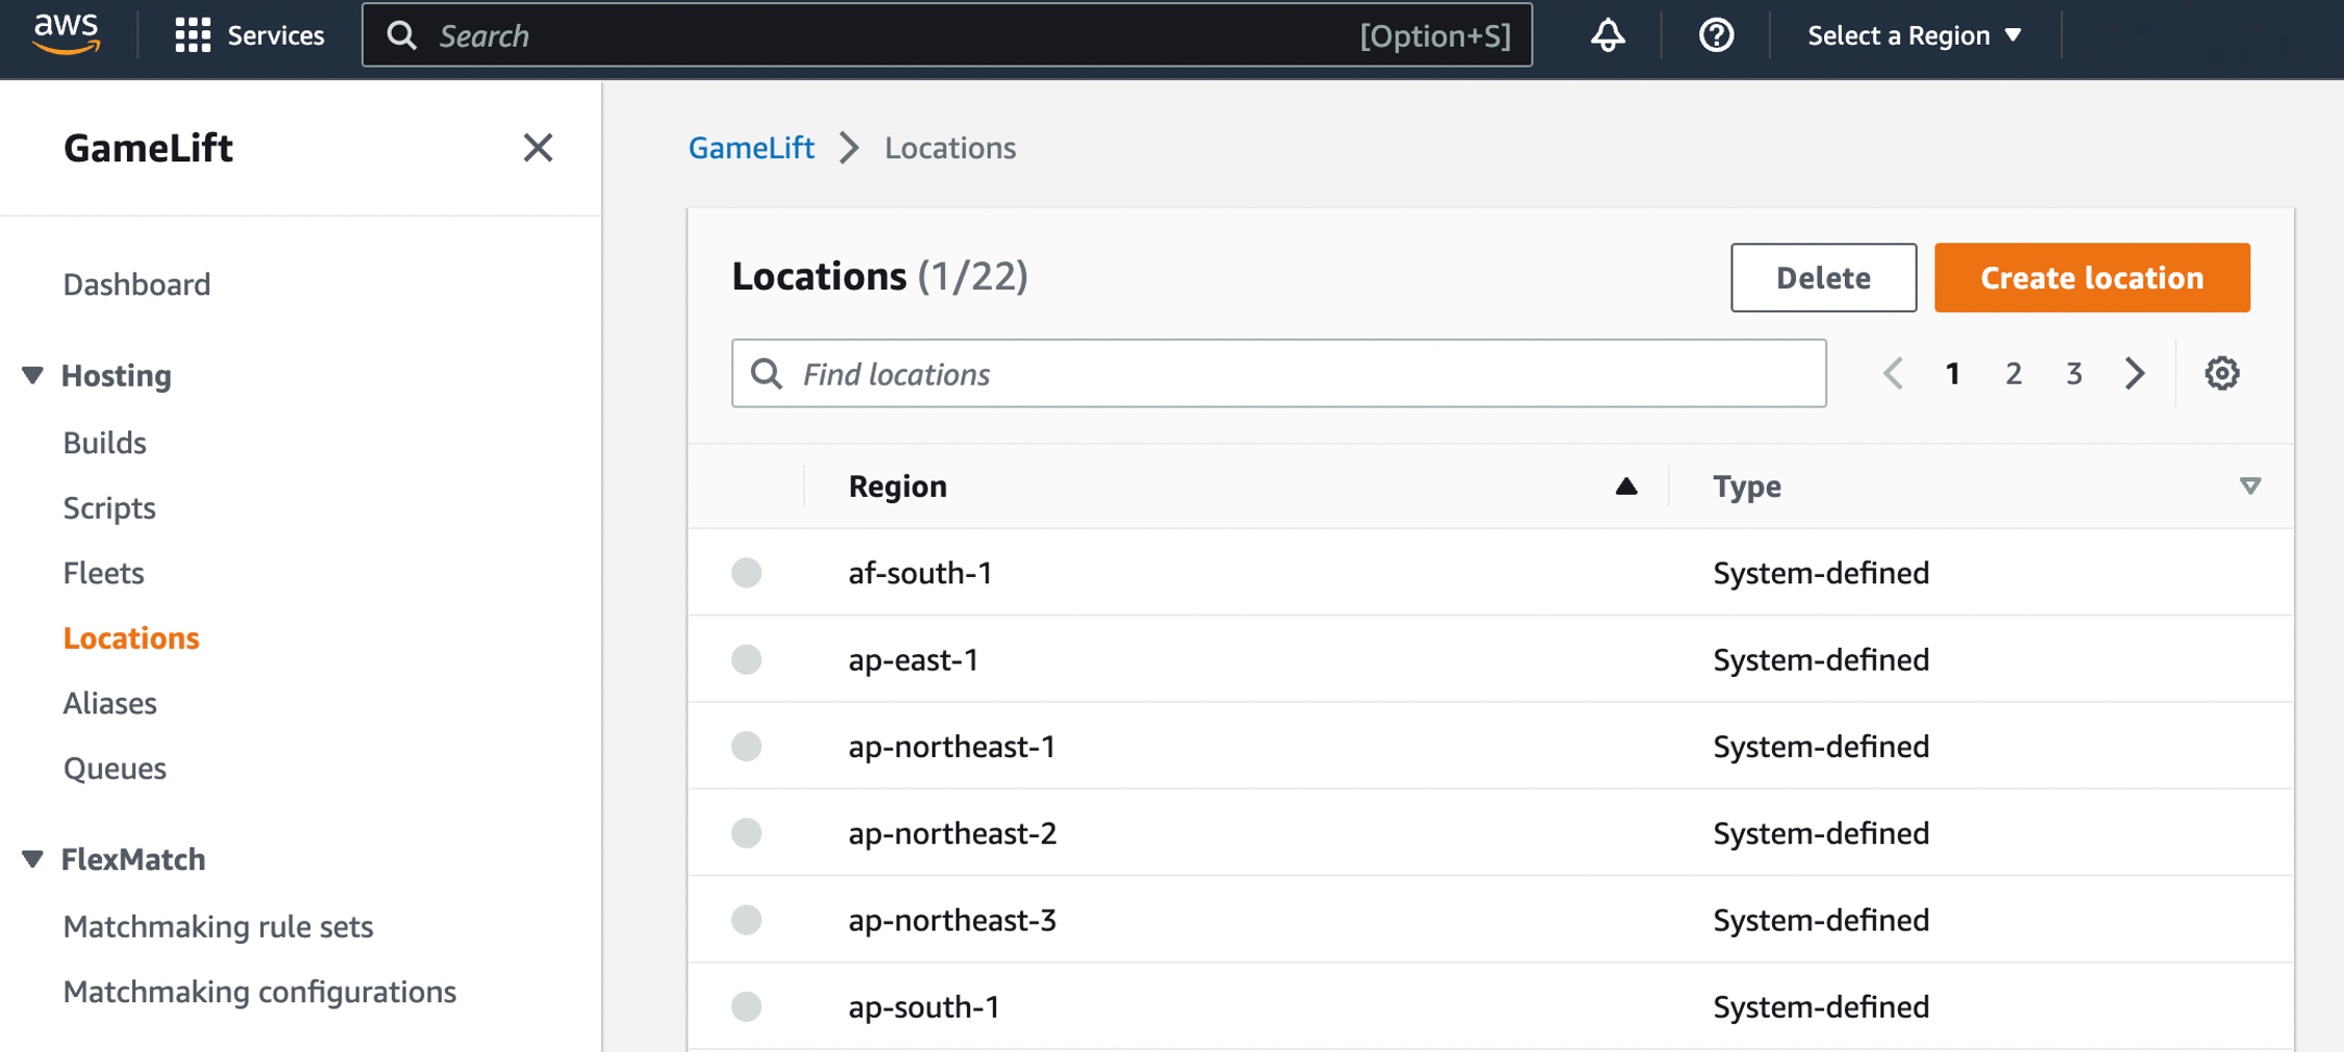
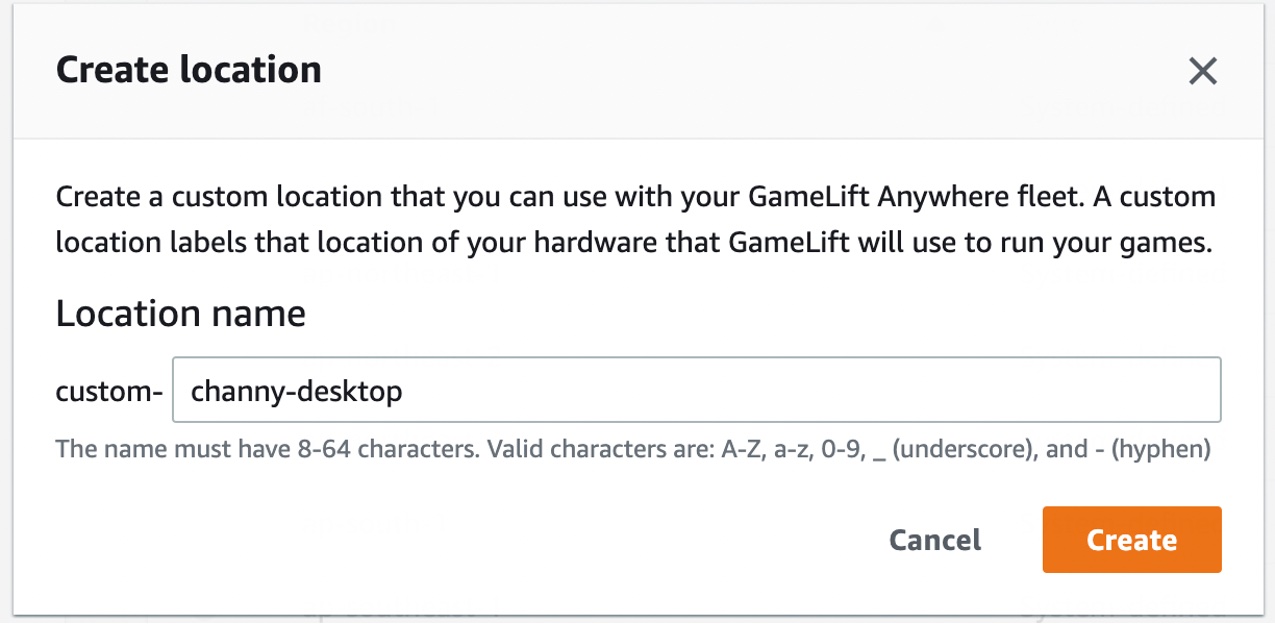
You can create a custom location of your hardware that you can use with your GameLift Anywhere fleet to test your games.

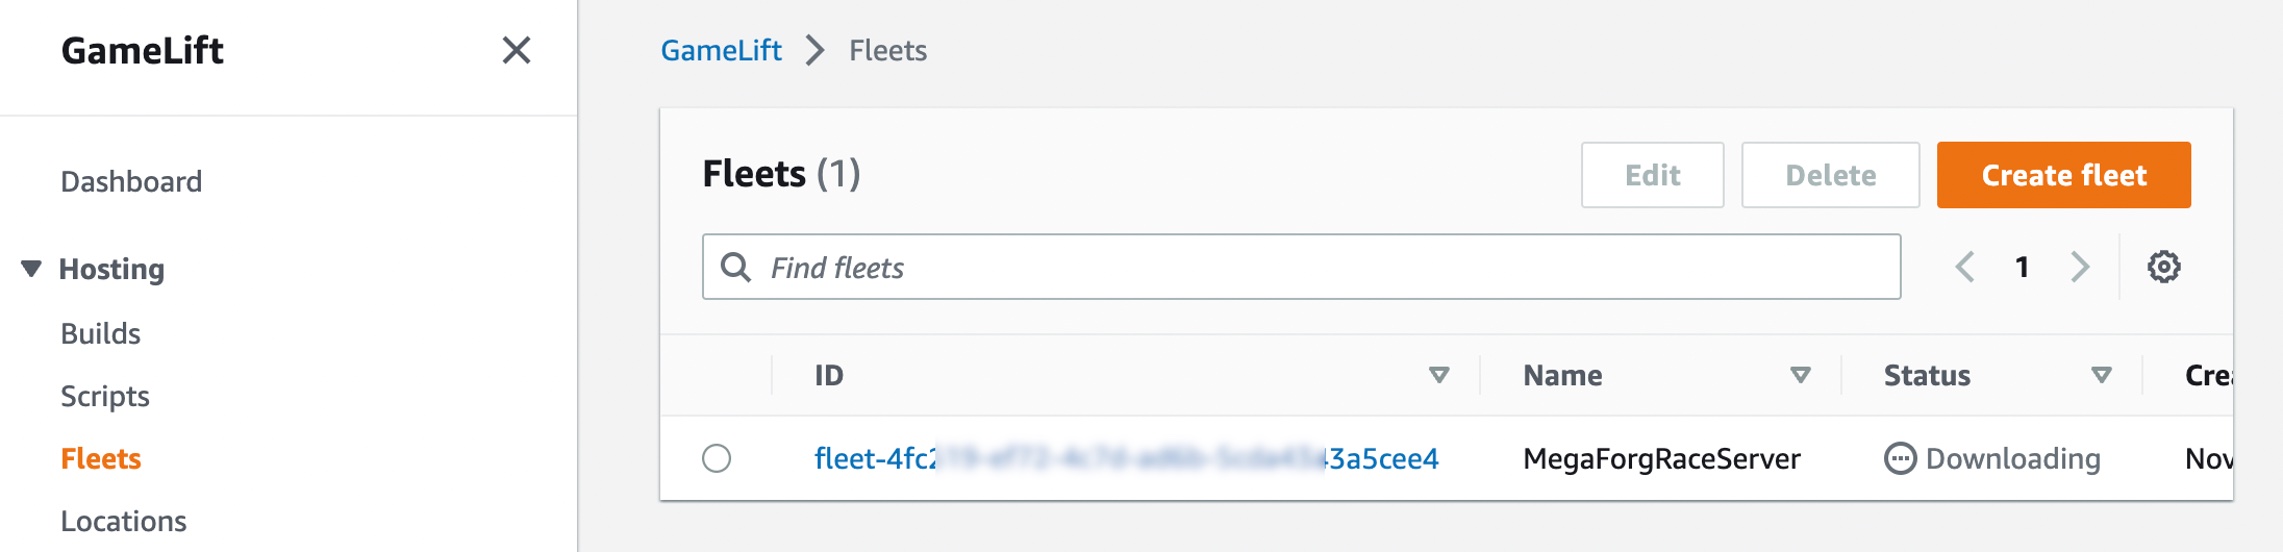
Choose Fleets from the left navigation pane, then choose Create fleet to add your GameLift Anywhere fleet in the desired location.

Choose Anywhere on the Choose compute type step.

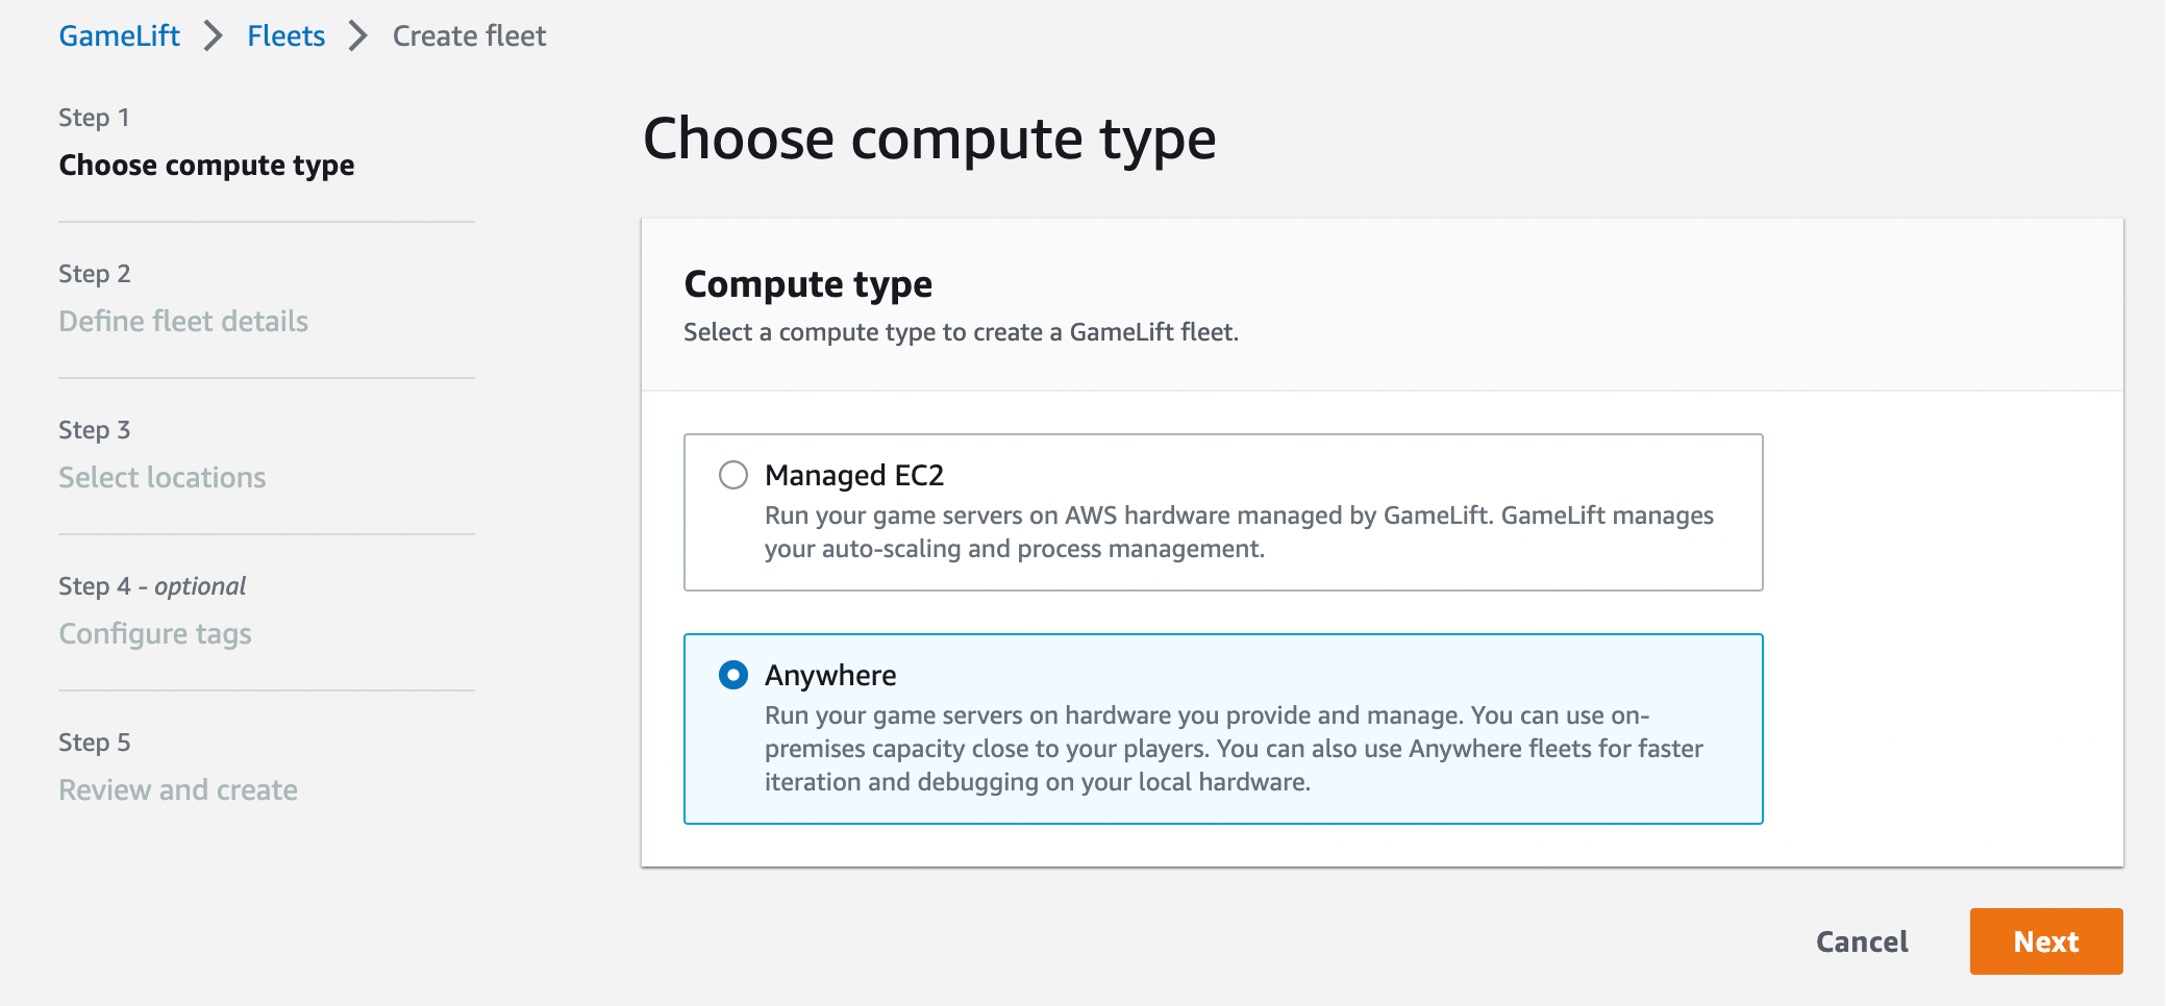
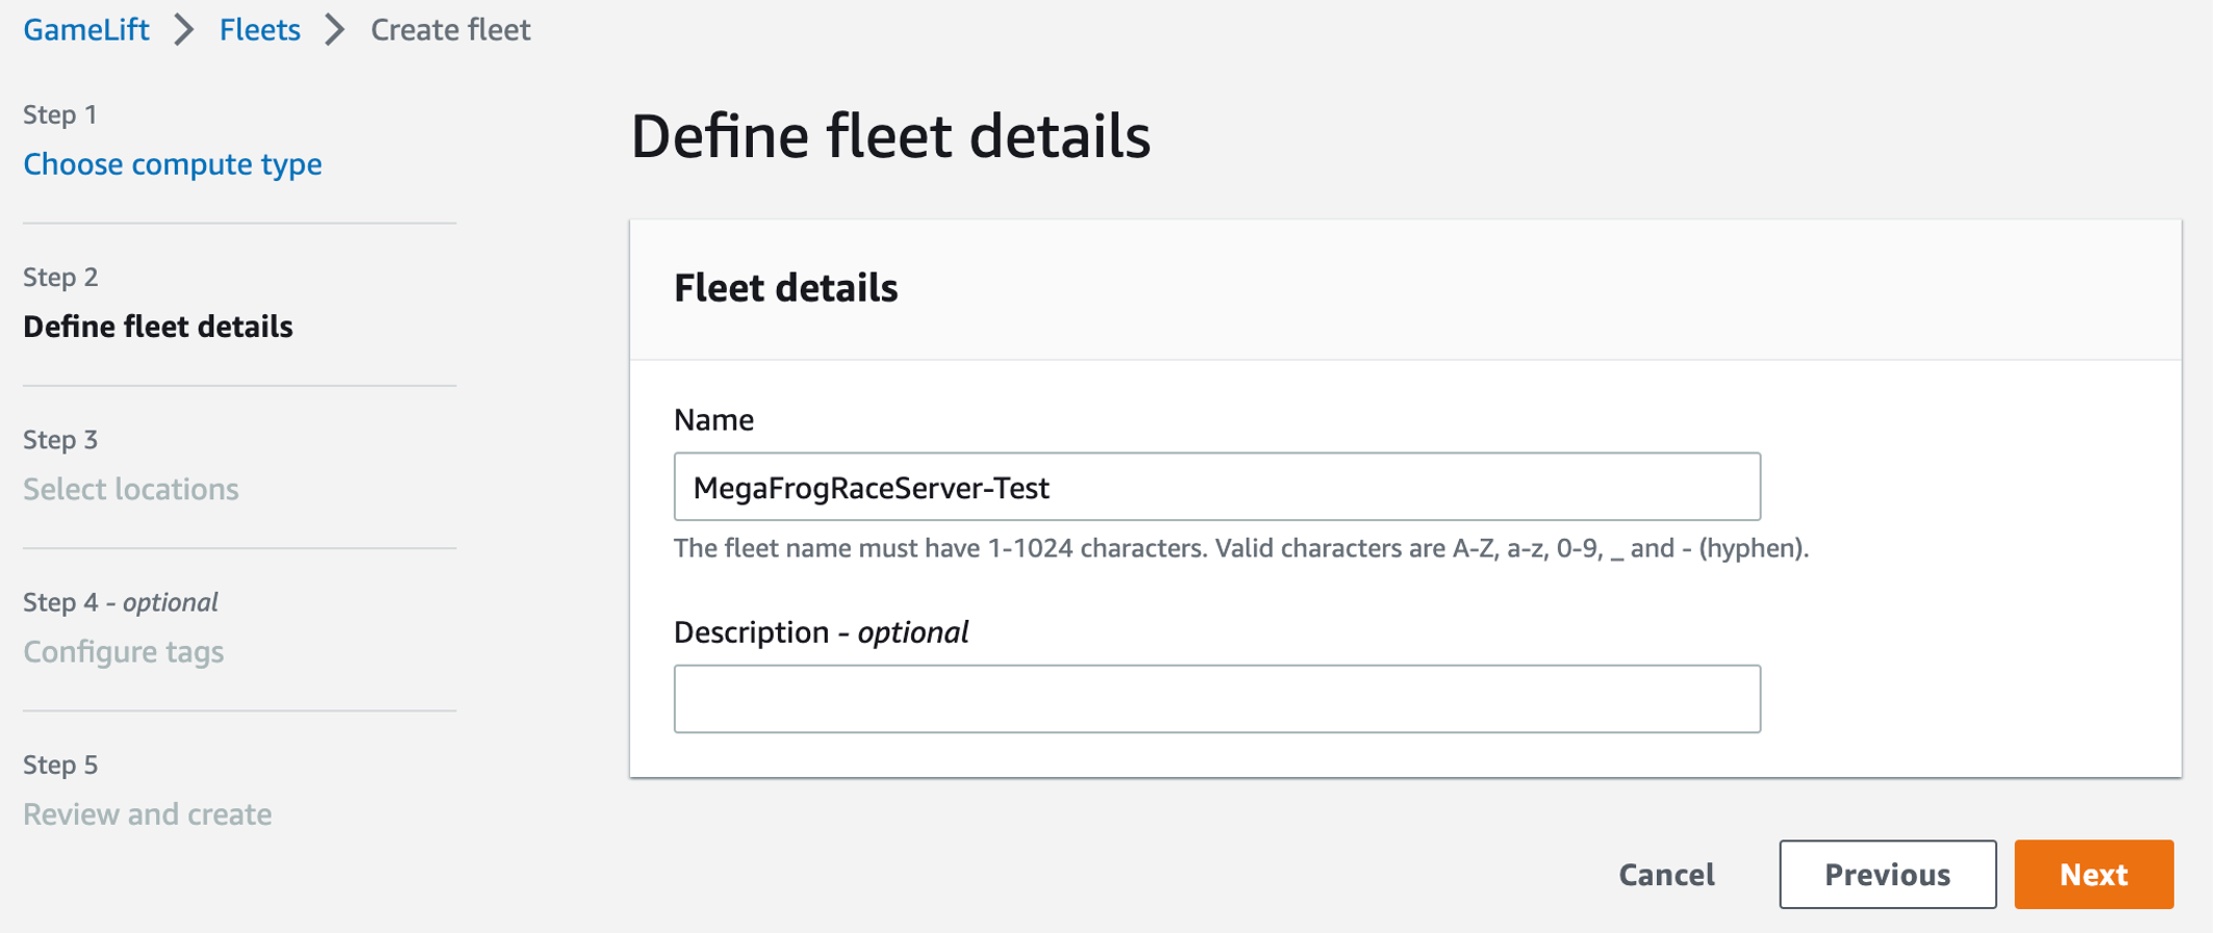
Define your fleet details, such as a fleet name and optional items. For more information on settings, see Create a new GameLift fleet in the AWS documentation.

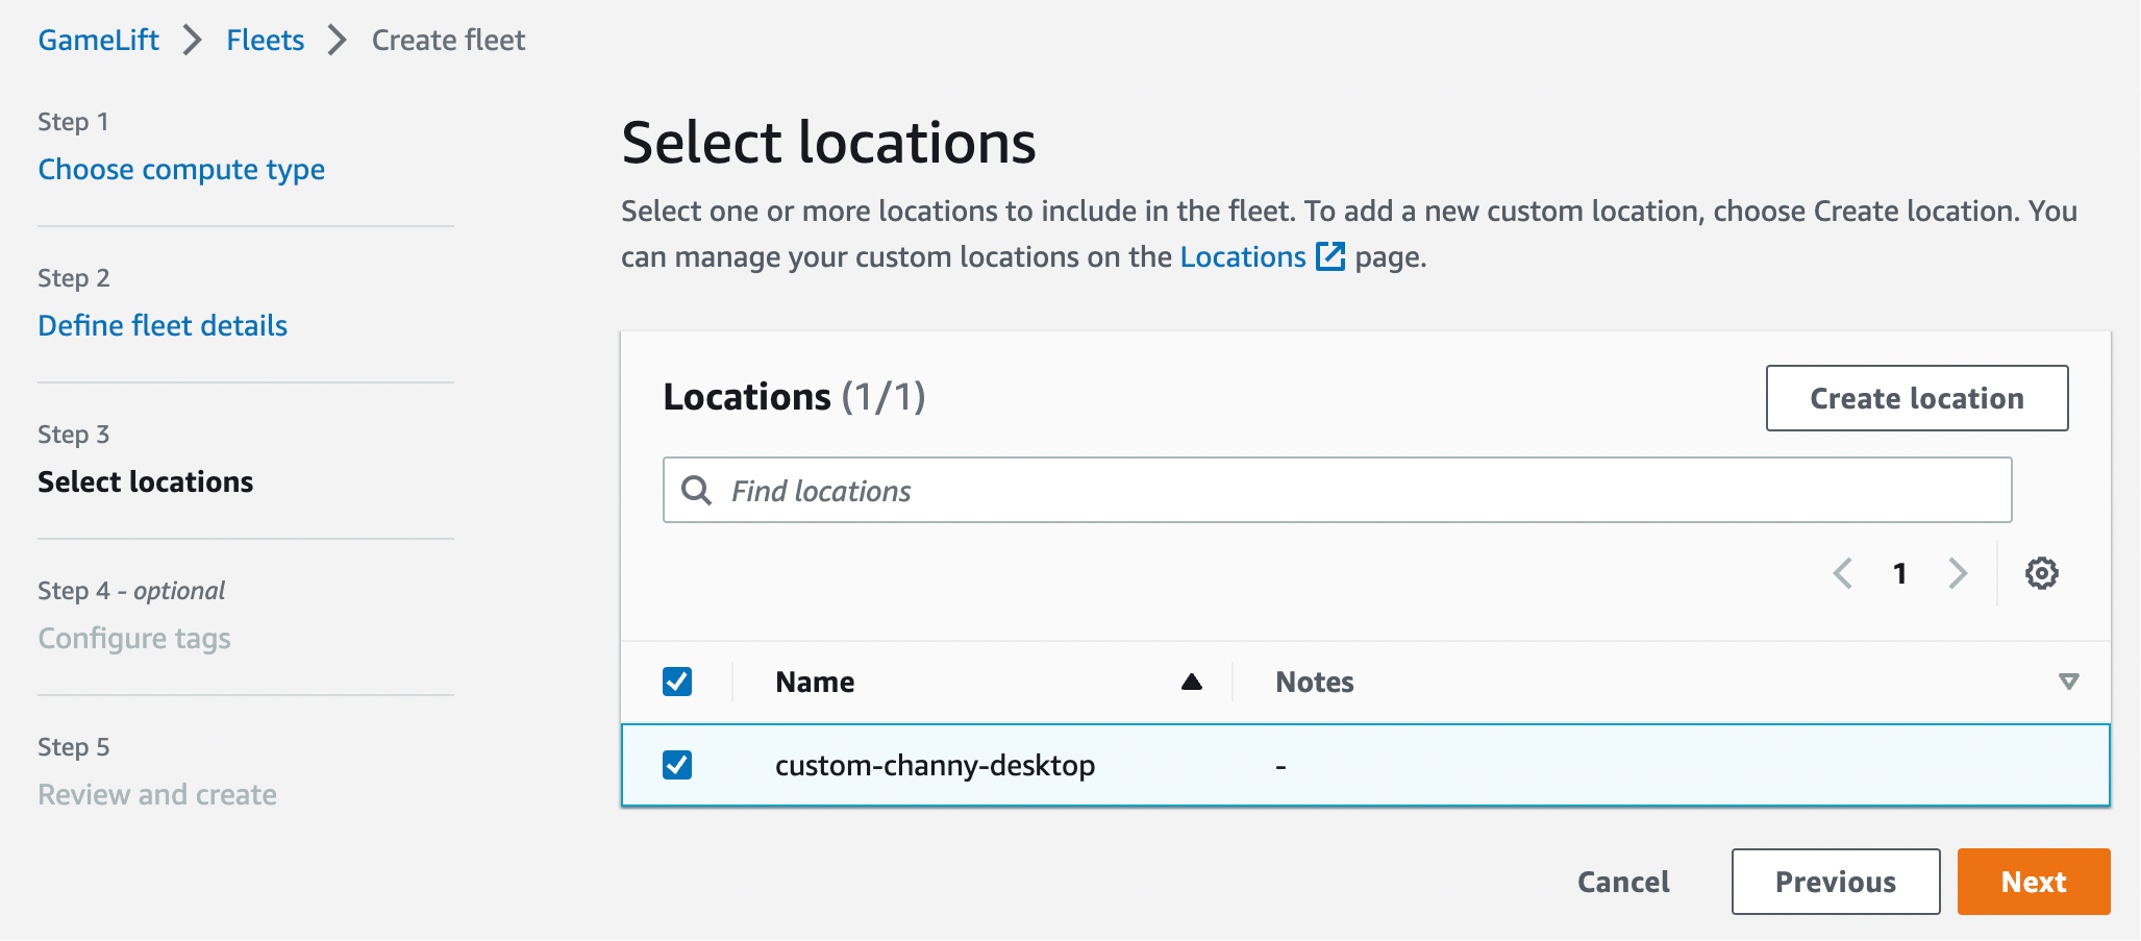
On the Select locations step, select the custom location that you created. The home AWS Region is automatically selected as the Region you are creating the fleet in. You can use the home Region to access and use your resources.

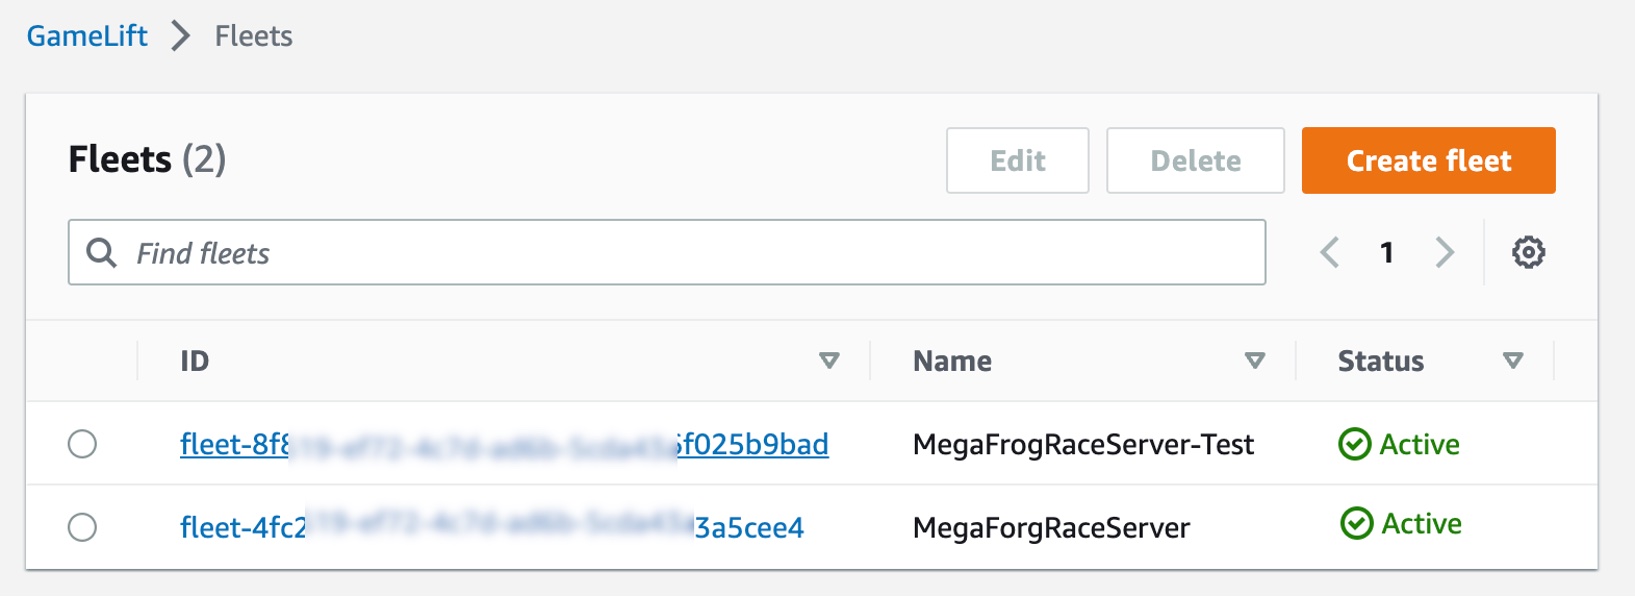
After completing the fleet creation steps to create your Anywhere fleet, you can see active fleets in both the managed EC2 instances and the Anywhere location. You also can integrate remote on-premises hardware by adding more GameLift Anywhere locations, so you can manage your game sessions from one place. To learn more, see Create a new GameLift fleet in the AWS documentation.

You can register your laptop as a compute resource in the fleet that you created. Use the fleet-id created in the previous step and add a compute-name and your laptop’s ip-address.

$ aws gamelift register-compute 
    --compute-name ChannyDevLaptop 
    --fleet-id fleet-12345678-abcdefghi 
    --ip-address 10.1.2.3

Now, you can start a debug session of your game server by retrieving the authorization token for your laptop in the fleet that you created.

$ aws gamelift get-compute-auth-token 
    --fleet-id fleet-12345678-abcdefghi 
    --compute-name ChannyDevLaptop

To run a debug instance of your game server executable, your game server must call InitSDK(). After the process is ready to host a game session, the game server calls ProcessReady(). To learn more, see Integrating games with custom game servers and Testing your integration in the AWS documentation.

Now Available
Amazon GameLift Anywhere is available in all Regions where Amazon GameLift is available.  GameLift offers a step-by-step developer guide, API reference guide, and GameLift SDKs. You can also see for yourself how easy it is to test Amazon GameLift using our sample game to get started.

Give it a try, and please send feedback to AWS re:Post for Amazon GameLift or through your usual AWS support contacts.

Channy

Announcing Amazon CodeCatalyst, a Unified Software Development Service (Preview)

Today, we announced the preview release of Amazon CodeCatalyst. A unified software development and delivery service, Amazon CodeCatalyst enables software development teams to quickly and easily plan, develop, collaborate on, build, and deliver applications on AWS, reducing friction throughout the development lifecycle.

In my time as a developer the biggest excitement—besides shipping software to users—was the start of a new project, or being invited to join a project. Both came with the anticipation of building something cool, cutting new code—seeing an idea come to life. However, starting out was sometimes a slow process. My team or I would need to update our local development environments—or entirely new machines—with tools, libraries, and programming frameworks. We had to create source code repositories and set up other shared tools such as Jira, Confluence, or Jenkins, configure build pipelines and other automation workflows, create test environments, and so on. Day-to-day maintenance of development and build environments consumed valuable team cycles and energy. Collaboration between the team took effort, too, because tools to share information and have a single source of truth were not available. Context switching between projects and dealing with conflicting dependencies in those projects, e.g., Python 3.6 for project X and Python 2.7 for project Y—especially when we had only a single machine to work on—further increased the burden.

It doesn’t seem to have gotten any better! These days, when talking to developers about their experiences, I often hear them express that they feel modern development has become even more complicated. This is due to having to select and configure a wider collection of modern frameworks and libraries, tools, cloud services, continuous integration and delivery pipelines, and many other choices that all need to work together to deliver the application experience. What was once manageable by one developer on one machine is now a sprawling, dynamic, complex net of decisions and tradeoffs, made even more challenging by the need to coordinate all this across dispersed teams.

Enter Amazon CodeCatalyst
I’ve spent some time talking with the team behind Amazon CodeCatalyst about their sources of inspiration and goals. Taking feedback from both new and experienced developers and service teams here at AWS, they examined the challenges typically experienced by teams and individual developers when building software for the cloud. Having gathered and reviewed this feedback, they set about creating a unified tool that smooths out the rough edges that needlessly slow down software delivery, and they added features to make it easier for teams to work together and collaborate. Features in Amazon CodeCatalyst to address these challenges include:

  • Blueprints that set up the project’s resources—not just scaffolding for new projects, but also the resources needed to support software delivery and deployment.
  • On-demand cloud-based Dev Environments, to make it easy to replicate consistent development environments for you or your teams.
  • Issue management, enabling tracing of changes across commits, pull requests, and deployments.
  • Automated build and release (CI/CD) pipelines using flexible, managed build infrastructure.
  • Dashboards to surface a feed of project activities such as commits, pull requests, and test reporting.
  • The ability to invite others to collaborate on a project with just an email.
  • Unified search, making it easy to find what you’re looking for across users, issues, code and other project resources.

There’s a lot in Amazon CodeCatalyst that I don’t have space to cover in this post, so I’m going to briefly cover some specific features, like blueprints, Dev Environments, and project collaboration. Other upcoming posts will cover additional features.

Project Blueprints
When I first heard about blueprints, they sounded like a feature to scaffold some initial code for a project. However, they’re much more! Parameterized application blueprints enable you to set up shared project resources to support the application development lifecycle and team collaboration in minutes—not just initial starter code for an application. The resources that a blueprint creates for a project include a source code repository, complete with initial sample code and AWS service configuration for popular application patterns, which follow AWS best practices by default. If you prefer, an external Git repository such as GitHub may be used instead. The blueprint can also add an issue tracker, but external trackers such as Jira can also be used. Then, the blueprint adds a build and release pipeline for CI/CD, which I’ll come to shortly, as well as other integrated tooling.

The project resources and integrated tools set up using blueprints, including the CI/CD pipeline and the AWS resources to host your application, make it so that you can press “deploy” and get sample code running in a few minutes, enabling you to jump right in and start working on your specific business logic.

Project blueprints when starting a new project

At launch, customers can choose from blueprints with Typescript, Python, Java, .NET, Javascript for languages and React, Angular, and Vue frameworks, with more to come. And you don’t need to start with a blueprint. You can build projects with workflows that run on anything that works with Linux and Windows operating systems.

Cloud-Based Dev Environments
Development teams can often run into a problem of “environment drift” where one team member has a slightly different version of a toolchain or library compared to everyone else or the test environments. This can introduce subtle bugs that might go unnoticed for some time. Dev Environment specifications, and the other shared resources, that blueprints create help ensure there’s no unnecessary variance, and everyone on the team gets the same setup to provide a consistent, repeatable experience between developers.

Amazon CodeCatalyst uses a devfile to define the configuration of an on-demand, cloud-based Dev Environment, which currently supports four resizable instance size options with 2, 4, 8, or 16 vCPUs. The devfile defines and configures all of the resources needed to code, test, and debug for a given project, minimizing the time the development team members need to spend on creating and maintaining their local development environments. Devfiles, which are added to the source code repository by the selected blueprint can also be modified if required. With Dev Environments, context switching between projects incurs less overhead—with one click, you can simply switch to a different environment, and you’re ready to start working. This means you’re easily able to work concurrently on multiple codebases without reconfiguring. Being on-demand, Dev Environments can also be paused, restarted, or deleted as needed.

Below is an example of a devfile that bootstraps a Dev Environment.

schemaVersion: 2.0.0
metadata:
  name: aws-universal
  version: 1.0.1
  displayName: AWS Universal
  description: Stack with AWS Universal Tooling
  tags:
    - aws
    - a12
  projectType: aws
commands:
  - id: npm_install
    exec:
      component: aws-runtime
      commandLine: "npm install"
      workingDir: /projects/spa-app
events:
  postStart:
    - npm_install
components:
  - name: aws-runtime
    container:
      image: public.ecr.aws/aws-mde/universal-image:latest
      mountSources: true
      volumeMounts:
        - name: docker-store
          path: /var/lib/docker
  - name: docker-store
    volume:
      size: 16Gi

Developers working in cloud-based Dev Environments provisioned by Amazon CodeCatalyst can use AWS Cloud9 as their IDE. However, they can just as easily work with Amazon CodeCatalyst from other IDEs on their local machines, such as JetBrains IntelliJ IDEA Ultimate, PyCharm Pro, GoLand, and Visual Studio Code. Developers can also create Dev Environments from within their IDE, such as Visual Studio Code or for JetBrains using the JetBrains Gateway app. Below, JetBrains IntelliJ is being used.

Editing an application source file in JetBrains IntelliJ

Build and Release Pipelines
The build and release pipeline created by the blueprint run on flexible, managed infrastructure. The pipelines can use on-demand compute or preprovisioned builds, including a choice of machine sizes, and you can bring your own container environments. You can incorporate build actions that are built in or provided by partners (e.g., Mend, which provides a software composition analysis build action), and you can also incorporate GitHub Actions to compose fully automated pipelines. Pipelines are configurable using either a visual editor or YAML files.

Build and release pipelines enable deployment to popular AWS services, including Amazon Elastic Container Service (Amazon ECS), AWS Lambda, and Amazon Elastic Compute Cloud (Amazon EC2). Amazon CodeCatalyst makes it trivial to set up test and production environments and deploy using pipelines to one or many Regions or even multiple accounts for security.

Running automated workflow

Project Collaboration
As a unified software development service, Amazon CodeCatalyst not only makes it easier to get started building and delivering applications on AWS, it helps developers of all levels collaborate on projects through a single shared project space and source of truth. Developers can be invited to collaborate using just an email. On accepting the invitation, the developer sees the full project context and can begin work at once using the project’s Dev Environments—no need to spend time updating or reconfiguring their local machine with required tools, libraries, or other pre-requisites.

Existing members of an Amazon CodeCatalyst space, or new members using their email, can be invited to collaborate on a project:

Inviting new members to collaborate on a project

Each will receive an invitation email containing a link titled Accept Invitation, which when clicked, opens a browser tab to sign in. Once signed in, they can view all the projects in the Amazon CodeCatalyst space they’ve been invited to and can also quickly switch to other spaces in which they are the owner or to which they’ve been invited.

Projects I'm invited to collaborate on

From there, they can select a project and get an immediate overview of where things stand, for example, the status of recent workflows, any open pull requests, and available Dev Environments.

CodeCatalyst project summary

On the Issues board, team members can see which issues need to be worked on, select one, and get started.

Viewing issues

Being able to immediately see the context for the project, and have access to on-demand cloud-based Dev Environments, all help with being able to start contributing more quickly, eliminating setup delays.

Get Started with Amazon CodeCatalyst in the Free Tier Today!
Blueprints to scaffold not just application code but also shared project resources supporting the development and deployment of applications, issue tracking, invite-by-email collaboration, automated workflows, and more are all available today in the newly released preview of Amazon CodeCatalyst to help accelerate your cloud development and delivery efforts. Learn more in the Amazon CodeCatalyst User Guide. And, as I mentioned earlier, additional blogs posts and other supporting content are planned by the team to dive into the range of features in more detail, so be sure to look out for them!

Step Functions Distributed Map – A Serverless Solution for Large-Scale Parallel Data Processing

I am excited to announce the availability of a distributed map for AWS Step Functions. This flow extends support for orchestrating large-scale parallel workloads such as the on-demand processing of semi-structured data.

Step Function’s map state executes the same processing steps for multiple entries in a dataset. The existing map state is limited to 40 parallel iterations at a time. This limit makes it challenging to scale data processing workloads to process thousands of items (or even more) in parallel. In order to achieve higher parallel processing prior to today, you had to implement complex workarounds to the existing map state component.

The new distributed map state allows you to write Step Functions to coordinate large-scale parallel workloads within your serverless applications. You can now iterate over millions of objects such as logs, images, or .csv files stored in Amazon Simple Storage Service (Amazon S3). The new distributed map state can launch up to ten thousand parallel workflows to process data.

You can process data by composing any service API supported by Step Functions, but typically, you will invoke Lambda functions to process the data with code written in your favorite programming language.

Step Functions distributed map supports a maximum concurrency of up to 10,000 executions in parallel, which is well above the concurrency supported by many other AWS services. You can use the maximum concurrency feature of the distributed map to ensure that you do not exceed the concurrency of a downstream service. There are two factors to consider when working with other services. First, the maximum concurrency supported by the service for your account. Second, the burst and ramping rates, which determine how quickly you can achieve the maximum concurrency.

Let’s use Lambda as an example. Your functions’ concurrency is the number of instances that serve requests at a given time. The default maximum concurrency quota for Lambda is 1,000 per AWS Region. You can ask for an increase at any time. For an initial burst of traffic, your functions’ cumulative concurrency in a Region can reach an initial level of between 500 and 3000, which varies per Region. The burst concurrency quota applies to all your functions in the Region.

When using a distributed map, be sure to verify the quota on downstream services. Limit the distributed map maximum concurrency during your development, and plan for service quota increases accordingly.

To compare the new distributed map with the original map state flow, I created this table.

Original map state flow New distributed map flow
Sub workflows
  • Runs a sub-workflow for each item in an array. The array must be passed from the previous state.
  • Each iteration of the sub-workflow is called a map iteration, and its events are added to the state machine’s execution history.
  • Runs a sub-workflow for each item in an array or Amazon S3 dataset.
  • Each sub-workflow is run as a totally separate child execution, with its own event history.
Parallel branches Map iterations run in parallel, with an effective maximum concurrency of around 40 at a time. Can pass millions of items to multiple child executions, with concurrency of up to 10,000 executions at a time.
Input source Accepts only a JSON array as input. Accepts input as Amazon S3 object list, JSON arrays or files, csv files, or Amazon S3 inventory.
Payload 256 KB Each iteration receives a reference to a file (Amazon S3) or a single record from a file (state input). Actual file processing capability is limited by Lambda storage and memory.
Execution history 25,000 events Each iteration of the map state is a child execution, with up to 25,000 events each (express mode has no limit on execution history).

Sub-workflows within a distributed map work with both Standard workflows and the low-latency, short-duration Express Workflows.

This new capability is optimized to work with S3. I can configure the bucket and prefix where my data are stored directly from the distributed map configuration. The distributed map stops reading after 100 million items and supports JSON or csv files of up to 10GB.

When processing large files, think about downstream service capabilities. Let’s take Lambda again as an example. Each input—a file on S3, for example—must fit within the Lambda function execution environment in terms of temporary storage and memory. To make it easier to handle large files, Lambda Powertools for Python introduced a new streaming feature to fetch, transform, and process S3 objects with minimal memory footprint. This allows your Lambda functions to handle files larger than the size of their execution environment. To learn more about this new capability, check the Lambda Powertools documentation.

Let’s See It in Action
For this demo, I will create a workflow that processes one thousand dog images stored on S3. The images are already stored on S3.

➜  ~ aws s3 ls awsnewsblog-distributed-map/images/
2022-11-08 15:03:36      27034 n02085620_10074.jpg
2022-11-08 15:03:36      34458 n02085620_10131.jpg
2022-11-08 15:03:36      12883 n02085620_10621.jpg
2022-11-08 15:03:36      34910 n02085620_1073.jpg
...

➜  ~ aws s3 ls awsnewsblog-distributed-map/images/ | wc -l
    1000

The workflow and the S3 bucket must be in the same Region.

To get started, I navigate to the Step Functions page of the AWS Management Console and select Create state machine. On the next page, I choose to design my workflow using the visual editor. The distributed map works with Standard workflows, and I keep the default selection as-is. I select Next to enter the visual editor.

Distributed Map - create a workflowIn the visual editor, I search and select the Map component on the left-side pane, and I drag it to the workflow area. On the right side, I configure the component. I choose Distributed as Processing mode and Amazon S3 as Item Source.

Distributed maps are natively integrated with S3. I enter the name of the bucket (awsnewsblog-distributed-map) and the prefix (images) where my images are stored.

On the Runtime Settings section, I choose Express for Child workflow type. I also may decide to restrict the Concurrency limit. It helps to ensure we operate within the concurrency quotas of the downstream services (Lambda in this demo) for a particular account or Region.

By default, the output of my sub-workflows will be aggregated as state output, up to 256KB. To process larger outputs, I may choose to Export map state results to Amazon S3.

Distributed Map - add a Lambda invocation

Finally, I define what to do for each file. In this demo, I want to invoke a Lambda function for each file in the S3 bucket. The function exists already. I search for and select the Lambda invocation action on the left-side pane. I drag it to the distributed map component. Then, I use the right-side configuration panel to select the actual Lambda function to invoke: AWSNewsBlogDistributedMap in this example.

Distributed Map - add a Lambda invocation

When I am done, I select Next. I select Next again on the Review generated code page (not shown here).

On the Specify state machine settings page, I enter a Name for my state machine and the IAM Permissions to run. Then, I select Create state machine.

Create State Machine - Final ScreenNow I am ready to start the execution. On the State machine page, I select the new workflow and select Start execution. I can optionally enter a JSON document to pass to the workflow. In this demo, the workflow does not handle the input data. I leave it as-is, and I select Start execution.

Start workflow execution Start workflow execution - pass input data

During the execution of the workflow, I can monitor the progress. I observe the number of iterations, and the number of items successfully processed or in error.

I can drill down on one specific execution to see the details.

Distributed Map - monitor execution details

With just a few clicks, I created a large-scale and heavily parallel workflow able to handle a very large quantity of data.

Which AWS Service Should I Use
As often happens on AWS, you might observe an overlap between this new capability and existing services such as AWS Glue, Amazon EMR, or Amazon S3 Batch Operations. Let’s try to differentiate the use cases.

In my mental model, data scientists and data engineers use AWS Glue and EMR to process large amounts of data. On the other hand, application developers will use Step Functions to add serverless data processing into their applications. Step Functions is able to scale from zero quickly, which makes it a good fit for interactive workloads where customers may be waiting for the results. Finally, system administrators and IT operation teams are likely to use Amazon S3 Batch Operations for single-step IT automation operations such as copying, tagging, or changing permissions on billions of S3 objects.

Pricing and Availability
AWS Step Functions’ distributed map is generally available in the following ten AWS Regions: US East (Ohio, N. Virginia), US West (Oregon), Asia Pacific (Singapore, Sydney, Tokyo), Canada (Central), and Europe (Frankfurt, Ireland, Stockholm).

The pricing model for the existing inline map state does not change. For the new distributed map state, we charge one state transition per iteration. Pricing varies between Regions, and it starts at $0.025 per 1,000 state transitions. When you process your data using express workflows, you are also charged based on the number of requests for your workflow and its duration. Again, prices vary between Regions, but they start at $1.00 per 1 million requests and $0.06 per GB-hour (prorated to 100ms).

For the same amount of iterations, you will observe a cost reduction when using the combination of the distributed map and standard workflows compared to the existing inline map. When you use express workflows, expect the costs to stay the same for more value with the distributed map.

I am really excited to discover what you will build using this new capability and how it will unlock innovation. Go start to build highly parallel serverless data processing workflows today!

— seb

AWS Marketplace Vendor Insights – Simplify Third-Party Software Risk Assessments

AWS Marketplace Vendor Insights is a new capability of AWS Marketplace. It simplifies third-party software risk assessments when procuring solutions from the AWS Marketplace.

It helps you to ensure that the third-party software continuously meets your industry standards by compiling security and compliance information, such as data privacy and residency, application security, and access control, in one consolidated dashboard.

As a security engineer, you may now complete third-party software risk assessment in a few days instead of months. You can now:

  • Quickly discover products in AWS Marketplace that meet your security and certification standards by searching for and accessing Vendor Insights profiles.
  • Access and download current and validated information, with evidence gathered from the vendors’ security tools and audit reports. Reports are available for download on AWS Artifact third-party reports (now available in preview).
  • Monitor your software’s security posture post-procurement and receive notifications for security and compliance events.

As a software vendor, you can now reduce the operational burden of responding to buyer requests for risk assessment information. It gives your customers a self-service access experience. You can now:

  • Build your product’s security profile by uploading your ISO 27001 or SOC2 Type 2 report and completing a software risk assessment with AWS Audit Manager.
  • Store and share your compliance reports such as ISO 27001 and SOC2 Type 2, using AWS Artifact third-party reports (preview).
  • View and approve your buyer requests for viewing security controls and compliance artifacts stored in Vendor Insights.

Let’s See It in Action
I want to procure a solution on the AWS Marketplace. But before purchasing the product, as a security engineer, I want to review its compliance. I navigate to the AWS Marketplace page of the AWS Management Console. I use the faceted search on the left side to select vendors that are ISO 27001 compliant.

AWS MArketplace vendor insights - faceted searchI select a product. On the Product Overview page, I select View assessment data on the top right side (not shown on the screenshot). Then, I can see the overview page, which shows the Security certification received and the Expiration date.

AWS MArketplace vendor insights - certification receivedI select the Security and compliance tab and see that I need to request access to see the detailed security and compliance information. I select the Request access button on the top right side to ask the vendor for access to their compliance documents.

AWS MArketplace vendor insights - request access part 1

On the next page, I fill in the Your information form with my details, and I select Request access.

AWS MArketplace vendor insights - request access part 2The Next Steps section details what will happen next. The seller will contact me to sign a nondisclosure agreement (NDA). The seller will notify AWS Marketplace when the NDA is signed. Then, I will be granted access to Vendor Insights data.

The process can take a few days. For this demo, I switch to a fictional product—Everest—for which I have access to the compliance data. Here is the Security and compliance tab when my request for access is accepted.

The Summary section shows how many controls are available. It reports how many have been validated with evidence and how many have been self-reported by the seller. It also shows how many noncompliant controls are reported.

I can scroll down the page to see the details for multiple categories: Audit, compliance and security policy, Data security, Access management, Application security, Risk management and incident response, Business resiliency and continuity, End user device security, Infrastructure security, Human resources, and Security and configuration policy. The screenshot does not show all of them.

AWS Marketplace vendor insights - security and complianceI select the detail for Access control and see the list under Control name. For each of them, I can see the compliance for SOC2 Type 2, ISO 27001, and the Vendor self-assessment.

AWS Marketplace vendor insights - access controlI select the noncompliant one to get the details and the explanation the vendor provided.

AWS Marketplace vendor insights - non compliant details

If needed, I might also use AWS Artifact third-party reports (preview) to download the compliance reports.

For Software Vendors
As a software vendor, you can create a security profile for your SaaS products on AWS Marketplace and share this profile with your prospective and existing buyers. It helps you to reduce the manual work for engineering and security teams to respond to your customer questionnaires.

To create a security profile, you will need to complete a self-assessment using AWS Audit Manager on your marketplace management AWS account, share the current SOC2 Type II and ISO27001 compliance artifacts, if available, and turn on automated assessment using Audit Manager and AWS Config on your production AWS accounts.

Our team has created an AWS CloudFormation template to automate the onboarding steps. You can find the technical resources, such as the setup guide and the onboarding templates, on our GitHub repository. Once the profile is created, Vendor Insights will keep your security profile up to date by using automated evidence from Audit Manager and AWS Config. The updates to your profile are sent as notifications. Your security and compliance team can review the updates before they are shared with buyers.

With Vendor Insights, you manage access to your product’s security profile by approving the buyer’s subscription requests. When a buyer requests access, Vendor Insights shares their contact information over email to your compliance or deal-desk operations team. They can complete the NDA with the buyer and notify AWS Marketplace to grant the buyer access to your security profile. You can also request AWS Marketplace to revoke the buyer’s subscription on a later day if you don’t want to share your product’s security and compliance posture information with the buyer anymore.

The entire process is documented in the AWS Marketplace Vendor Insights seller guide.

Pricing and Availability
Vendor Insights is now available in all AWS Regions where AWS Marketplace is available.

The pricing model is very simple; there is no charge involved for using AWS Marketplace Vendor Insights.

For buyers, you can access and download assets during your procurement phase. You lose access to the Vendor Insights profile if you have not purchased the product after 60 days. When you purchase the product, you keep access to the product’s security profile for continuous monitoring of its compliance status.

For sellers, AWS Marketplace doesn’t charge to activate and use Vendor Insights. You will incur fees for using Audit Manager and AWS Config.

Go and start your risk assessments on the AWS Marketplace today.

— seb

Next Generation SageMaker Notebooks – Now with Built-in Data Preparation, Real-Time Collaboration, and Notebook Automation

In 2019, we introduced Amazon SageMaker Studio, the first fully integrated development environment (IDE) for data science and machine learning (ML). SageMaker Studio gives you access to fully managed Jupyter Notebooks that integrate with purpose-built tools to perform all ML steps, from preparing data to training and debugging models, tracking experiments, deploying and monitoring models, and managing pipelines.

Today, I’m excited to announce the next generation of Amazon SageMaker Notebooks to increase efficiency across the ML development workflow. You can now improve data quality in minutes with the built-in data preparation capability, edit the same notebooks with your teams in real time, and automatically convert notebook code to production-ready jobs.

Let me show you what’s new!

New Notebook Capability for Simplified Data Preparation
The new built-in data preparation capability is powered by Amazon SageMaker Data Wrangler and is available in SageMaker Studio notebooks.  SageMaker Studio notebooks automatically generate key visualizations on top of Pandas data frames to help you understand data distribution and identify data quality issues, like missing values, invalid data, and outliers. You can also select the target column for ML models and generate ML-specific insights such as imbalanced class or high correlation columns. You then receive recommendations for data transformations to resolve the issues. You can apply the data transformations right in the UI, and SageMaker Studio notebooks automatically generate the corresponding transformation code in the notebook cells that you can use to replay your data preparation pipeline.

Using the Built-in Data Preparation Capability
To get started, pip install and import sagemaker_datawrangler along with the pandas Python package. Then, download the dataset you want to analyze to the notebook working directory, and read the dataset with pandas.

import pandas as pd 
import sagemaker_datawrangler 

!aws s3 cp s3://<YOUR_S3_BUCKET>/data.csv . 

df = pd.read_csv("data.csv")

Now, when you display the data frame, it automatically shows key data visualizations at the top of each column, surfaces data insights, detects data quality issues, and suggests solutions to improve data quality. When you select a column as the target column for ML predictions, you get target-specific insights and warnings, such as mixed data types in target (for regression use cases) or too few instances per class (for classification use cases).

In this example, I’m using the Women’s E-Commerce Clothing Reviews dataset that contains customer reviews and ratings for women’s clothing. This dataset was obtained from Kaggle and has been modified by Amazon to add synthetic data quality issues.

Amazon SageMaker Studio notebooks with built-in data preparation

You can review the suggested data transformations to improve the data quality and apply them right in the UI. For a list of all supported data transformations, have a look at the documentation. Once you apply a data transformation, SageMaker Studio notebooks automatically generate the code to reproduce those data preparation steps in another notebook cell.

For my example, I select Rating as my target column. Target column insights tells me in a high-priority warning that this column has too few instances per class and with a medium-priority warning that classes are too imbalanced. Let’s follow the suggestions and drop rare target values and drop missing values. I will also follow the suggestions for some of the feature columns and drop missing values in the Review Text column and drop the Division Name column.

Once I apply the transformations, the notebook generates this code for me:

# Pandas code generated by sagemaker_datawrangler
output_df = df.copy(deep=True)


# Code to Drop rare target values for column: Rating to resolve warning: Too few instances per class 
rare_target_labels_to_drop = ['-100', '100']
output_df = output_df[~output_df['Rating'].isin(rare_target_labels_to_drop)]


# Code to Drop missing for column: Rating to resolve warning: Missing values 
output_df = output_df[output_df['Rating'].notnull()]


# Code to Drop missing for column: Review Text to resolve warning: Missing values 
output_df = output_df[output_df['Review Text'].notnull()]


# Code to Drop column for column: Division Name to resolve warning: Missing values 
output_df=output_df.drop(columns=['Division Name'])

I can now review and modify the code if needed or start integrating the data transformations as part of my ML development workflow.

Introducing Shared Spaces for Team-Based Sharing and Real-Time Collaboration
SageMaker Studio now offers shared spaces that give data science and ML teams a workspace where they can read, edit, and run notebooks together in real time to streamline collaboration and communication during the development process. Shared spaces provide a shared Amazon EFS directory that you can utilize to share files within a shared space. All taggable SageMaker resources that you create in a shared space are automatically tagged to help you organize and have a filtered view of your ML resources, such as training jobs, experiments, and models, that are relevant to the business problem you work on in the space. This also helps you monitor costs and plan budgets using tools such as AWS Budgets and AWS Cost Explorer.

And that’s not all. You can now also create multiple SageMaker domains within the same AWS account to scope access and isolate resources to different teams or business units in your organization. Now, let me show you how to create a shared space for users within a SageMaker domain.

Using Shared Spaces
You can use the SageMaker console or the AWS CLI to create shared spaces for a SageMaker domain. To get started in the SageMaker console, go to Domains, select or create a new domain, and select Space management on the Domain details page. Then, select Create and give the shared space a name.

Amazon SageMaker Spaces - Create Space

Users in this SageMaker domain can now launch and join the shared space through their SageMaker domain user profiles.

Amazon SageMaker Spaces - Launch Spaces

In a shared space, select the new Collaborators icon in the left navigation menu. You can now see who else is currently active in this space. The following screenshot shows user tom on the left, editing a notebook file. On the right, user antje sees the edits in real time, together with an annotation of the user name that currently edits that notebook cell.

Amazon SageMaker Spaces

New Notebook Capability to Automatically Convert Notebook Code to Production-Ready Jobs
You can now select a notebook and automate it as a job that can run in a production environment without the need to manage the underlying infrastructure. When you create a SageMaker Notebook Job, SageMaker Studio takes a snapshot of the entire notebook, packages its dependencies in a container, builds the infrastructure, runs the notebook as an automated job on a schedule you define, and deprovisions the infrastructure upon job completion. This notebook capability is now also available in SageMaker Studio Lab, our free ML development environment that provides the compute, storage, and security to learn and experiment with ML.

Using the Notebook Capability to Automate Notebooks
To get started, open a notebook file in SageMaker Studio. Then, right-click your notebook file and select Create Notebook Job or select the Create Notebook Job icon, as highlighted in the following screenshot.

Amazon SageMaker Studio - Automate your notebooks

Define a name for the Notebook Job, review the input file location, specify the compute type to use, and whether to run the job immediately or on a schedule. Then, select Create.

Amazon SageMaker Studio - Create Notebook Job

The Notebook Job has been created, and you can review all Notebook Job Definitions in the UI.

Amazon SageMaker Studio - Notebook Job Definitions

Now Available
The new Amazon SageMaker Studio notebook capabilities are now available in all AWS Regions where Amazon SageMaker Studio is available except for the AWS China Regions.

At launch, the built-in data preparation capability powered by SageMaker Data Wrangler is supported for SageMaker Studio notebooks and the following notebook kernel images:

  • Python 3 (Data Science) with Python 3.7
  • Python 3 (Data Science 2.0) with Python 3.8
  • Python 3 (Data Science 3.0) with Python 3.10
  • Spark Analytics 1.0 and 2.0

For more information, visit Amazon SageMaker Notebooks.

Start building your ML projects with the next generation of Amazon SageMaker Notebooks today!

— Antje

Announcing Additional Data Connectors for Amazon AppFlow

Gathering insights from data is a more effective process if that data isn’t fragmented across multiple systems and data stores, whether on premises or in the cloud. Amazon AppFlow provides bidirectional data integration between on-premises systems and applications, SaaS applications, and AWS services. It helps customers break down data silos using a low- or no-code, cost-effective solution that’s easy to reconfigure in minutes as business needs change.

Today, we’re pleased to announce the addition of 22 new data connectors for Amazon AppFlow, including:

  • Marketing connectors (e.g., Facebook Ads, Google Ads, Instagram Ads, LinkedIn Ads).
  • Connectors for customer service and engagement (e.g., MailChimp, Sendgrid, Zendesk Sell or Chat, and more).
  • Business operations (Stripe, QuickBooks Online, and GitHub).

In total, Amazon AppFlow now supports over 50 integrations with various different SaaS applications and AWS services. This growing set of connectors can be combined to enable you to achieve 360 visibility across the data your organization generates. For instance, you could combine CRM (Salesforce), e-commerce (Stripe), and customer service (ServiceNow, Zendesk) data to build integrated analytics and predictive modeling that can guide your next best offer decisions and more. Using web (Google Analytics v4) and social surfaces (Facebook Ads, Instagram Ads) allows you to build comprehensive reporting for your marketing investments, helping you understand how customers are engaging with your brand. Or, sync ERP data (SAP S/4HANA) with custom order management applications running on AWS. For more information on the current range of connectors and integrations, visit the Amazon AppFlow integrations page.

Datasource connectors for Amazon AppFlow

Amazon AppFlow and AWS Glue Data Catalog
Amazon AppFlow has also recently announced integration with the AWS Glue Data Catalog to automate the preparation and registration of your SaaS data into the AWS Glue Data Catalog. Previously, customers using Amazon AppFlow to store data from supported SaaS applications into Amazon Simple Storage Service (Amazon S3) had to manually create and run AWS Glue Crawlers to make their data available to other AWS services such as Amazon Athena, Amazon SageMaker, or Amazon QuickSight. With this new integration, you can populate AWS Glue Data Catalog with a few clicks directly from the Amazon AppFlow configuration without the need to run any crawlers.

To simplify data preparation and improve query performance when using analytics engines such as Amazon Athena, Amazon AppFlow also now enables you to organize your data into partitioned folders in Amazon S3. Amazon AppFlow also automates the aggregation of records into files that are optimized to the size you specify. This increases performance by reducing processing overhead and improving parallelism.

You can find more information on the AWS Glue Data Catalog integration in the recent What’s New post.

Getting Started with Amazon AppFlow
Visit the Amazon AppFlow product page to learn more about the service and view all the available integrations. To help you get started, there’s also a variety of videos and demos available and some sample integrations available on GitHub. And finally, should you need a custom integration, try the Amazon AppFlow Connector SDK, detailed in the Amazon AppFlow documentation. The SDK enables you to build your own connectors to securely transfer data between your custom endpoint, application, or other cloud service to and from Amazon AppFlow‘s library of managed SaaS and AWS connectors.

— Steve