Category: <span>Announcements</span>

Amazon Nimble Studio – Build a Creative Studio in the Cloud

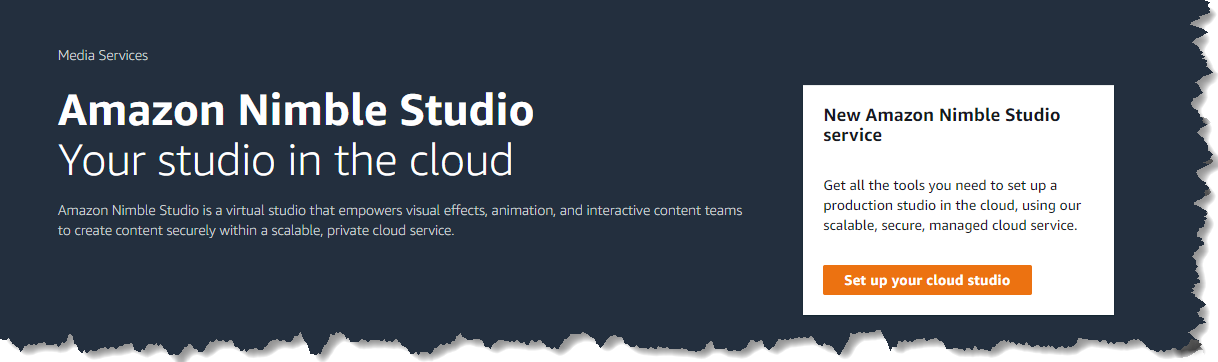
Amazon Nimble Studio is a new service that creative studios can use to produce visual effects, animations, and interactive content entirely in the cloud with AWS, from the storyboard sketch to the final deliverable. Nimble Studio provides customers with on-demand access to virtual workstations, elastic file storage, and render farm capacity. It also provides built-in automation tools for IP security, permissions, and collaboration.

Traditional creative studios often face the challenge of attracting and onboarding talent. Talent is not localized, and it’s important to speed up the hiring of remote artists and make them as productive as if they were in the same physical space. It’s also important to allow distributed teams to use the same workflow, software, licenses, and tools that they use today, while keeping all assets secure.

In addition, traditional customers resort to buying more hardware for their local render farms, rent hardware at a premium, or extend their capacity with cloud resources. Those who decide to render on the cloud navigate these options and the large breadth of AWS offerings and perceive complexity, which can lead them to choose legacy approaches.

Screenshot of maya lighting


Today, we are happy to announce the launch of Amazon Nimble Studio, a service that addresses these concerns by providing ready-made IT infrastructure as a service, including workstations, storage, and rendering.

Nimble Studio is part of a broader portfolio of purpose-built AWS capabilities for media and entertainment use cases, including AWS services, AWS and Partner Solutions, and over 400 AWS Partners. You can learn more about our AWS for Media & Entertainment initiative, also launched today, which helps media and entertainment customers easily identify industry-specific AWS capabilities across five key business areas: Content production, Direct-to-consumer and over-the-top (OTT) streaming, Broadcast, Media supply chain and archive, and Data science and Analytics.

Benefits of using Nimble Studio
Nimble Studio is built on top of AWS infrastructure, ensuring performant computing power and security of your data. It also enables an elastic production, allowing studios to scale the artists’ workstations, storage, and rendering needs based on demand.

When using Nimble Studio, artists can use their favorite creative software tools on an Amazon Elastic Compute Cloud (Amazon EC2) virtual workstation. Nimble Studio uses EC2 for compute, Amazon FSx for storage, AWS Single Sign-On for user management, and AWS Thinkbox Deadline for render farm management.

Nimble Studio is open and compatible with most storage solutions that support the NFS/SMB protocol, such as Weka.io and Qumulo, so you can bring your own storage.

For high-performance remote display, the service uses the NICE DCV protocol and provisions G4dn instances that are available with NVIDIA GPUs.

By providing the ability to share assets using globally accessible data storage, Nimble Studio makes it possible for studios to onboard global talent. And Nimble Studio centrally manages licenses for many software packages, reduces the friction of onboarding new artists, and enables predictable budgeting.

In addition, Nimble Studio comes with an artist-friendly console. Artists don’t need to have an AWS account or use the AWS Management Console to do their work.

But my favorite thing about Nimble Studio is that it’s intuitive to set up and use. In this post, I will show you how to create a cloud-based studio.

screenshot of the intro of nimble studio


Set up a cloud studio using Nimble Studio
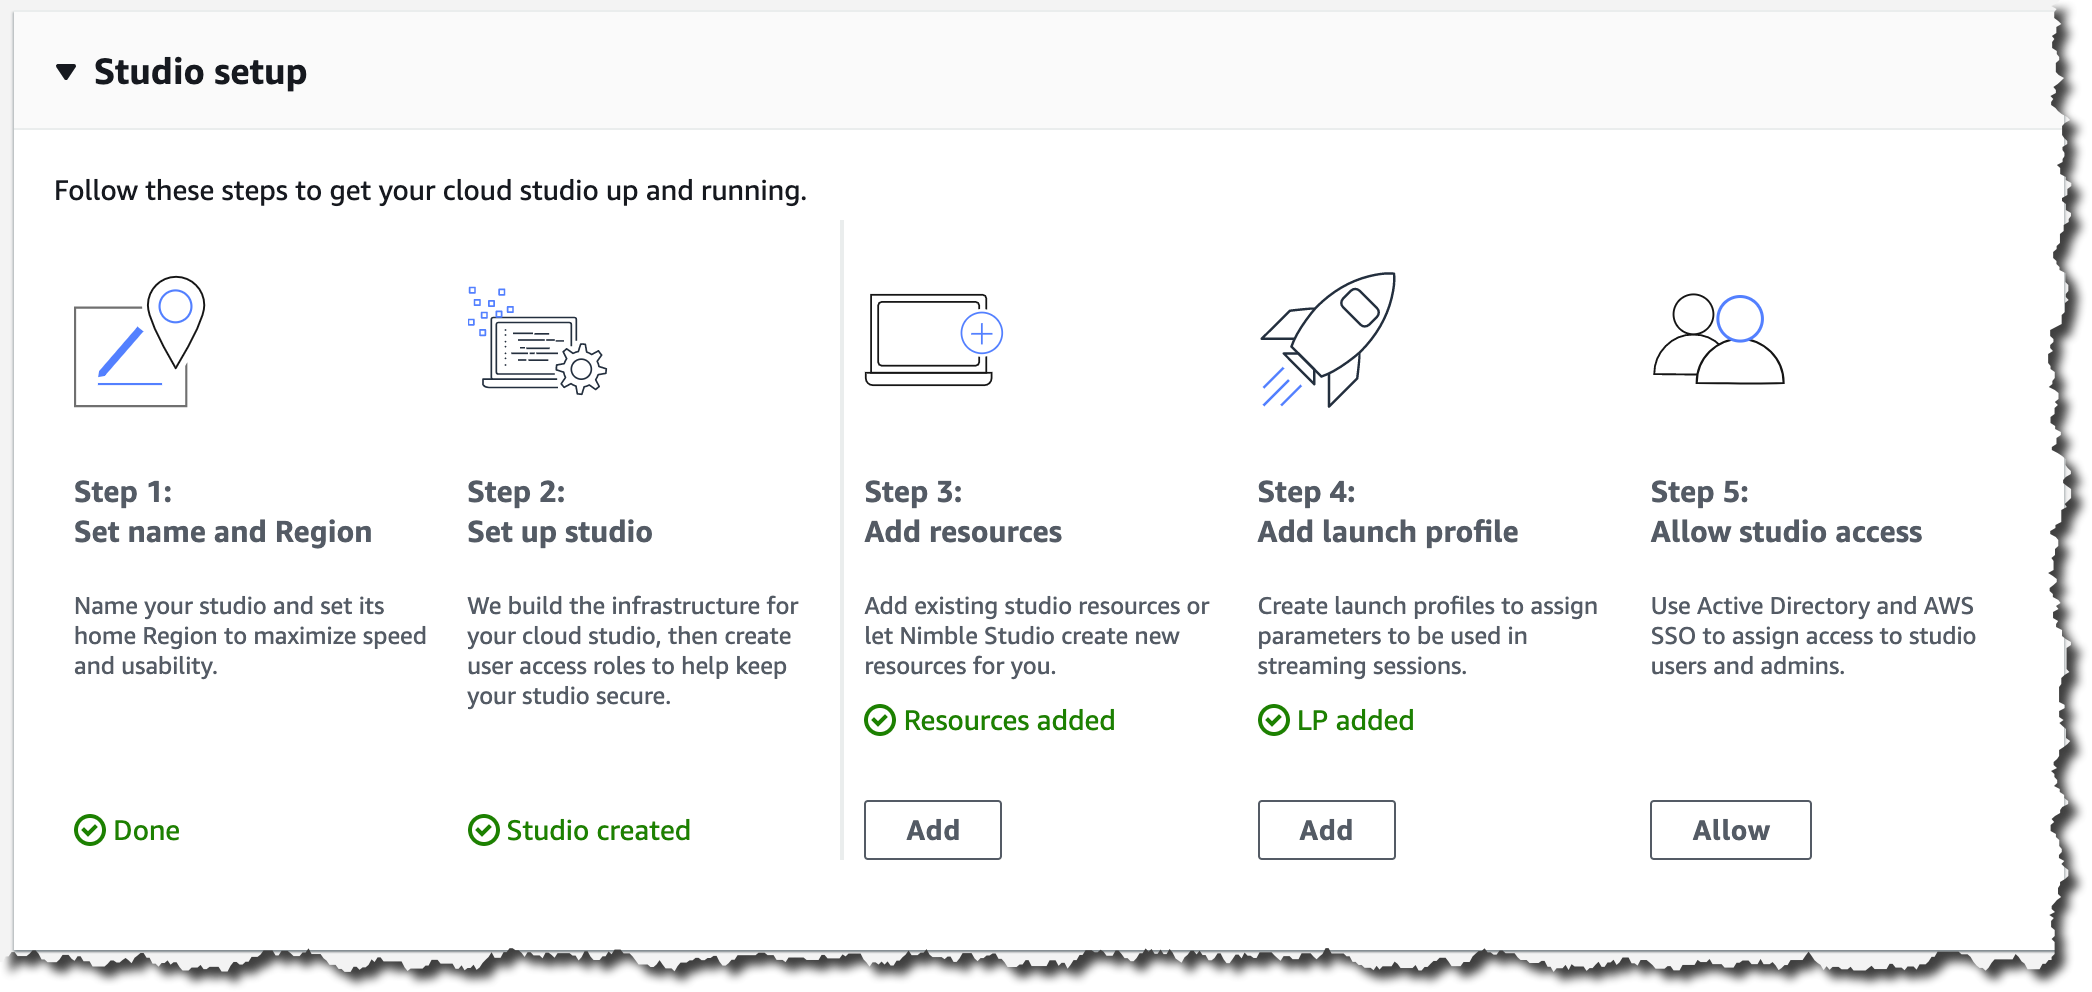
To get started with Nimble Studio, go to the AWS Management Console and create your cloud studio. You can decide if you want to bring your existing resources, such as file storage, render farm, software license service, Amazon Machine Image (AMI), or a directory in Active Directory. Studios that migrate existing projects can use AWS Snowball for fast and secure physical data migration.

Configure AWS SSO
For this configuration, choose the option where you don’t have any existing resources, so you can see how easy it is to get started. The first step is to configure AWS SSO in your account. You will use AWS SSO to assign the artists permissions based on some roles to access the studio. To set up AWS SSO, follow these steps in the AWS Directory Services console.

Configure your studio with StudioBuilder
StudioBuilder is a tool that will help you to deploy your studio simply by answering some configuration questions. StudioBuilder is available in an AMI. You can get it for free from the AWS Marketplace.

After you get the AMI from AWS Marketplace, you can find it in the Public images list in the EC2 console. Launch that AMI in an EC2 instance. I recommend a t3.medium instance. Set the Auto-assign Public IP field to Enable to ensure that your instance receives a public IP address. You will use it later to connect to the instance.

Screenshot of launching the StudioBuilder AMI

As soon as you connect to the instance, you are directed to the StudioBuilder setup.

Screenshot of studio builder setup

The setup guides you, step by step through the configuration of networking, storage, Active Directory, and rendering farm. Simply answer the questions to build the right studio for your needs.

Screenshot of the studio building

The setup takes around 90 minutes. You can monitor the progress using the AWS CloudFormation console. Your studio is ready when four new CloudFormation stacks have been created in your account: Network, Data, Service, and Compute.

Screenshot of stacks completed in CloudFormation

Now terminate the StudioBuilder instance and return to the Nimble Studio console. In Studio setup, you can see that you’ve completed four of the five steps.

Screenshot of the studio setup tutorial

Assign access to studio admin and users
To complete the last step, Step 5: Allow studio access, you will use the Active Directory directory you created during the StudioBuilder step and the AWS SSO you configured earlier to allow access to the administrators and artists to the studio.

Follow the instructions in the Nimble Studio console to connect the directory to AWS SSO. Then you can add administrators to your studio. Administrators have control over what users can do in the studio.

At this point, you can add users to the studio, but because your directory doesn’t have users yet, move to the next step. You can return to this step later to add users to the studio.

Accessing the studio for the first time
When you open the studio for the first time, you will find the Studio URL in the Studio Manager console. You will share this URL with your artists when the studio is ready. To sign in to the studio, you need the user name and password of the Admin you created earlier.

Screenshot of studio name

Launch profiles
When the studio opens, you will see two launch profiles: one that is a render farm instance and the other that is a workstation. They were created by StudioBuilder when you set up the studio. Launch profiles control access to resources in your studio, such as compute farms, shared file systems, instance types, and AMIs. You can use the Nimble Studio console to create as many launch profiles as you need, to customize your team’s access to the studio resources.

Screenshot of the studio

When you launch a profile, you launch a workstation that includes all the software you provided in the installed AMI. It takes a few minutes for the instance to launch for the first time. When it is ready, you will see the instance in the browser. You can sign in to it with the same user name and password you use to sign in to the studio.

Screenshot of launching a new instance

Now your studio is ready! Before you share it with your artists, you might want to configure more launch profiles, add your artist users to the directory, and give those users permissions to access the studio and launch profiles.

Here’s a short video that describes how Nimble Studio can help you and works:

Available now
Nimble Studio is now available in the US West (Oregon), US East (N. Virginia), Canada (Central), Europe (London), Asia Pacific (Sydney) Regions and the US West (Los Angeles) Local Zone.

Learn more about Amazon Nimble Studio and get started building your studio in the cloud.

Marcia

Decrease Your Machine Learning Costs with Instance Price Reductions and Savings Plans for Amazon SageMaker

Launched at AWS re:Invent 2017, Amazon SageMaker is a fully-managed service that has already helped tens of thousands of customers quickly build and deploy their machine learning (ML) workflows on AWS.

To help them get the most ML bang for their buck, we’ve added a string of cost-optimization services and capabilities, such as Managed Spot Training, Multi-Model Endpoints, Amazon Elastic Inference, and AWS Inferentia. In fact, customers find that the Total Cost of Ownership (TCO) for SageMaker over a three-year horizon is 54% lower compared to other cloud-based options, such as self-managed Amazon EC2 and AWS-managed Amazon EKS.

Since there’s nothing we like more than making customers happy by saving them money, I’m delighted to announce:

  • A price reduction for CPU and GPU instances in Amazon SageMaker,
  • The availability of Savings Plans for Amazon SageMaker.

Reducing Instance Prices in Amazon SageMaker
Effective today, we are dropping the price of several instance families in Amazon SageMaker by up to 14.2%.

This applies to:

Detailed pricing information is available on the Amazon SageMaker pricing page.

As welcome as price reductions are, many customers have also asked us for a simple and flexible way to optimize SageMaker costs for all instance-related activities, from data preparation to model training to model deployment. In fact, as a lot of customers are already optimizing their compute costs with Savings Plans, they told us that they’d love to do the same for their Amazon SageMaker costs.

Introducing SageMaker Savings Plans
Savings Plans for AWS Compute Services were launched in November 2019 to help customers optimize their compute costs. They offer up to 72% savings over the on-demand price, in exchange for your commitment to use a specific amount of compute power (measured in $ per hour) for a one- or three-year period. In the spirit of self-service, you have full control on setting up your plans, thanks to recommendations based on your past consumption, to usage reports, and to budget coverage and utilization alerts.

SageMaker Savings Plans follow in these footsteps, and you can create plans that cover ML workloads based on:

Savings Plans don’t distinguish between instance families, instance types, or AWS regions. This makes it easy for you to maximize savings regardless of how your use cases and consumption evolve over time, and you can save up to 64% compared to the on-demand price.

For example, you could start with small instances in order to experiment with different algorithms on a fraction of your dataset. Then, you could move on to preparing data and training at scale with larger instances on your full dataset. Finally, you could deploy your models in several AWS regions to serve low-latency predictions to your users. All these activities would be covered by the same Savings Plan, without any management required on your side.

Understanding Savings Plans Recommendations
Savings Plans provides you with recommendations that make it easy to find the right plan. These recommendations are based on:

  • Your SageMaker usage in the last 7, 30 or 60 days. You should select the time period that best represents your future usage.
  • The term of your plan: 1-year or 3-year.
  • Your payment option: no upfront, partial upfront (50% or more), or all upfront. Some customers prefer (or must use) this last option, as it gives them a clear and predictable view of their SageMaker bill.

Instantly, you’ll see what your optimized spend would be, and how much you could start saving per month. Savings Plans also suggest an hourly commitment that maximizes your savings. Of course, you’re completely free to use a different commitment, starting as low as $0.001 per hour!

Once you’ve made up your mind, you can add the plan to your cart, submit it, and start enjoying your savings.

Now, let’s do a quick demo, and see how I could optimize my own SageMaker spend.

Recommending Savings Plans for Amazon SageMaker
Opening the AWS Cost Management Console, I see a Savings Plans menu on the left.

Cost management console

Clicking on Recommendations, I select SageMaker Savings Plans.

Looking at the available options, I select Payer to optimize cost at the Organizations level, a 1-year term, a No upfront payment, and 7 days of past usage (as I’ve just ramped up my SageMaker usage).

SageMaker Savings Plan

Immediately, I see that I could reduce my SageMaker costs by 20%, saving $897.63 every month. This would only require a 1-year commitment of $3.804 per hour.

SageMaker Savings Plan

The monthly charge on my AWS bill would be $2,776 ($3.804 * 24 hours * 365 days / 12 months), plus any additional on-demand costs should my actual usage exceed the commitment. Pretty tempting, especially with no upfront required at all.

Moving to a 3-year plan (still no upfront), I could save $1,790.19 per month, and enjoy 41% savings thanks to a $2.765 per hour commitment.

SageMaker Savings Plan

I could add this plan to the cart as is, and complete my purchase. Every month for 3 years, I would be charged $2,018 ($2.765 * 24 * 365 / 12), plus additional on-demand cost.

As mentioned earlier, I can also create my own plan in just a few clicks. Let me show you how.

Creating Savings Plans for Amazon SageMaker
In the left-hand menu, I click on Purchase Savings Plans and I select SageMaker Savings Plans.

SageMaker Savings Plan

I pick a 1-year term without any upfront. As I expect to rationalize my SageMaker usage a bit in the coming months, I go for a commitment of $3 per hour, instead of the $3.804 recommendation. Then, I add the plan to the cart.

SageMaker Savings Plan

Confirming that I’m fine with an optimized monthly payment of $2,190, I submit my order.

SageMaker Savings Plan

The plan is now active, and I’ll see the savings on my next AWS bill. Thanks to utilization reports available in the Savings Plans console, I’ll also see the percentage of my commitment that I’ve actually used. Likewise, coverage reports will show me how much of my eligible spend has been covered by the plan.

Getting Started
Thanks to price reductions for CPU and GPU instances and to SageMaker Savings Plans, you can now further optimize your SageMaker costs in an easy and predictable way. ML on AWS has never been more cost effective.

Price reductions and SageMaker Savings Plans are available today in the following AWS regions:

  • Americas: US East (N. Virginia), US East (Ohio), US West (Oregon), US West (N. California), AWS GovCloud (US-West), Canada (Central), South America (São Paulo).
  • Europe, Middle East and Africa: Europe (Ireland), Europe (Frankfurt), Europe (London), Europe (Paris), Europe (Stockholm), Europe (Milan), Africa (Cape Town), Middle East (Bahrain).
  • Asia Pacific: Asia Pacific (Singapore), Asia Pacific (Tokyo), Asia Pacific (Sydney), Asia Pacific (Seoul), Asia Pacific (Mumbai), and Asia Pacific (Hong Kong).

Give them a try, and let us know what you think. As always, we’re looking forward to your feedback. You can send it to your usual AWS Support contacts, or on the AWS Forum for Amazon SageMaker.

– Julien


Modern Apps Live: Learn Serverless, Containers and More in May

Modern Apps Live is a series of events about modern application development that will be live-streaming on Twitch in May. Session topics include serverless, containers, and mobile and front-end development.

If you’re not familiar, modern applications are those that:

  • Can scale quickly to millions of users.
  • Have global availability.
  • Manage a lot of data (we’re talking exabytes of data).
  • Respond in milliseconds.

These applications are built using a combination of microservices architectures, serverless operational models, and agile developer processes. Modern applications allow organizations to innovate faster and reduce risk, time to market, and total cost of ownership.

Modern Apps Live is a series of four virtual events:

If you’re a developer, solutions architect, or IT and DevOps professional who wants to build and design modern applications, these sessions are for you, no matter if you’re just starting out or a more experience cloud practitioner. There will be time in each session for Q&A. AWS experts will be in the Twitch chat, ready to answer your questions.

If you cannot attend all four events, here are some sessions you definitely shouldn’t miss:

  • Keynotes are a must! AWS leadership will share product roadmaps and make some important announcements.
  • There are security best practices sessions scheduled on May 4 and May 19, during the Container Day x Kubecon and Serverless Live events. Security should be a top priority when you develop modern applications.
  • If you’re just getting started with serverless, don’t miss the “Building a Serverless Application Backend” on May 19. Eric Johnson and Justin Pirtle will show you how to pick the right serverless pattern for your workload and share information about security, observability, and simplifying your deployments.
  • On May 25, in the “API modernization with GraphQL” session, Brice Pelle will show how you can use GraphQL in your client applications.
  • Bring any burning questions about containers to the “Open Q&A and Whiteboarding” session during the Container Day x DockerCon event on May 26.

For more information or to register for the events, see the Modern Apps Live webpage.

I hope to see you there.

Marcia

Amazon CodeGuru Reviewer Updates: New Predictable Pricing Model Up To 90% Lower and Python Support Moves to GA

Amazon CodeGuru helps you automate code reviews and improve code quality with recommendations powered by machine learning and automated reasoning. You can use CodeGuru Reviewer to detect potential defects and bugs that are hard to find, and CodeGuru Profiler to fine-tune the performance of your applications based on live data. The service has been generally available since June 2020; you can read more about how to get started with CodeGuru here.

While working with many customers in the last few months, we introduced security detectors, Python support in preview, and memory profiling to help customers improve code quality and save hours of developer time. We also heard resounding feedback on various areas such as the structure of pricing and language coverage. We’ve decided to address that feedback and make it even easier to adopt Amazon CodeGuru at scale within your organization.

Today I’m happy to announce two major updates for CodeGuru Reviewer:

  • There’s a brand new, easy to estimate pricing model with lower and fixed monthly rates based on the size of your repository, with up to 90% price reductions
  • Python Support is now generally available (GA) with wider recommendation coverage and four updates related to Python detectors

New Predictable Pricing for CodeGuru Reviewer
CodeGuru Reviewer allows you to run full scans of your repository stored in GitHub, GitHub Enterprise, AWS CodeCommit, or Bitbucket. Also, every time you submit a pull request, CodeGuru Reviewer starts a new code review and suggests recommendations and improvements in the form of comments.

The previous pricing structure was based on the number of lines of code (LoC) analyzed per month, $0.75 per 100 LoC. We’ve heard your feedback: As a developer, you’d like to analyze your code as often as possible, create as many pull requests and branches as needed without thinking about cost, and maximize the chances of catching errors and defects before they hit production.

That’s why with the new pricing you’ll only pay a fixed monthly rate, based on the total size of your repositories: $10 per month for the first 100k lines of code, across all connected repositories. And $30 per month for each additional 100k of code. Please note that only the largest branch in the repository counts, and that empty lines and comments aren’t counted at all.

This price structure not only makes the cost more predictable and transparent, but it will also help simplify the way you scale CodeGuru Reviewer across different teams in the organization. You still have the possibility to perform full repository scans on demand and incremental reviews on each pull request. The monthly rate includes all incremental reviews, and you get up to two full scans per repository per month included in the monthly rate. Additional full scans are charged $10 per 100k lines of code.

Basically you get all the benefits of Amazon CodeGuru and all the new detectors and integrations, but it’s up to 90% cheaper. Also, you can get started at no cost with the Free Tier for the first 90 days, up to 100k LoC. When the Free Tier expires or if you exceed the 100k LoC, you simply pay the standard rates. Check out the updated pricing page here.

Let me share a few practical examples (excluding the Free Tier):

  1.  Medium-size repository of 150k LoC: In this case, your monthly rate gets rounded up to 200k lines of code, for a total of $40 per month ($10 + $30). The number of LoC is always rounded up. And by the way you could also connect a repository (or multiple) of up to 50K lines of code (bringing the total to that 200k lines of code) for the same price. Up to 2 full scans are included for each repository.
  2. Three repositories of 300k LoC each (the equivalent of a large repository of 900k LoC): In this case, your monthly rate is $250 ($10 for the first 100k lines of code, plus $240 for the remaining 800k lines of code). Up to 2 full scans are included for each repository.
  3.  Small repository of 70k LoC, with 10 full scans every month: In this case, your monthly rate is only $10 for the number of LoC, plus $60 for the additional full scans (560k LoC), for a total of $70 per month.
  4.  Small repository with 50 active branches, the largest branch containing 10k LoC, and 300 pull requests every month: Simple, just $10 per month. Up to 2 full scans are included for each repository.

The new pricing will apply starting in April for new repositories connected on April 6th, 2021, as well as for repositories already connected up to April 5th, 2021. We expect the largest majority of use cases to see a considerable cost reduction. Unless you need to perform full repository scans multiple times a day (this is quite an edge case), most small repositories up to 100k LoC will be charged only a predictable and affordable fee of $10 per month after the 90-day trial, regardless of the number of branches, contributors, or pull requests. Now you can develop and iterate on your code repositories — knowing that CodeGuru will review your code and find potential issues — without worrying about unpredictable costs.

Give CodeGuru Reviewer a try and connect your first repository in the CodeGuru console.

Python Support for CodeGuru Reviewer Now Generally Available
Python Support for CodeGuru Reviewer has been available in preview since December 2020. It allows you to improve your Python applications by suggesting optimal usage of data structures and concurrency. It helps you follow Python best practices for control flow, error handling, and the standard library. Last but not least, it offers recommendations about scientific/math operations and AWS best practices. These suggestions are useful for both beginners and expert developers, and for small and large teams who are passionate about code quality.

With today’s announcement of general availability, you’ll find four main updates related to Python detectors:

  • Increased coverage and precision for existing detectors: Many Python best practices have been integrated into the existing detectors related to standard library, data structures, control flow, and error handling. For example, CodeGuru Reviewer will warn you in case your code is creating a temporary file insecurely, using float numbers instead of decimal for scientific computation that requires maximum precision, or confusing equality with identity. These warnings will help you avoid security vulnerabilities, performance issues, and bugs in general.
  • Improved detector for resource leaks: During the preview, this detector only focused on open file descriptors; now it generates recommendations about a broader set of potential resource leaks such as connections, sessions, sockets, and multiprocessing thread pools. For example, you may implement a Python function that opens a new socket and then forget to close it. This is quite common and it doesn’t immediately turn into a problem, but resource leaks can cause your system to slow down or even crash in the long run. CodeGuru Reviewer will suggest closing the socket or wrapping it in a with statement. As a reminder, this detector is available for Java as well.
  • New code maintainability detector: This new detector helps you identify code issues related to aspects that usually make code bases harder to read, understand, and maintain, such as code complexity and tight coupling. For example, imagine that you’ve spent a couple of hours implementing a simple prototype and then you decide to integrate it with your production code as is. Because you were rushing a bit, this prototype may include a huge Python function with 50+ lines of code ranging from input validation, data preparation, some API calls, and a final write to disk. CodeGuru Reviewer will suggest you refactor this code into smaller, reusable, and loosely coupled functions that are easier to test and maintain.
  • New input validation detector: This new detector helps you identify situations where some functions or classes may benefit from additional validation of input parameters, especially when these parameter are likely to be user-generated or dynamic. For example, you may have implemented a Python function that takes an environment name as CLI input (e.g. dev, stage, prod), performs an API call, and then returns a resource ARN as output. You haven’t validated the environment name, so CodeGuru Reviewer might suggest you implement some additional validation; in this example, you may add a few lines of code to check that the environment name is not empty and that it’s a valid environment for this project.

Please note that Python Support for CodeGuru Profiler is still in preview: CodeGuru Profiler allows you to collect runtime performance data, identify how code is running on the CPU and where time is consumed, so you can tune your Python application starting from the most expensive parts — with the goal of reducing cost and improving performance.

You can get started with CodeGuru Reviewer and CodeGuru Profiler for Python in the CodeGuru console.

Conclusions
Amazon CodeGuru is available in 10 AWS Regions and it supports Python and Java applications. We’re looking forward to publishing even more detectors and support for more programming languages to help more developers and customers improve their application code quality and performance.

If you’d like to learn more about Amazon CodeGuru, check out the CodeGuru Reviewer documentation and CodeGuru Profiler documentation.

Alex