Month: <span>May 2021</span>

New Amazon FinSpace Simplifies Data Management and Analytics for Financial Services

Managing data is the core of the Financial Services Industry (FSI). I worked for private banking and fund management companies and helped analysts to collect, aggregate, and analyze hundreds of petabytes of data from internal data sources, such as portfolio management, order management, and accounting systems, but also from external data sources, such as real-time market feeds and historical equities pricing and alternative data systems. During that period, I spent my time trying to access data across organizational silos, to manage permissions, and to build systems to automate recurring tasks in ever-growing and more complex environments.

Today, we are launching a solution that would have reduced the time I spent on such projects: Amazon FinSpace is a data management and analytics solution purpose-built for the financial services industry. Amazon FinSpace reduces the time it takes to find and prepare data from months to minutes so analysts can spend more time on analysis.

What Our Customers Told Us
Before data can be combined and analyzed, analysts spend weeks or months to find and access data across multiple departments, each specialized by market, instrument, or geography. In addition to this logical segregation, data is also physically isolated in different IT systems, file systems, or networks. Because access to data is strictly controlled by governance and policy, analysts must prepare and explain access requests to the compliance department. This is a very manual, ad-hoc process.

Once granted access, they often must perform computational logic (such as Bollinger Bands, Exponential Moving Average, or Average True Range) on larger and larger datasets to prepare data for analysis or to derive information out of the data. These computations often run on servers with constrained capacity, as they were not designed to handle the size of workloads in the modern financial world. Even server-side systems are struggling to scale up and keep up with the ever-growing size of the datasets they need to store and analyze.

How Amazon FinSpace Helps
Amazon FinSpace removes the undifferentiated heavy lifting required to store, prepare, manage, and audit access to data. It automates the steps involved in finding data and preparing it for analysis. Amazon FinSpace stores and organizes data using industry and internal data classification conventions. Analysts connect to the Amazon FinSpace web interface to search for data using familiar business terms (“S&P500,” “CAC40,” “private equity funds in euro”).

Analysts can prepare their chosen datasets using a built-in library of more than 100 specialized functions for time series data. They can use the integrated Jupyter notebooks to experiment with data, and parallelize these financial data transformations at the scale of the cloud in minutes. Finally, Amazon FinSpace provides a framework to manage data access and to audit who is accessing what data and when. It tracks usage of data and generates compliance and audit reports.

Amazon FinSpace also makes it easy to work on historical data. Let’s imagine I built a model to calculate credit risk. This model relies on interest rate and inflation rate. These two rates get updated frequently. The risk level associated with a customer is not the same today as it was a few months ago, when inflation and interest rates were different. When data analysts are looking at data as it is now and as it was in the past, they call it bitemporal modeling. Amazon FinSpace makes it easy to go back in time and to compare how models are evolving alongside multiple dimensions.

To show you how Amazon FinSpace works, let’s imagine I have a team of analysts and data scientists and I want to provide them a tool to search, prepare, and analyze data.

How to Create an Amazon FinSpace Environment
As an AWS account administrator, I create a working environment for my team of financial analysts. This is a one-time setup.

I navigate to the Amazon FinSpace console and click Create Environment:

FinSpace Create environment

I give my environment a name. I select a KMS encryption key that will serve to encrypt data at rest. Then I choose either to integrate with AWS Single Sign-On or to manage usernames and passwords in Amazon FinSpace. AWS Single Sign-On integration allows your analysts to authenticate with external systems, such as a corporate Active Directory, to access the Amazon FinSpace environment. For this example, I choose to manage the credentials by myself.

FinSpace create environment details

I create a superuser who will have administration permission on the Amazon FinSpace environment. I click Add Superuser:

Finspace create super user 1Finspace create super user 2
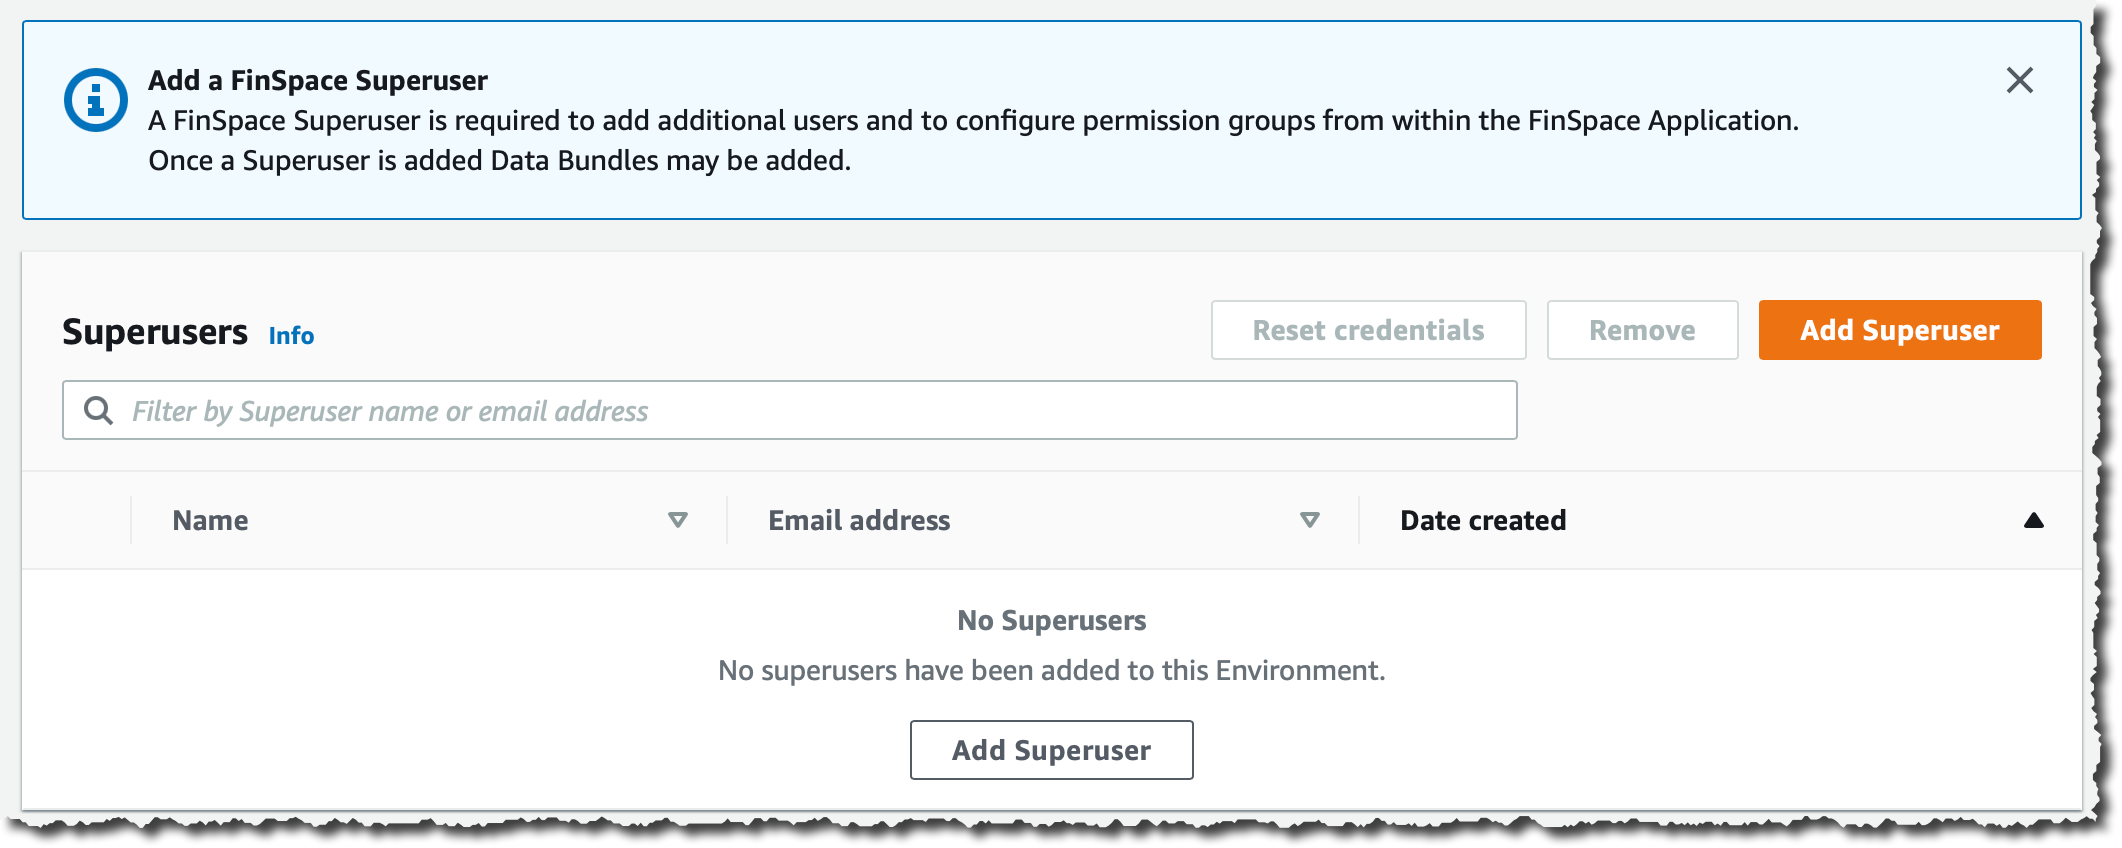
I take a note of the temporary password. I copy the text of the message to send to my superuser. This message includes the connection instructions for the initial connection to the environment.

The superuser has permission to add other users and to manage these users’ permissions in the Amazon FinSpace environment itself.

Finally, and just for the purpose of this demo, I choose to import an initial dataset. This allows me to start with some data in the environment. Doing so is just a single click in the console. The storage cost of this dataset is $41.46 / month and I can delete it at any time.

Under Sample data bundles, Capital Markets sample data, I click Install dataset. This can take several minutes, so it’s a good time to stand up, stretch your legs, and grab a cup of coffee.

FinSpace install sample dataset

How to Use an Amazon FinSpace Environment
In my role as financial analyst, my AWS account administrator sends me an email containing a URL to connect to my Amazon FinSpace Environment along with the related credentials. I connect to the Amazon FinSpace environment.

A couple of points are worth noting on the welcome page. First, on the top right side, I click the gear icon to access the environment settings. This is where I can add other users and manage their permissions. Second, you can browse the different data by categories on the left side, or search for specific terms by typing your search query on the search bar on top of the screen, and refine your search on the left side.

I can use Amazon FinSpace as my data hub. Data are fed through the API or I can load data directly from my workstation. I use tags to describe datasets. Datasets are containers for data; changes are versioned and I can create historical views of data or use the auto-updating data view that Amazon FinSpace maintains for me.

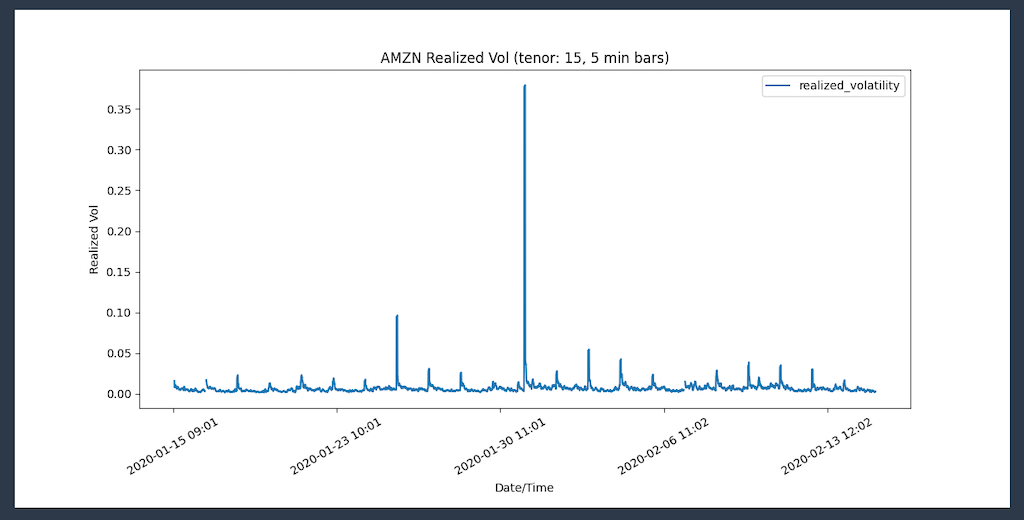
For this demo, let’s imagine I received a request from a portfolio manager who wants a chart showing realized volatility using 5 minute time bars for AMZN stock. Let me show you how I use the search bar to locate data and then use a notebook to analyze that data.

First, I search my dataset for stock price time bar summary, with 5 min intervals. I type “equity” in the search box. I’m lucky: The first result is the one I want. If needed, I could have refined the results using the facets on the left.

finspace search equity

Once I find the dataset, I explore its description, the schema, and other information. Based on these, I decide if this is the correct dataset to answer my portfolio manager’s request.

finspace dataset details


I click Analyze in notebook to start a Jupyter notebook where I’ll be able to further explore the data with PySpark. Once the notebook is open, I first check it is correctly configured to use the Amazon FinSpace PySpark kernel (starting the kernel takes 5-8 minutes).

Finspace select kernel

I click “play” on the first code box to connect to the Spark cluster.

finspace connect to cluster

To analyze my dataset and answer the specific question from my PM, I need to type a bit of PySpark code. For the purpose of this demo, I am using sample code from the Amazon FinSpace GitHub repository. You can upload the Notebook to your environment. Click the up arrow as shown on the top left of the screen above to select the file from your local machine.

This notebook pulls data from the Amazon FinSpace catalog “US Equity Time-Bar Summary” data I found earlier, and then uses the Amazon FinSpace built-in analytic function realized_volatility() to compute realized volatility for a group of tickers and exchange event types.

Before creating any graph, let’s have a sense of the dataset. What is the time range of the data ? What tickers are in this dataset ? I answer these questions with simple select() or groupby() functions provided by Amazon FinSpace. I prepare my FinSpaceAnalyticsAnalyser class with the code below :

from aws.finspace.analytics import FinSpaceAnalyticsManager
finspace = FinSpaceAnalyticsManager(spark = spark, endpoint=hfs_endpoint)

sumDF = finspace.read_data_view(dataset_id = dataset_id, data_view_id = view_id)

Once done, I can start to explore the dataset:
finspace analysis 1

I can see there are 561778 AMZN trades and price quotes between Oct. 1, 2019 and March 31, 2020.

To plot the realized volatility, I use Panda to plot the values:

finspace plot realized volatility code

When I execute this code block, I receive:

finspace plot realized volatility graph


Similarly, I can start a Bollinger Bands analysis to check if the volatility spike created an oversold condition on the AMZN stock. I am also using Panda to plot the values.

finspace plot bollinger bandcode

and generate this graph:

finspace plot realized volatility bolinger graph


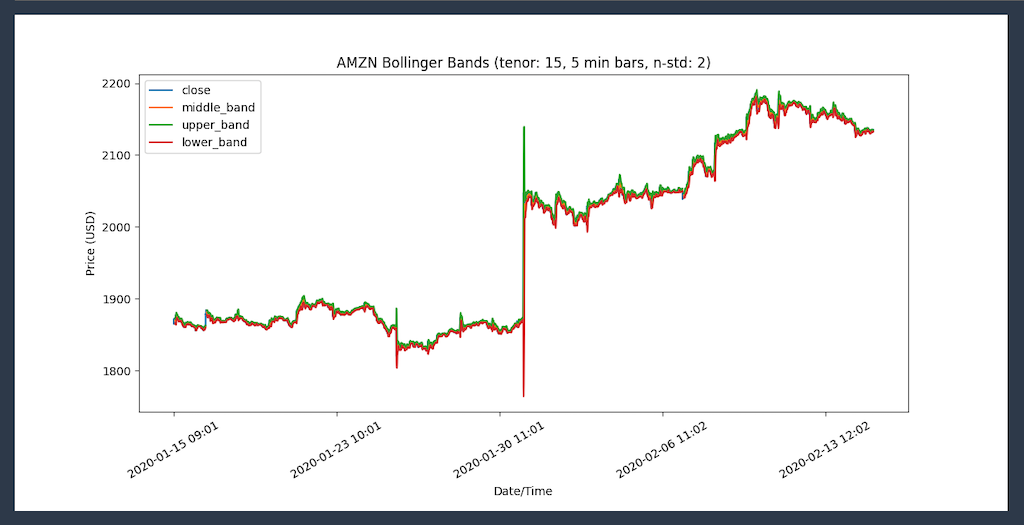
I am ready to answer the portfolio manager’s question. But why was there a spike on Jan 30 2020 ? The answer is in the news: “Amazon soars after huge earnings beat.” 🙂

Availability and Pricing
Amazon FinSpace is available today in US East (N. Virginia), US East (Ohio), US West (Oregon), Europe (Ireland), and Canada (Central).

As usual, we charge you only for the resources your project uses. Pricing is based on three dimensions: the number of analysts with access to the service, the volume of data ingested, and the compute hours used to apply your transformations. Detailed pricing information is available on the service pricing page.

Give it a try today and let us know your feedback.

— seb

Improve Google Cloud Search results with Contextual Boost

What’s changing 

We’re adding the ability to boost Google Cloud Search results using the Cloud Search Query API for third party data sources. Contextual boost is achieved by defining document specific context at the time of indexing and using the right contextual values at the time of query. Contextual boost is one of the key ways used to enable search personalization. 
Some examples of the contextual attributes you can define are: 
  • Location: Certain results can be more relevant to users from a specific location. For example, an employee in Japan might search for “benefits,” and want to receive benefits information specific to their office in Japan 
  • Department: Certain results can be more relevant to a user’s department. For example, a member of the Sales team might search for “pitch decks,” and want to discover pitch decks specific to their team 
  • Tenure: Certain results can be more relevant to the user’s tenure. For example, a new employee might search for “onboarding documents,” and want to discover documents specific to employee onboarding 

Who’s impacted 

Admins and end users 

Why you’d use it 

Context is a critical element in providing highly relevant search results. By providing a wide range of contextual attributes, users will see more tailored results based on inputs such as location, department, and job role. This helps reduce the time spent searching by surfacing more relevant content faster. 
With this launch, we provide support for a wide range of contextual attributes that can be used to personalize the results for the end users. This launch also supports combining contextual attributes for deeper context. Combining attributes helps to further triangulate the right results tailored for a specific end user.


Getting started

Availability

  • Available to Google Cloud Search customers

Rollout pace

Introducing CloudFront Functions – Run Your Code at the Edge with Low Latency at Any Scale

With Amazon CloudFront, you can securely deliver data, videos, applications, and APIs to your customers globally with low latency and high transfer speeds. To offer a customized experience and the lowest possible latency, many modern applications execute some form of logic at the edge. The use cases for applying logic at the edge can be grouped together in two main categories:

  • First are the complex, compute-heavy operations that are executed when objects are not in the cache. We launched Lambda@Edge in 2017 to offer a fully programmable, serverless edge computing environment for implementing a wide variety of complex customizations. Lambda@Edge functions are executed in a regional edge cache (usually in the AWS region closest to the CloudFront edge location reached by the client). For example, when you’re streaming video or audio, you can use Lambda@Edge to create and serve the right segments on-the-fly reducing the need for origin scalability. Another common use case is to use Lambda@Edge and Amazon DynamoDB to translate shortened, user-friendly URLs to full URL landing pages.
  • The second category of use cases are simple HTTP(s) request/response manipulations that can be executed by very short-lived functions. For these use cases, you need a flexible programming experience with the performance, scale, and cost-effectiveness that enable you to execute them on every request.

To help you with this second category of use cases, I am happy to announce the availability of CloudFront Functions, a new serverless scripting platform that allows you to run lightweight JavaScript code at the 218+ CloudFront edge locations at approximately 1/6th the price of Lambda@Edge.

Architectural diagram.

CloudFront Functions are ideal for lightweight processing of web requests, for example:

  • Cache-key manipulations and normalization: Transform HTTP request attributes (such as URL, headers, cookies, and query strings) to construct the cache-key, which is the unique identifier for objects in cache and is used to determine whether an object is already cached. For example, you could cache based on a header that contains the end user’s device type, creating two different versions of the content for mobile and desktop users. By transforming the request attributes, you can also normalize multiple requests to a single cache-key entry and significantly improve your cache-hit ratio.
  • URL rewrites and redirects: Generate a response to redirect requests to a different URL. For example, redirect a non-authenticated user from a restricted page to a login form. URL rewrites can also be used for A/B testing.
  • HTTP header manipulation: View, add, modify, or delete any of the request/response headers. For instance, add HTTP Strict Transport Security (HSTS) headers to your response, or copy the client IP address into a new HTTP header so that it is forwarded to the origin with the request.
  • Access authorization: Implement access control and authorization for the content delivered through CloudFront by creating and validating user-generated tokens, such as HMAC tokens or JSON web tokens (JWT), to allow/deny requests.

To give you the performance and scale that modern applications require, CloudFront Functions uses a new process-based isolation model instead of virtual machine (VM)-based isolation as used by AWS Lambda and Lambda@Edge. To do that, we had to enforce some restrictions, such as avoiding network and file system access. Also, functions run for less than one millisecond. In this way, they can handle millions of requests per second while giving you great performance on every function execution. Functions add almost no perceptible impact to overall content delivery network (CDN) performance.

Similar to Lambda@Edge, CloudFront Functions runs your code in response to events generated by CloudFront. More specifically, CloudFront Functions can be triggered after CloudFront receives a request from a viewer (viewer request) and before CloudFront forwards the response to the viewer (viewer response).

Lambda@Edge can also be triggered before CloudFront forwards the request to the origin (origin request) and after CloudFront receives the response from the origin (origin response). You can use CloudFront Functions and Lambda@Edge together, depending on whether you need to manipulate content before, or after, being cached.

Architectural diagram.

If you need some of the capabilities of Lambda@Edge that are not available with CloudFront Functions, such as network access or a longer execution time, you can still use Lambda@Edge before and after content is cached by CloudFront.

Architectural diagram.

To help you understand the difference between CloudFront Functions and Lambda@Edge, here’s a quick comparison:

CloudFront Functions Lambda@Edge
Runtime support JavaScript
(ECMAScript 5.1 compliant)
Node.js, Python
Execution location 218+ CloudFront
Edge Locations
13 CloudFront
Regional Edge Caches
CloudFront triggers supported Viewer request
Viewer response
Viewer request
Viewer response
Origin request
Origin response
Maximum execution time Less than 1 millisecond 5 seconds (viewer triggers)
30 seconds (origin triggers)
Maximum memory 2MB 128MB (viewer triggers)
10GB (origin triggers)
Total package size 10 KB 1 MB (viewer triggers)
50 MB (origin triggers)
Network access No Yes
File system access No Yes
Access to the request body No Yes
Pricing Free tier available;
charged per request
No free tier; charged per request
and function duration

Let’s see how this works in practice.

Using CloudFront Functions From the Console
I want to customize the content of my website depending on the country of origin of the viewers. To do so, I use a CloudFront distribution that I created using an S3 bucket as origin. Then, I create a cache policy to include the CloudFront-Viewer-Country header (that contains the two-letter country code of the viewer’s country) in the cache key. CloudFront Functions can see CloudFront-generated headers (like the CloudFront geolocation or device detection headers) only if they are included in an origin policy or cache key policy.

In the CloudFront console, I select Functions on the left bar and then Create function. I give the function a name and Continue.

Console screenshot.

From here, I can follow the lifecycle of my function with these steps:

  1. Build the function by providing the code.
  2. Test the function with a sample payload.
  3. Publish the function from the development stage to the live stage.
  4. Associate the function with one or more CloudFront distributions.

Console screenshot.

1. In the Build tab, I can access two stages for each function: a Development stage for tests, and a Live stage that can be used by one or more CloudFront distributions. With the development stage selected, I type the code of my function and Save:

function handler(event) {
  var request = event.request;
  var supported_countries = ['de', 'it', 'fr'];
  if (request.uri.substr(3,1) != '/') {
    var headers = request.headers;
    var newUri;
    if (headers['cloudfront-viewer-country']) {
      var countryCode = headers['cloudfront-viewer-country'].value.toLowerCase();
      if (supported_countries.includes(countryCode)) {
        newUri = '/' + countryCode + request.uri;
      }
    }
    if (newUri === undefined) {
      var defaultCountryCode = 'en';
      newUri = '/' + defaultCountryCode + request.uri;
    }
    var response = {
      statusCode: 302,
      statusDescription: 'Found',
      headers: {
        "location": { "value": newUri }
      }
    }
    return response;
  }
  return request;
}

The function looks at the content of the CloudFront-Viewer-Country header set by CloudFront. If it contains one of the supported countries, and the URL does not already contain a country prefix, it adds the country at the beginning of the URL path. Otherwise, it lets the request pass through without changes.

2. In the Test tab, I select the event type (Viewer Request), the Stage (Development, for now) and a sample event.

Console screenshot.

Below, I can customize the Input event by selecting the HTTP method, and then editing the path of the URL, and optionally the client IP to use. I can also add custom headers, cookies, or query strings. In my case, I leave all the default values and add the CloudFront-Viewer-Country header with the value of FR (for France). Optionally, instead of using the visual editor, I can customize the input event by editing the JSON payload that is passed to the function.

Console screenshot.

I click on the Test button and look at the Output. As expected, the request is being redirected (HTTP status code 302). In the Response headers, I see that the location where the request is being redirected starts with /fr/ to provide custom content for viewers based in France. If something doesn’t go as expected in my tests, I can look at the Function Logs. I can also use console.log() in my code to add more debugging information.

Console screenshot.

In the Output, just above the HTTP status, I see the Compute utilization for this execution. Compute utilization is a number between 0 and 100 that indicates the amount of time that the function took to run as a percentage of the maximum allowed time. In my case, a compute utilization of 21 means that the function completed in 21% of the maximum allowed time.

3. I run more tests using different configurations of URL and headers, then I move to the Publish tab to copy the function from the development stage to the live stage. Now, the function is ready to be associated with an existing distribution.

Console screenshot.

4. In the Associate tab, I select the Distribution, the Event type (Viewer Request or Viewer Response) and the Cache behavior (I only have the Default (*) cache behavior for my distribution). I click Add association and confirm in the dialog.

Console screenshot.

Now, I see the function association at the bottom of the Associate tab.

Console screenshot.

To test this configuration from two different locations, I start two Amazon Elastic Compute Cloud (Amazon EC2) instances, one in the US East (N. Virginia) Region and one in the Europe (Paris) Region. I connect using SSH and use cURL to get an object from the CloudFront distribution. Previously, I have uploaded two objects to the S3 bucket that is used as the origin for the distribution: one, for customers based in France, using the fr/ prefix, and one, for customers not in a supported country, using the en/ prefix.

I list the two objects using the AWS Command Line Interface (CLI):

$ aws s3 ls --recursive s3://BUCKET
2021-04-01 13:54:20         13 en/doc.txt
2021-04-01 13:54:20          8 fr/doc.txt

In the EC2 instance in the US East (N. Virginia) Region, I run this command to download the object:

[us-east-1]$ curl -L https://d2wj2l15gt32vo.cloudfront.net/doc.txt 
Good morning

Then I run the same command in the Europe (Paris) Region:

[eu-west-3]$ curl -L https://d2wj2l15gt32vo.cloudfront.net/doc.txt
Bonjour

As expected, I am getting different results from the same URL. I am using the -L option so that cURL is following the redirect it receives. In this way, each command is executing two HTTP requests: the first request receives the HTTP redirect from the CloudFront function, the second request follows the redirect and is not modified by the function because it contains a custom path in the URL (/en/ or /fr/).

To see the actual location of the redirect and all HTTP response headers, I use cURL with the -i option. These are the response headers for the EC2 instance running in the US; the function is executed at an edge location in Virginia:

[us-east-1]$ curl -i https://d2wj2l15gt32vo.cloudfront.net/doc.txt 
HTTP/2 302 
server: CloudFront
date: Thu, 01 Apr 2021 14:39:31 GMT
content-length: 0
location: /en/doc.txt
x-cache: FunctionGeneratedResponse from cloudfront
via: 1.1 cb0868a0a661911b98247aaff77bc898.cloudfront.net (CloudFront)
x-amz-cf-pop: IAD50-C2
x-amz-cf-id: TuaLKKg3YvLKN85fzd2qfcx9jOlfMQrWazpOVmN7NgfmmcXc1wzjmA==

And these are the response headers for the EC2 instance running in France; this time, the function is executed in an edge location near Paris:

[eu-west-3]$ curl -i https://d2wj2l15gt32vo.cloudfront.net/doc.txt
HTTP/2 302 
server: CloudFront
date: Thu, 01 Apr 2021 14:39:26 GMT
content-length: 0
location: /fr/doc.txt
x-cache: FunctionGeneratedResponse from cloudfront
via: 1.1 6fa25eadb94abd73b5efc56a89b2d829.cloudfront.net (CloudFront)
x-amz-cf-pop: CDG53-C1
x-amz-cf-id: jzWcbccJiTDRj22TGwsn_

Availability and Pricing
CloudFront Functions is available today and you can use it with new and existing distributions. You can use CloudFront Functions with the AWS Management Console, AWS Command Line Interface (CLI), AWS SDKs, and AWS CloudFormation. With CloudFront Functions, you pay by the number of invocations. You can get started with CloudFront Functions for free as part of the AWS Free Usage Tier. For more information, please see the CloudFront pricing page.

AWS for the Edge
Amazon CloudFront and AWS edge networking capabilities are part of the AWS for the Edge portfolio. AWS edge services improve performance by moving compute, data processing, and storage closer to end-user devices. This includes deploying AWS managed services, APIs, and tools to locations outside AWS data centers, and even onto customer-owned infrastructure and devices.

AWS offers you a consistent experience and portfolio of capabilities from the edge to the cloud. Using AWS, you have access to the broadest and deepest capabilities for edge use cases, like edge networking, hybrid architectures, connected devices, 5G, and multi-access edge computing.

Start using CloudFront Functions today to add custom logic at the edge for your applications.

Danilo

Happy 10th Birthday – AWS Identity and Access Management

Amazon S3 turned 15 earlier this year, and Amazon EC2 will do the same in a couple of months. Today we are celebrating the tenth birthday of AWS Identity and Access Management (IAM).

The First Decade
Let’s take a walk through the last decade and revisit some of the most significant IAM launches:

Am IAM policy in text form, shown in Windows Notepad.May 2011 – We launched IAM, with the ability to create users, groups of users, and to attach policy documents to either one, with support for fifteen AWS services. The AWS Policy Generator could be used to build policies from scratch, and there was also a modest collection of predefined policy templates. This launch set the standard for IAM, with fine-grained permissions for actions and resources, and the use of conditions to control when a policy is in effect. This model has scaled along with AWS, and remains central to IAM today.

August 2011 – We introduced the ability for you to use existing identities by federating into your AWS Account, including support for short-term temporary AWS credentials.

June 2012 – With the introduction of IAM Roles for EC2 instances, we made it easier for code running on an EC2 instance to make calls to AWS services.

February 2015 – We launched Managed Policies, and simultaneously turned the existing IAM policies into first-class objects that could be created, named, and used for multiple IAM users, groups, or roles.

AWS Organizations, with a root account and three accounts inside.February 2017 – We launched AWS Organizations, and gave you the ability to to implement policy-based management that spanned multiple AWS accounts, grouped into a hierarchy of Organizational Units. This launch also marked the debut of Service Control Policies (SCPs) that gave you the power to place guard rails around the level of access allowed within the accounts of an Organization.

April 2017 – Building on the IAM Roles for EC2 Instances, we introduced service-linked roles. This gave you the power to delegate permissions to AWS services, and made it easier for you to work with AWS services that needed to call other AWS services on your behalf.

December 2017 – We introduced AWS Single Sign-On to make it easier for you to centrally manage access to AWS accounts and your business applications. SSO is built on top of IAM and takes advantage of roles, temporary credentials, and other foundational IAM features.

November 2018 – We introduced Attribute-Based Access Control (ABAC) as a complement to the original Role-Based Access Control to allow you to use various types of user, resource, and environment attributes to drive policy & permission decisions. This launch allowed you to tag IAM users and roles, which allowed you to match identity attributes and resource attributes in your policies. After this launch, we followed up with support for the use of ABAC in conjunction with AWS SSO and Cognito.

IAM Access Analyzer, showing some active findingsDecember 2019 – We introduced IAM Access Analyzer to analyze your policies and determine which resources can be accessed publicly or from other accounts.

March 2021 – We added policy validation (over 100 policy checks) and actionable recommendations to IAM Access Analyzer in order to help you to construct IAM policies and SCPs that take advantage of time-tested AWS best practices.

April 2021 – We made it possible for you to generate least-privilege IAM policy templates based on access activity.

Then and Now
In the early days, a typical customer might use IAM to control access to a handful of S3 buckets, EC2 instances, and SQS queues, all in a single AWS account. These days, some of our customers use IAM to control access to billions of objects that span multiple AWS accounts!

Because every call to an AWS API must call upon IAM to check permissions, the IAM team has focused on availability and scalability from the get-go. Back in 2011 the “can the caller do this?” function handled a couple of thousand requests per second. Today, as new services continue to appear and the AWS customer base continues to climb, this function now handles more than 400 million API calls per second worldwide.

As you can see from my summary, IAM has come quite a long way from its simple yet powerful beginnings just a decade ago. While much of what was true a decade ago remains true today, I would like to call your attention to a few best practices that have evolved over time.

Multiple Accounts – Originally, customers generally used a single AWS account and multiple users. Today, in order to accommodate multiple business units and workloads, we recommend the use of AWS Organizations and multiple accounts. Even if your AWS usage is relatively simple and straightforward at first, your usage is likely to grow in scale and complexity, and it is always good to plan for this up front. To learn more, read Establishing Your Best Practice AWS Environment.

Users & SSO – In a related vein, we recommend that you use AWS SSO to create and manage users centrally, and then grant them access to one or more AWS accounts. To learn more, read the AWS Single Sign-On User Guide.

Happy Birthday, IAM
In line with our well-known penchant for Customer Obsession, your feedback is always welcome! What new IAM features and capabilities would you like to see in the decade to come? Leave us a comment and I will make sure that the team sees it.

And with that, happy 10th birthday, IAM!

Jeff;