Azure Health Bot’s new regions empower customers to build critical business applications by hosting database in the same region as the application stack and close to customers for better performance.
Azure Stream Analytics: 5 new regions are now generally available
Azure Stream Analytics is a fully managed, real-time analytics service designed to help you analyze and process fast moving streams of data that can be used to get insights, build reports, or trigger alerts and actions. The service is now available in 5 new regions.
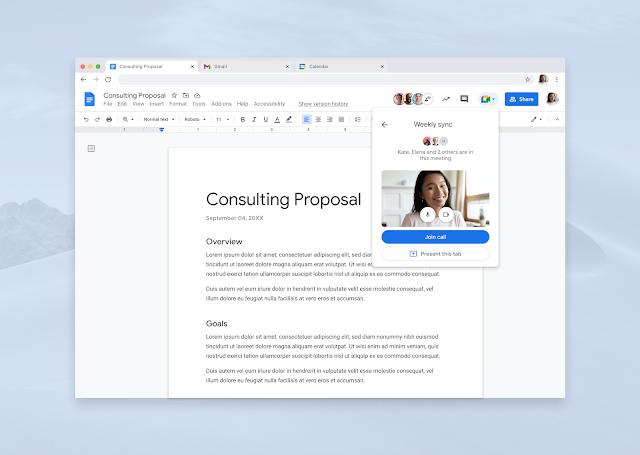
Present from Google Docs, Sheets, and Slides directly to Google Meet
What’s changing
Who’s impacted
Why it’s important
Getting started
- Admins: No action required.
- End users: Visit the Help Center to learn more about presenting a doc, sheet, or slide directly in Google Meet.
Rollout pace
- Rapid Release domains: Gradual rollout (up to 15 days for feature visibility) starting on May 18, 2021
- Scheduled Release domains: Gradual rollout (up to 15 days for feature visibility) starting on June 7, 2021
Availability
- Available to all Google Workspace customers, as well as G Suite Basic and Business customers
- Available to users with personal Google Accounts
Resources
![]()
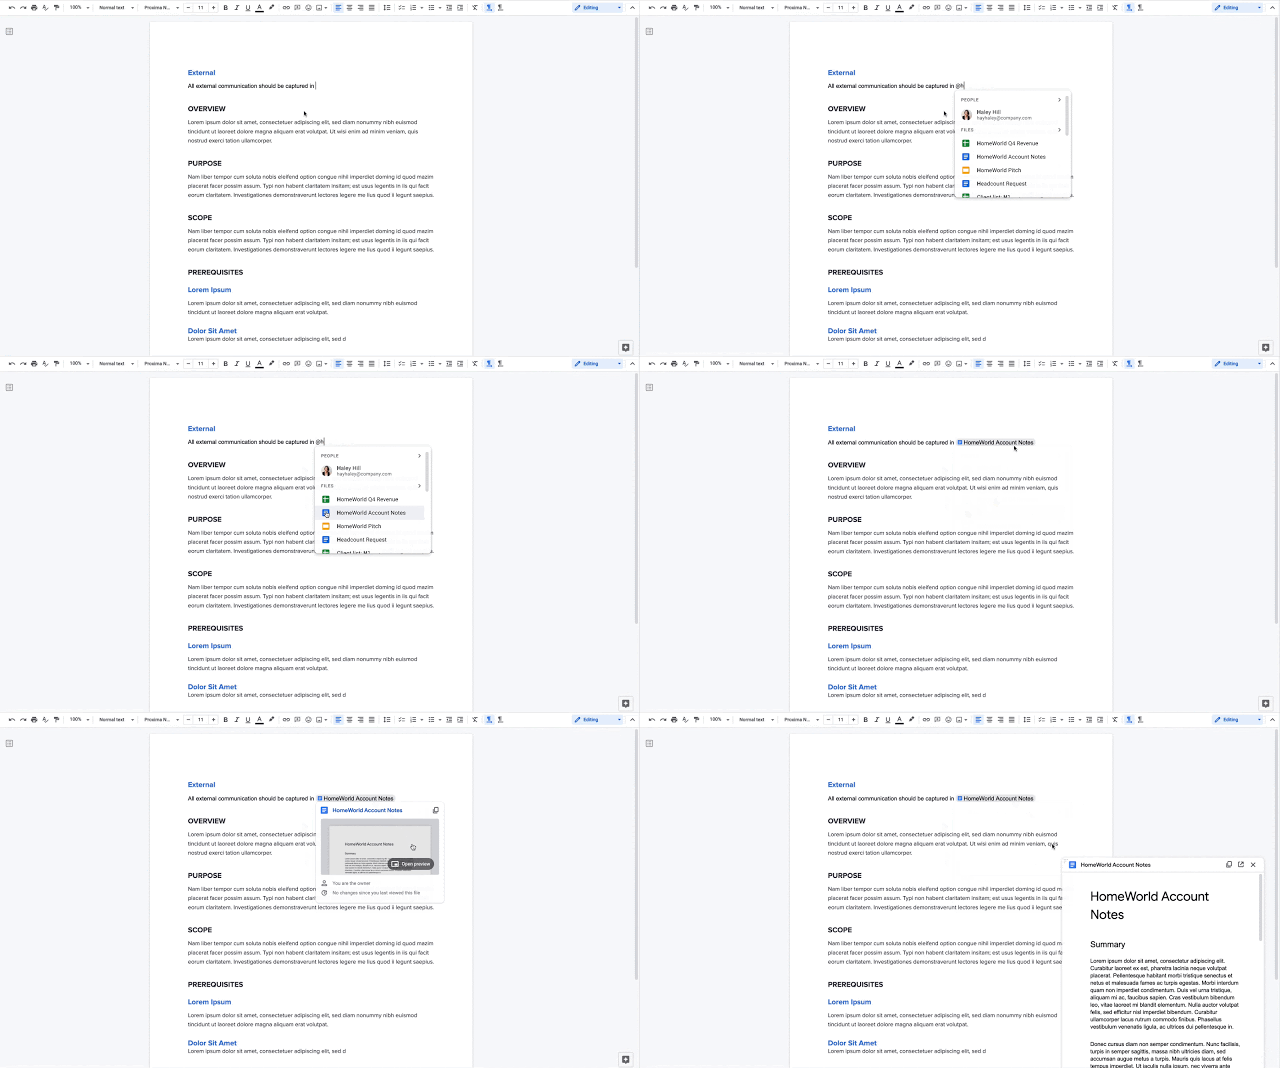
Insert smart chips for files and meetings, create checklists in Google Docs
What’s changing
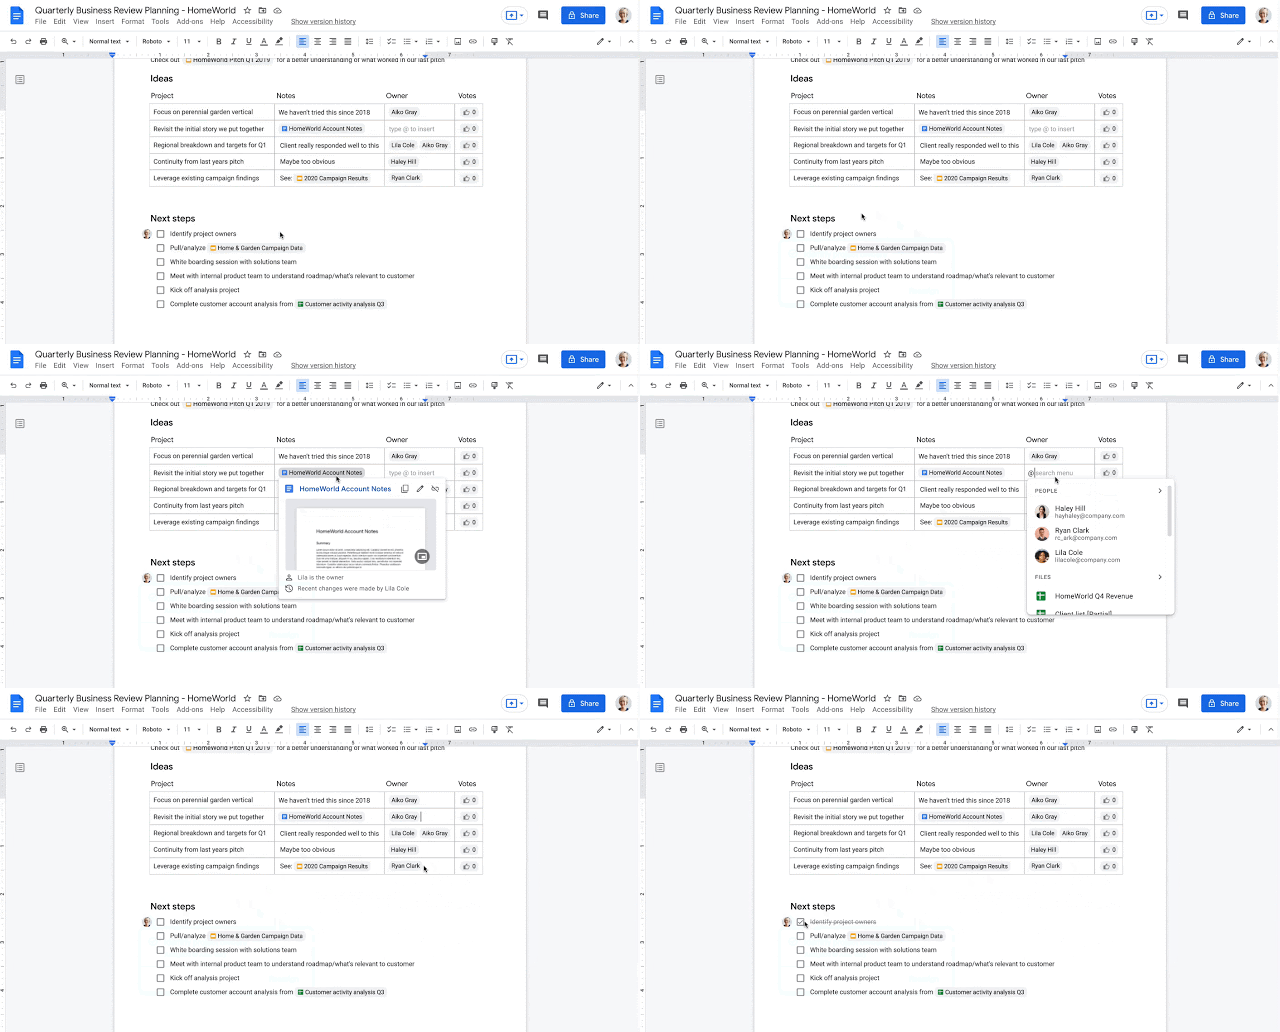
- Insert smart chips for Google Docs, Sheets, Slides files, other Google Drive files, and Calendar events
- Create checklists
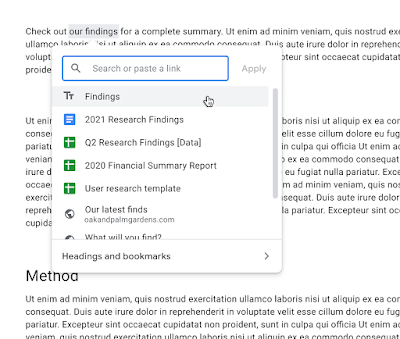
- Insert links more easily with intelligent suggestions in the insert link dialog
Who’s impacted
Why it’s important
Additional details
- Table templates to quickly insert various tables in Docs, such as topic-voting tables, where feedback can be seamlessly gathered in one place.
- Meeting note templates which will automatically import any relevant information from a Calendar meeting invite, including smart chips for attendees and files.
- Pageless format in Docs will allow you to remove the boundaries of a page to create an infinite surface to work on.
- Timeline view in Sheets that makes it easier and faster to track tasks by allowing you to organize your data by owner, category, campaign, or whichever attribute fits best.
Getting started
- Admins: There is no admin action required.
- End users: This feature will be available for all users. Visit the Help Center to learn more about using smart chips and checklists in Google Docs.
Rollout pace
- Rapid Release domains: Gradual rollout (up to 15 days for feature visibility) starting on May 18, 2021
- Scheduled Release domains: Gradual rollout (up to 15 days for feature visibility) starting on June 7, 2021
Availability
- Available to all Google Workspace customers, as well as G Suite Basic and Business customers
Resources
![]()
General availability: IoT Hub service API support for Azure Active Directory based access control
IoT Hub support for Azure Active Directory (Azure AD) and Role-Based Access Control (RBAC) is now generally available for service APIs. This means you can secure your service connections to IoT Hub with much more flexibility and granularity.
General availability: Azure Key Vault SLA raised to 99.99%
Key Vault is now being offered at a 99.99% availability SLA, an improvement over our previous 99.9% SLA.
Azure Sphere 21.05 will not be released – 21.06 coming in June
This month, Azure Sphere will not release an updated OS or SDK for 21.05. The next software update will be generally available in June.
How to Use the New AWS Application Migration Service for Lift-and-Shift Migrations
Since AWS acquired CloudEndure in 2019, our new colleagues have offered CloudEndure Migration and CloudEndure Disaster Recovery. CloudEndure Migration can move applications from any physical, virtual, or cloud-based infrastructure to AWS at no charge. This complements AWS Server Migration Service (AWS SMS), which is an agentless service for migrating on-premises workloads to AWS. CloudEndure Disaster Recovery is a separate business continuity offering, designed to help you minimize downtime and data loss. It continuously replicates the contents of your on-premises, virtual, or cloud-based systems to a low-cost staging area in the AWS Region of your choice, within the confines of your AWS account. This offer is available to all AWS customers and partners.
Recently, we launched AWS Application Migration Service (AWS MGN) (AWS MGN), which we now recommend as the primary migration service for lift-and-shift migrations to AWS. We encourage customers who are currently using CloudEndure Migration or AWS SMS to switch to AWS MGN for future migrations. AWS MGN enables organizations to move applications to AWS without having to make any changes to the applications, their architecture, or the migrated servers.
With AWS MGN, you can minimize time-intensive, error-prone manual processes by automatically replicating entire servers and converting your source servers from physical, virtual, or cloud infrastructure to run natively on AWS. The service simplifies your migration by enabling you to use the same automated process for a wide range of applications. By launching non-disruptive tests before migrating, you can be confident that your most critical applications such as SAP, Oracle, and SQL Server will work seamlessly on AWS.
AWS MGN reduces overall migration costs because there is no need to invest in multiple migration solutions, specialized cloud development, or application-specific skills. This is because AWS MGN can be used to migrate any application from any source infrastructure that runs supported operating systems.
How AWS MGN Works
To migrate to AWS, you install the AWS MGN Replication Agent on your source servers and then view and define replication settings in the AWS MGN console. AWS MGN uses these settings to create and manage a staging area subnet with lightweight Amazon Elastic Compute Cloud (Amazon EC2) instances, that act as replication servers used to replicate data between your source servers and AWS.
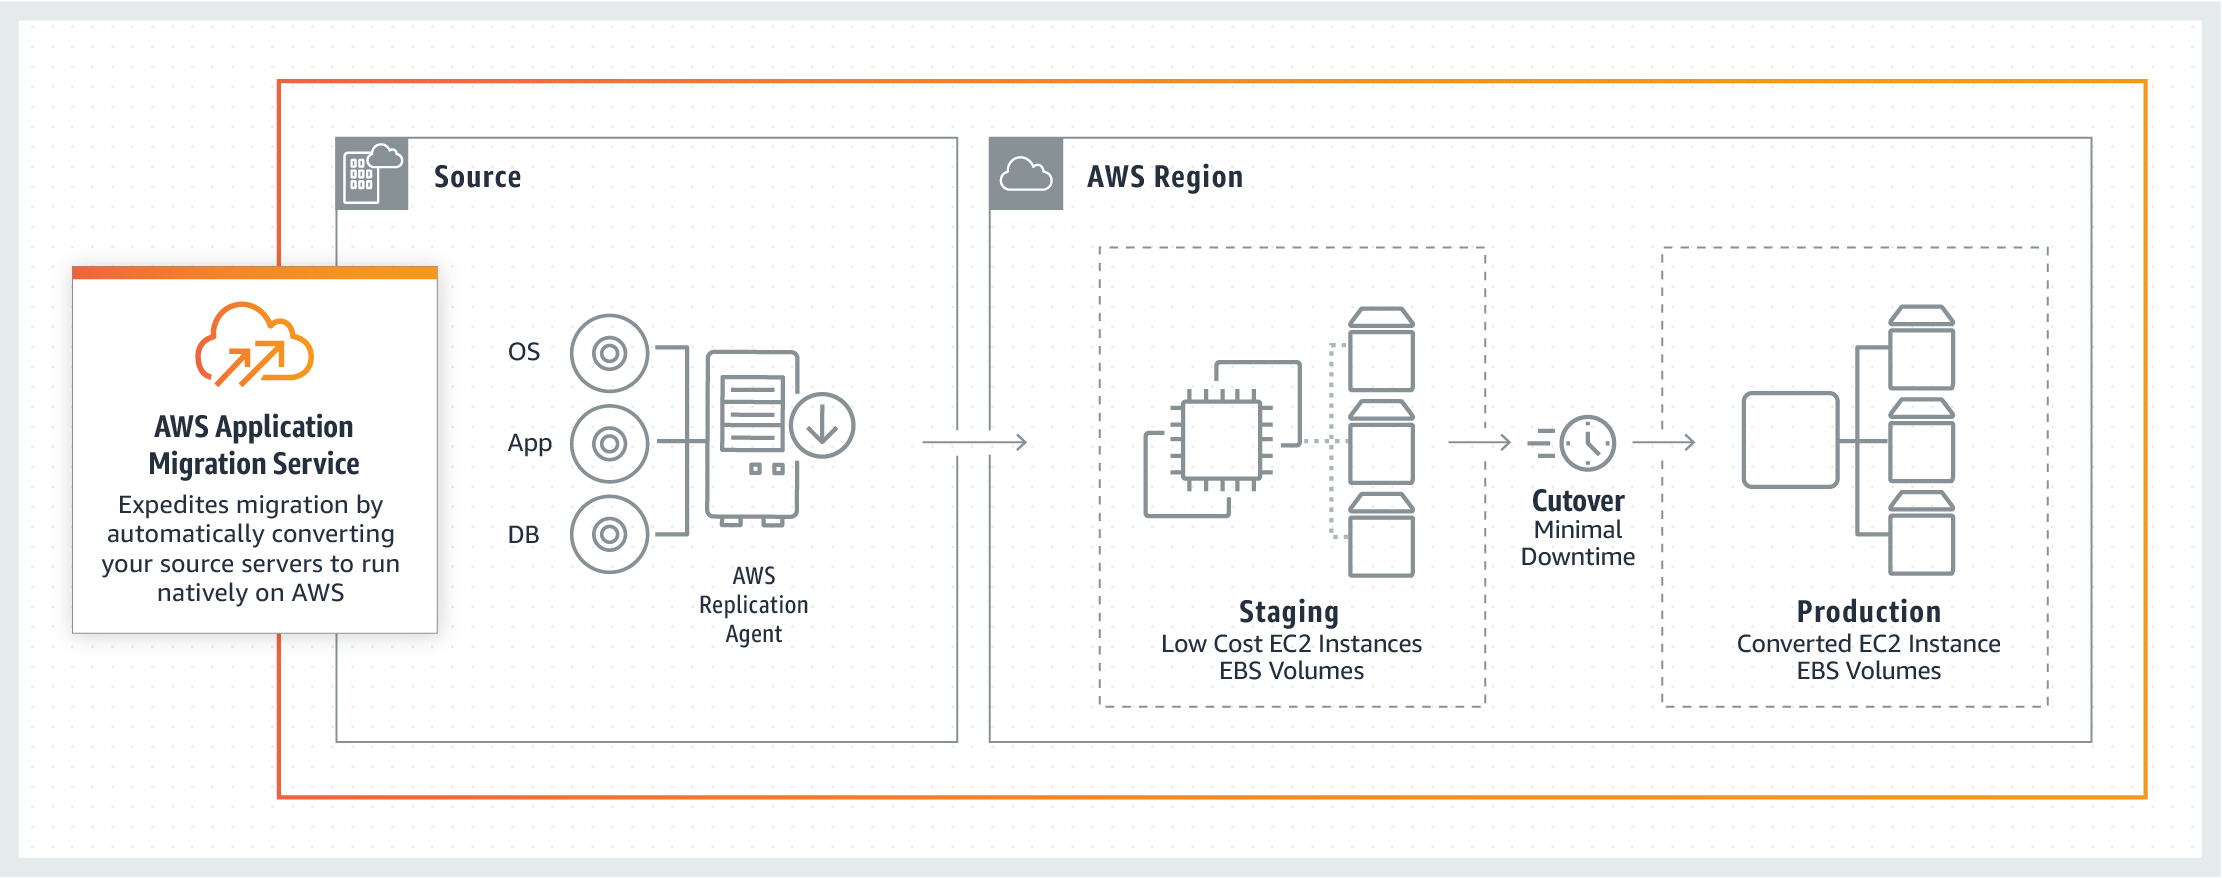
Replication servers receive data from the agent running on your source servers and write this data to the Amazon Elastic Block Store (EBS) volumes. Your replicated data is compressed and encrypted in transit and at rest using EBS encryption. AWS MGN keeps your source servers up to date on AWS using continuous, block-level data replication. It uses your defined launch settings to launch instances when you conduct non-disruptive tests or perform a cutover.
When you launch test or cutover instances, AWS MGN converts your source servers to boot and run natively on AWS. After confirming that your launched instances are operating properly on AWS, you can decommission your source servers. You can then choose to modernize your applications by using AWS services and capabilities.
AWS MGN – Getting Started
To get started, create the replication settings template in the AWS MGN console. This template will determine how data replication will work for each newly added source server. Before you configure your template, ensure that you meet the network requirements for running AWS MGN.
In the AWS MGN console, choose Get started to create the template.
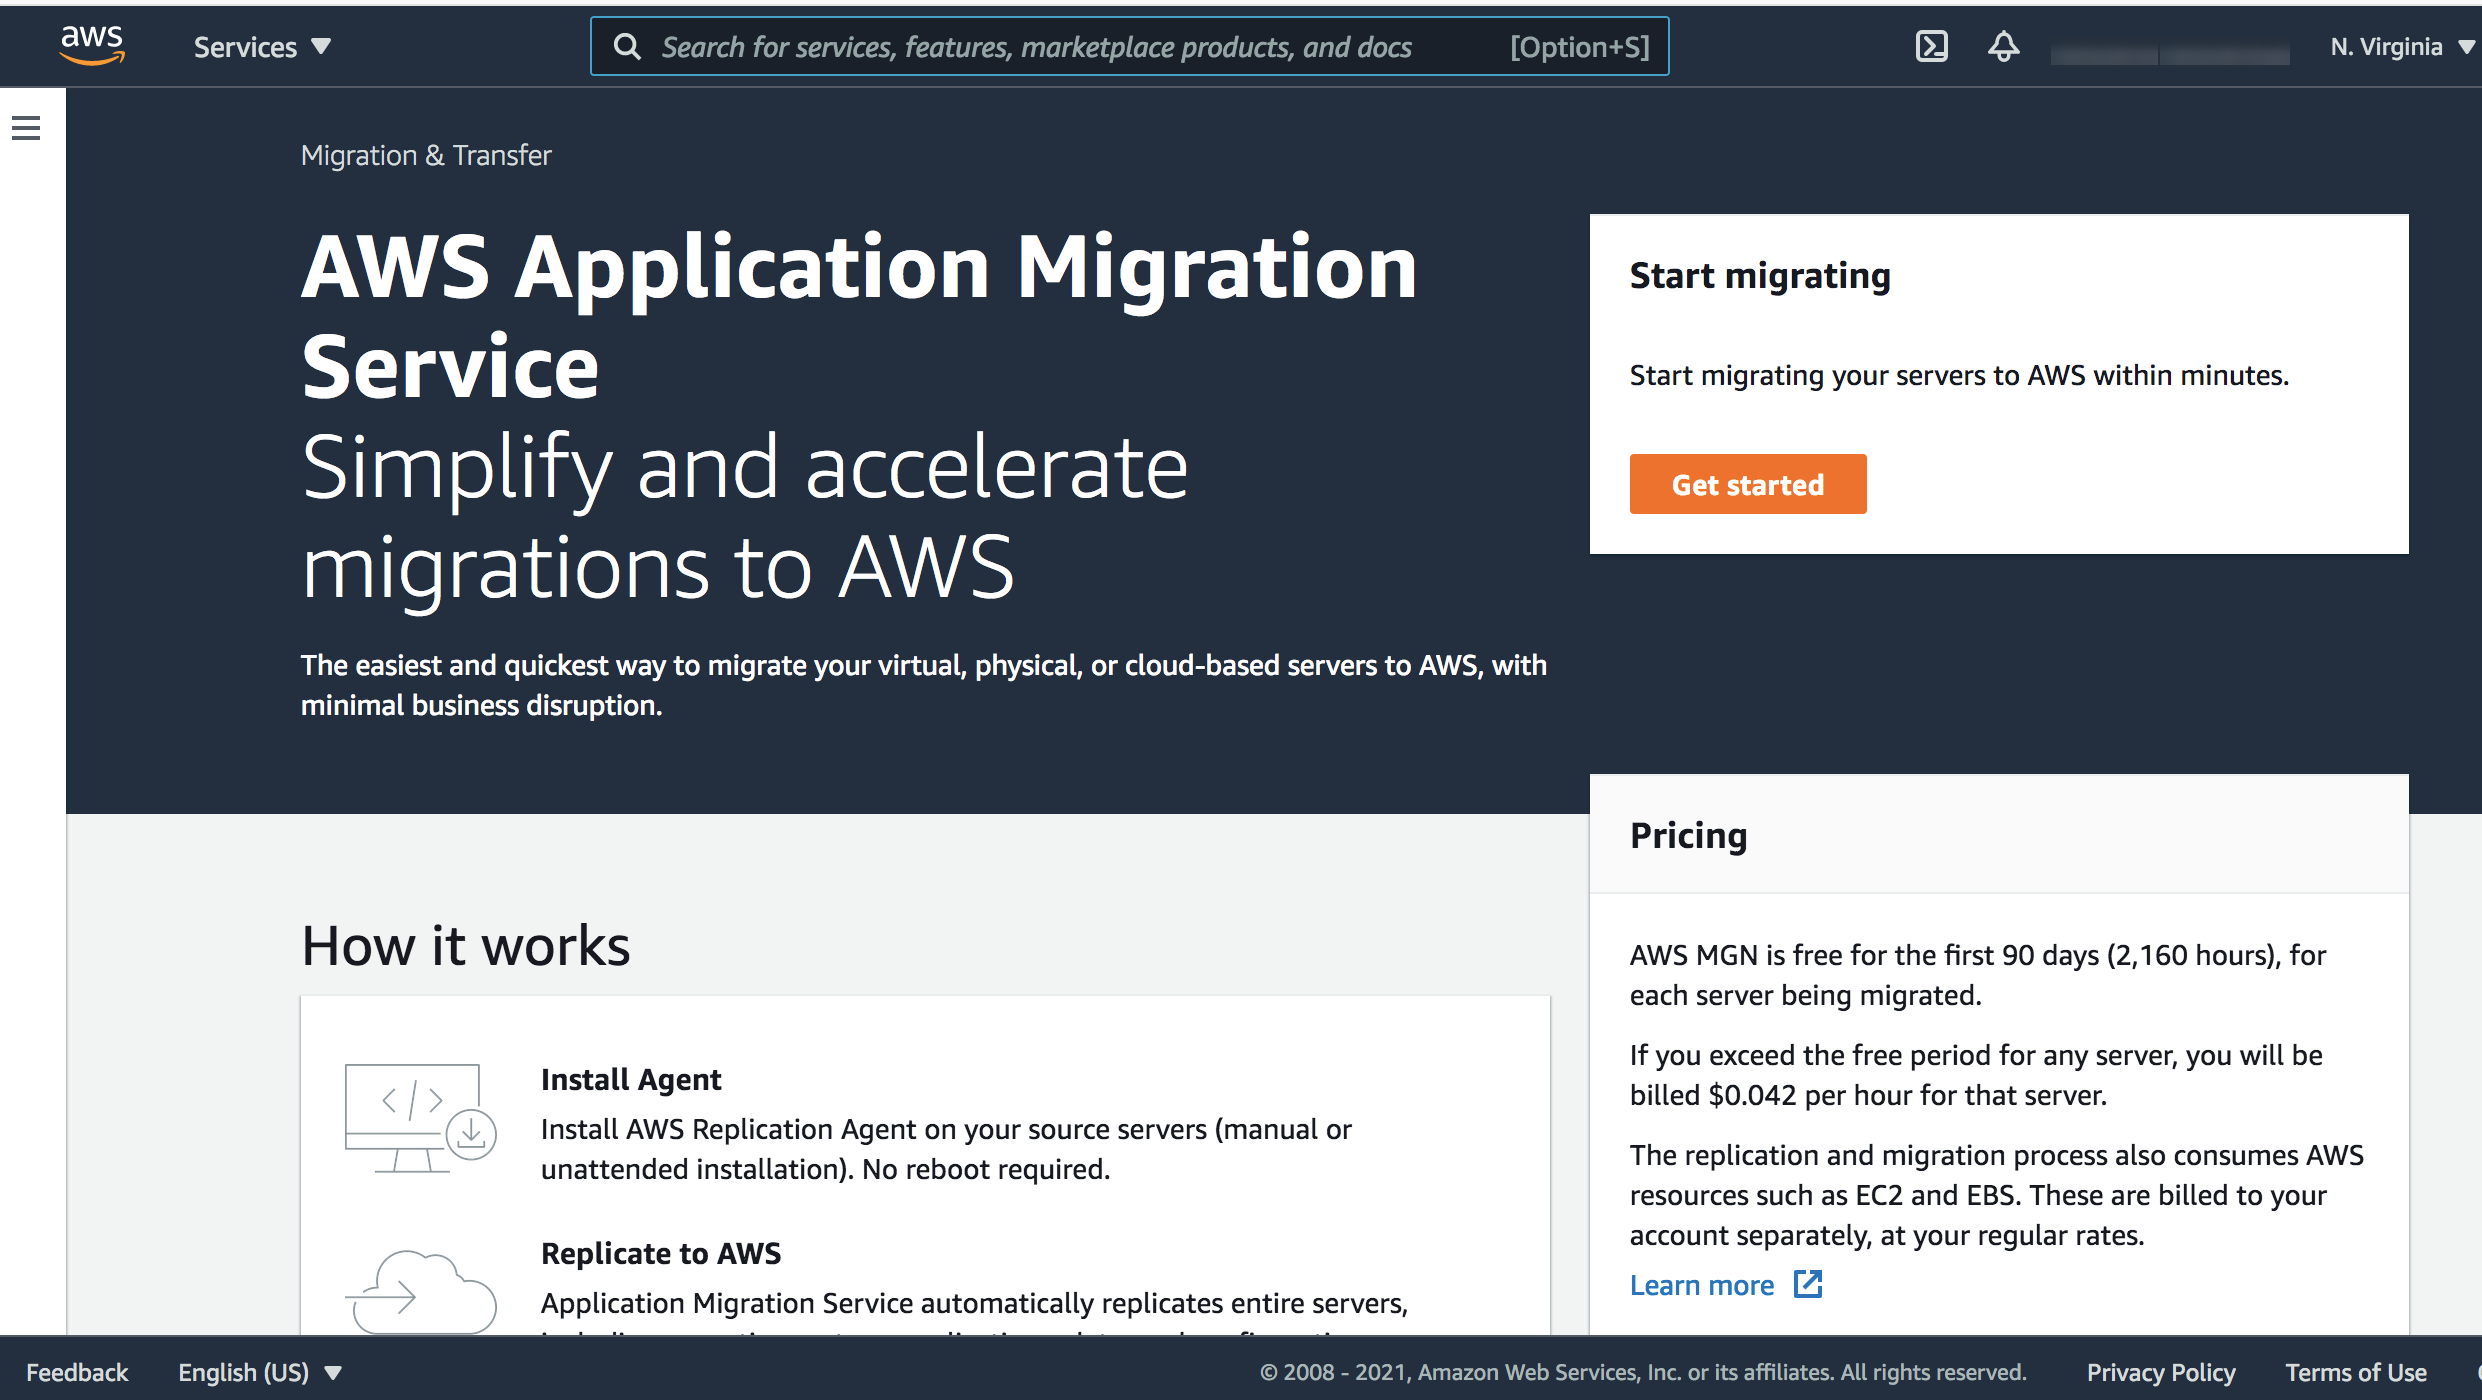
The replication settings configured in this template will be applied to each newly added source server. You can change the settings at any time for any individual source server or group of source servers.
Replication servers are lightweight EC2 instances that are used to replicate data between your source servers and AWS. They are automatically launched and terminated as needed. You can use data routing and throttling settings to control how data is routed from your source servers to the replication servers.
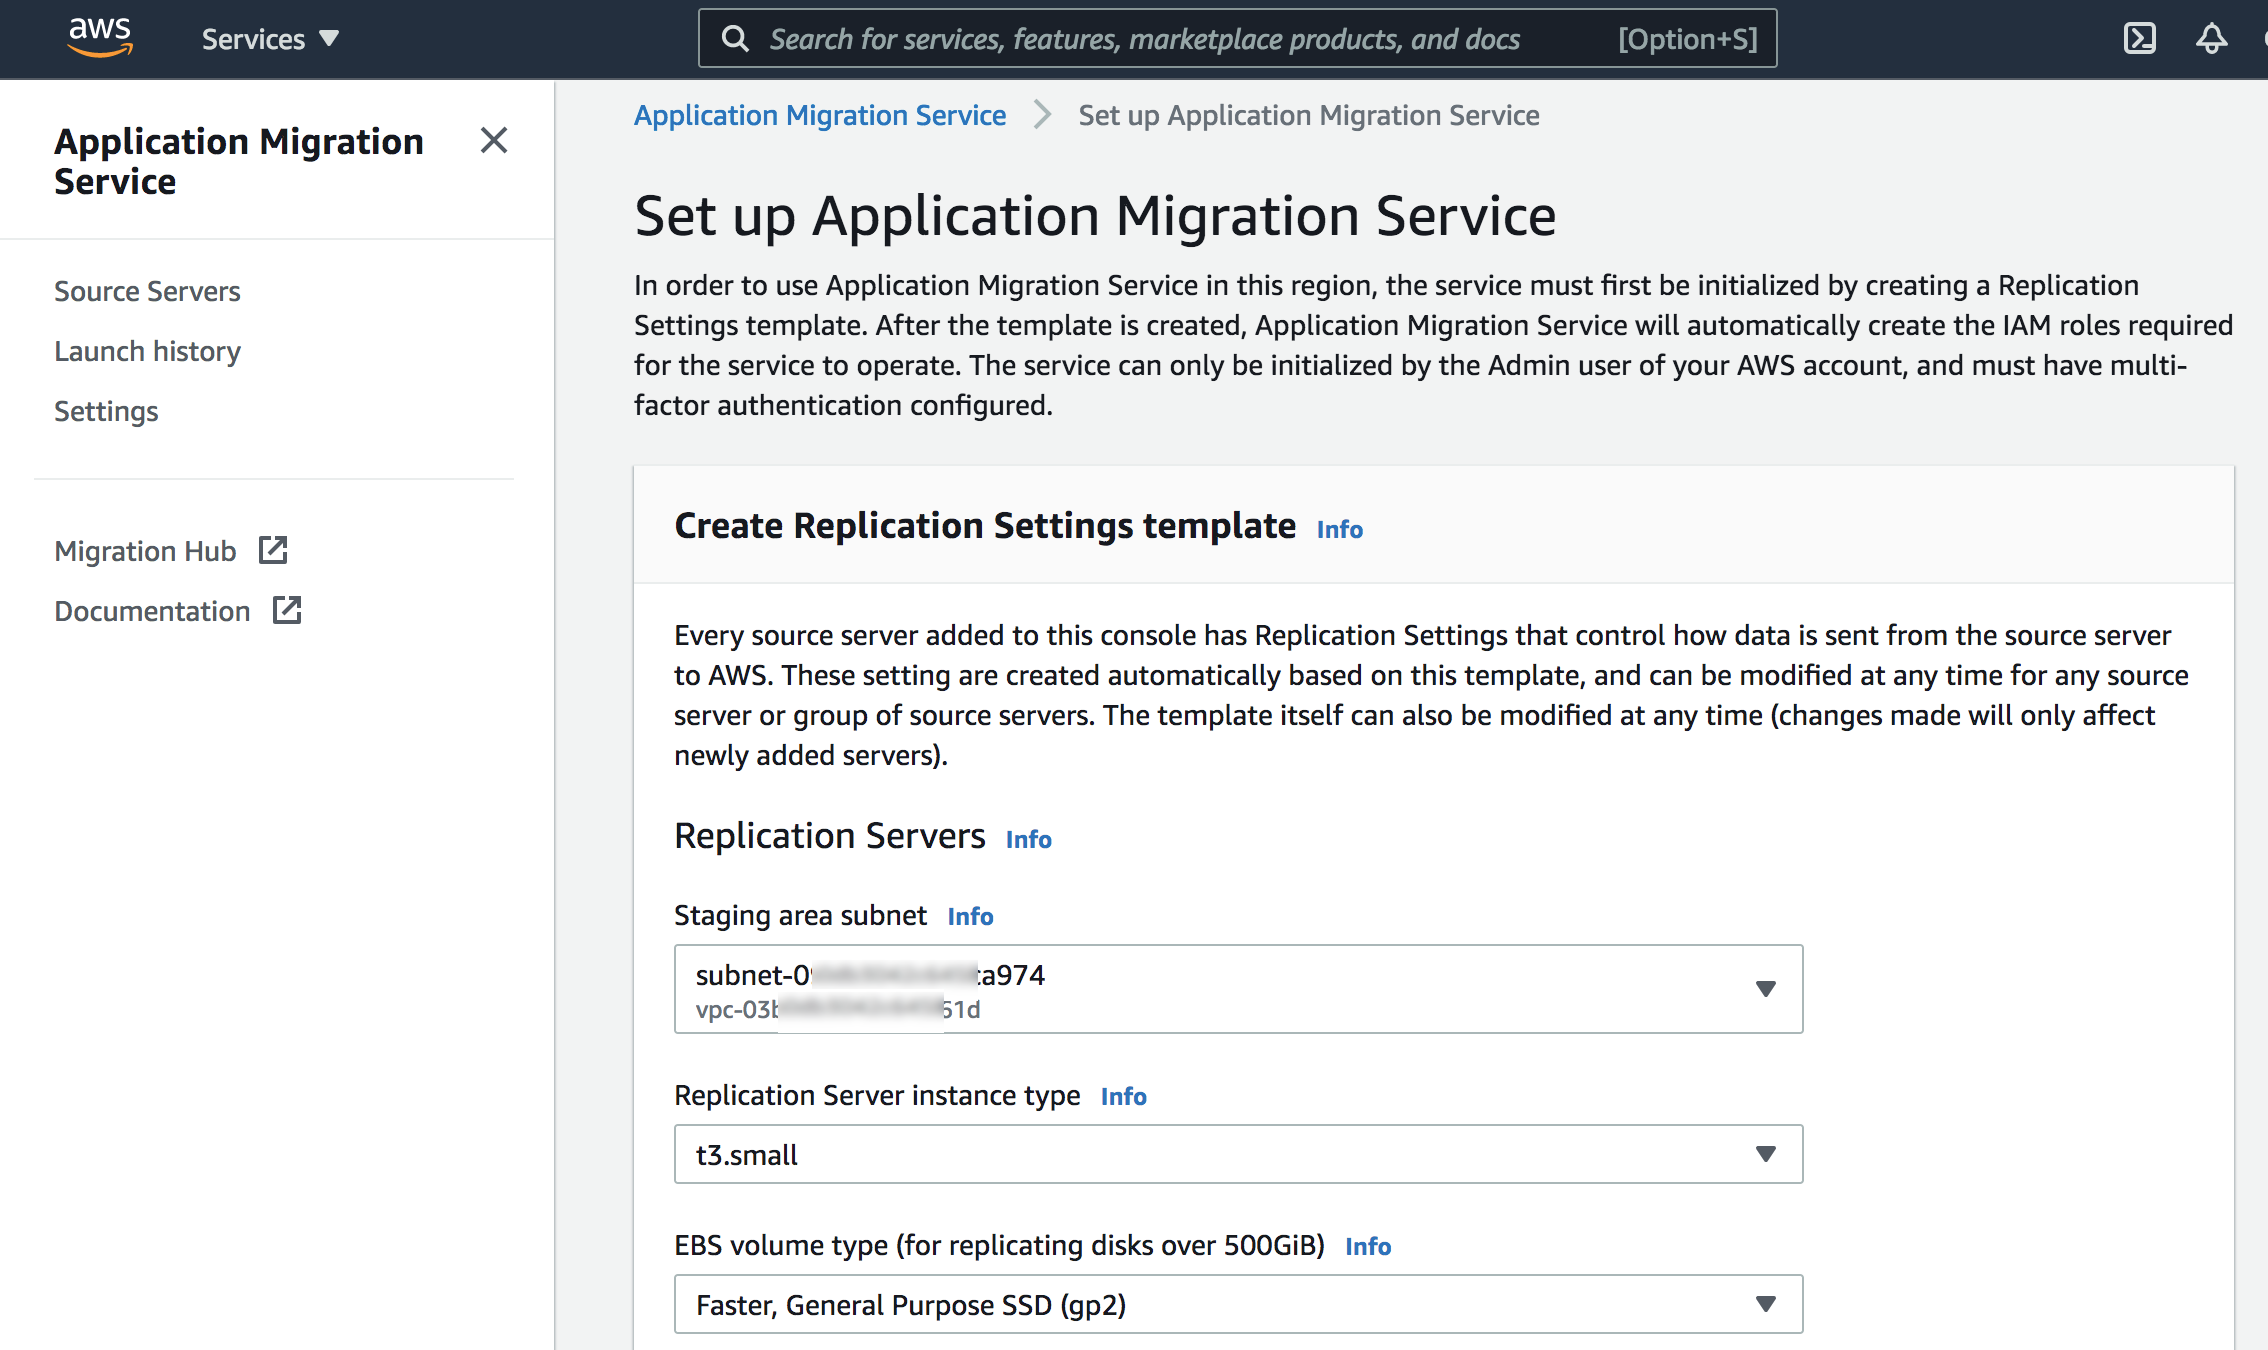
After you create your template, you can add your source servers. To edit your template, in the left navigation pane, choose Settings. You can edit individual server replication settings after you add your source servers.

To add source servers to AWS MGN, install the AWS MGN Replication Agent on them. You can install the agent on servers running Linux and Windows. For more information, see adding source servers in the documentation.
For example, download the aws-replication-installer-init.py agent installer with the wget command and run the installation script in your Linux source server.

After the AWS Replication Agent is installed, the server will be added to AWS MGN console and undergo the initial sync process.
The Source Servers page displays a list of source servers. Each row in the list represents a single server. The migration lifecycle column shows the current state of each source server. After the initial sync process has been completed successfully, data replication will start automatically.

After you have added your source servers, you must configure the launch settings for each server. The launch settings are a set of instructions that determine how a test or cutover instance will be launched for each source server on AWS.
You must configure the launch settings before you launch test or cutover instances. To access the launch settings, choose the host name of a source server and then navigate to the Launch settings tab.

After you have added your source servers and configured their launch settings, you are ready to launch a test instance. You must test the migration of your source servers to AWS before you initiate a cutover, to verify that your source servers function properly in the AWS environment.
To launch a test or cutover instance for a single source server or multiple source servers, on the Source Servers page, select the checkbox for each server for which you want to launch a test instance.

You can test one source server at a time or multiple source servers simultaneously. For each source server, you will be informed of the success or failure of the test. Choose Launch test instances to start the test, and then choose Launch.
When the test has started, the console will display a Launch job started message. To view the specific job for the test launch, choose View job details.

Use the Migration dashboard tab to monitor the progress in relation to the migration lifecycle.

As a best practice, perform a test at least one week before you plan to migrate your source servers. This allows you time to identify and solve problems before the cutover takes place. After you launch the test instances, use SSH (Linux) or RDP (Windows) to connect to your instance and ensure that everything is working correctly.
After you have finalized the testing of your source servers, you are ready for a cutover. It’s a best practice to schedule the cutover time in advance. After the cutover action is performed, the server is considered migrated, and you should redirect your users from your original source servers to the migrated ones.
If you are completely done with your migration and performed a successful cutover, you can finalize the cutover. This will change your source servers’ migration lifecycle status to Cutover complete, indicating that the cutover is complete and that the migration has been performed successfully.
Monitoring and Troubleshooting
You can monitor AWS MGN using Amazon CloudWatch, Amazon EventBridge, and AWS CloudTrail, which collect raw data and process it into readable, near-real-time metrics. For more information, see Monitoring Application Migration Service in the documentation.
If you encounter any issues and want to launch new test or cutover instances, you can revert the test or cutover action. This will revert your source servers lifecycle status to the previous stage, indicating that these servers have not undergone cutover. During a revert, you will also have the option to delete your test or cutover instances for cost-saving purposes. For more information, see Troubleshooting in the documentation.
Now Available
AWS Application Migration Service (AWS MGN) (AWS MGN) is now available in the US East (N. Virginia), US West (Oregon), US East (Ohio), Asia Pacific (Tokyo), Asia Pacific (Sydney), Asia Pacific (Singapore), Europe (Ireland), Europe (Frankfurt), and Europe (Stockholm). If your preferred AWS Region is not currently supported by AWS MGN, consider using CloudEndure Migration. If you cannot install an agent on your servers, consider using AWS Server Migration Service (AWS SMS).
Although the use of AWS MGN is free for 90 days, you will incur charges for any AWS infrastructure that is provisioned during migration and after cutover. For more information, see the AWS MGN pricing page.
Get started with the AWS Application Migration Service today. Please send feedback through your AWS Support contacts.
– Channy
For an overview of AWS MGNbenefits, service, and network architecture details, watch the video.
Action Required: Migrate your Azure Blockchain Service data by 10 September 2021
Migrate your data to the ConsenSys Quorum Blockchain Service.
Public preview of Azure VPN Client for macOS
Azure VPN Client for macOS enables customers to utilize features of Azure AD natively, such as multi-factor authentication, Conditional Access, and user-based policies for their Mac clients.


