Month: <span>December 2022</span>

New – Process PDFs, Word Documents, and Images with Amazon Comprehend for IDP

Today we are announcing a new Amazon Comprehend feature for intelligent document processing (IDP). This feature allows you to classify and extract entities from PDF documents, Microsoft Word files, and images directly from Amazon Comprehend without you needing to extract the text first.

Many customers need to process documents that have a semi-structured format, like images of receipts that were scanned or tax statements in PDF format. Until today, those customers first needed to preprocess those documents to flatten them into machine-readable text, which can reduce the quality of the document context. Then they could use Amazon Comprehend to classify and extract entities from those preprocessed files.

Now with Amazon Comprehend for IDP, customers can process their semi-structured documents, such as PDFs, docx, PNG, JPG, or TIFF images, as well as plain-text documents, with a single API call. This new feature combines OCR and Amazon Comprehend’s existing natural language processing (NLP) capabilities to classify and extract entities from the documents. The custom document classification API allows you to organize documents into categories or classes, and the custom-named entity recognition API allows you to extract entities from documents like product codes or business-specific entities. For example, an insurance company can now process scanned customers’ claims with fewer API calls. Using the Amazon Comprehend entity recognition API, they can extract the customer number from the claims and use the custom classifier API to sort the claim into the different insurance categories—home, car, or personal.

Starting today, Amazon Comprehend for IDP APIs are available for real-time inferencing of files, as well as for asynchronous batch processing on large document sets. This feature simplifies the document processing pipeline and reduces development effort.

Getting Started
You can use Amazon Comprehend for IDP from the AWS Management Console, AWS SDKs, or AWS Command Line Interface (CLI).

In this demo, you will see how to asynchronously process a semi-structured file with a custom classifier. For extracting entities, the steps are different, and you can learn how to do it by checking the documentation.

In order to process a file with a classifier, you will first need to train a custom classifier. You can follow the steps in the Amazon Comprehend Developer Guide. You need to train this classifier with plain text data.

After you train your custom classifier, you can classify documents using either asynchronous or synchronous operations. For using the synchronous operation to analyze a single document, you need to create an endpoint to run real-time analysis using a custom model. You can find more information about real-time analysis in the documentation. For this demo, you are going to use the asynchronous operation, placing the documents to classify in an Amazon Simple Storage Service (Amazon S3) bucket and running an analysis batch job.

To get started classifying documents in batch from the console, on the Amazon Comprehend page, go to Analysis jobs and then Create job.

Create new job

Then you can configure the new analysis job. First, input a name and pick Custom classification and the custom classifier you created earlier.

Then you can configure the input data. First, select the S3 location for that data. In that location, you can place your PDFs, images, and Word Documents. Because you are processing semi-structured documents, you need to choose One document per file. If you want to override Amazon Comprehend settings for extracting and parsing the document, you can configure the Advanced document input options.

Input data for analysis job

After configuring the input data, you can select where the output of this analysis should be stored. Also, you need to give access permissions for this analysis job to read and write on the specified Amazon S3 locations, and then you are ready to create the job.

Configuring the classification job

The job takes a few minutes to run, depending on the size of the input. When the job is ready, you can check the output results. You can find the results in the Amazon S3 location you specified when you created the job.

In the results folder, you will find a .out file for each of the semi-structured files Amazon Comprehend classified. The .out file is a JSON, in which each line represents a page of the document. In the amazon-textract-output directory, you will find a folder for each classified file, and inside that folder, there is one file per page from the original file. Those page files contain the classification results. To learn more about the outputs of the classifications, check the documentation page.

Job output

Available Now
You can get started classifying and extracting entities from semi-structured files like PDFs, images, and Word Documents asynchronously and synchronously today from Amazon Comprehend in all the Regions where Amazon Comprehend is available. Learn more about this new launch in the Amazon Comprehend Developer Guide.

Marcia

Introducing Amazon GameLift Anywhere – Run Your Game Servers on Your Own Infrastructure

In 2016, we launched Amazon GameLift, a dedicated hosting solution that securely deploys and automatically scales fleets of session-based multiplayer game servers to meet worldwide player demand.

With Amazon GameLift, you can create and upload a game server build once, replicate, and then deploy across multiple AWS Regions and AWS Local Zones to reach your players with low-latency experiences across the world. GameLift also includes standalone features for low-cost game fleets with GameLift FleetIQ and player matchmaking with GameLift FlexMatch.

Game developers asked us to reduce the wait time to deploy a candidate server build to the cloud each time they needed to test and iterate their game during the development phase. In addition, our customers told us that they often have ongoing bare-metal contracts or on-premises game servers and want the flexibility to use their existing infrastructure with cloud servers.

Today we are announcing the general availability of Amazon GameLift Anywhere, which decouples game session management from the underlying compute resources. With this new release, you can now register and deploy any hardware, including your own local workstations, under a logical construct called an Anywhere Fleet.

Because your local hardware can now be a GameLift-managed server, you can iterate on the server build in your familiar local desktop environment, and any server error can materialize in seconds. You can also set breakpoints in your environment’s debugger, thereby eliminating trial and error and further speeding up the iteration process.

Here are the major benefits for game developers to use GameLift Anywhere.

  • Faster game development – Instantly test and iterate on your local workstation while still leveraging GameLift FlexMatch and Queue services.
  • Hybrid server management – Deploy, operate, and scale dedicated game servers hosted in the cloud or on-premises, all from a single location.
  • Streamline server operations – Reduce cost and operational complexity by unifying server infrastructure under a single game server orchestration layer.

During the beta period of GameLift Anywhere, lots of customers gave feedback. For example, Nitro Games has been an Amazon GameLift customer since 2020 and have used the service for player matchmaking and managing dedicated game servers in the cloud. Daniel Liljeqvist, Senior DevOps Engineer at Nitro Games said “With GameLift Anywhere we can easily debug a game server on our local machine, saving us time and making the feedback loop much shorter when we are developing new games and features.”

GameLift Anywhere resources such as locations, fleets, and compute are managed through the same highly secure AWS API endpoints as all AWS services. This also applies to generating the authentication tokens for game server processes that are only valid for a limited amount of time for additional security. You can leverage AWS Identity and Access Management (AWS IAM) roles and policies to fully manage access to all the GameLift Anywhere endpoints.

Getting Started with GameLift Anywhere
Before creating your GameLift fleet in your local hardware, you can create custom locations to run your game builds or scripts. Choose Locations in the left navigation pane of the GameLift console and select Create location.

You can create a custom location of your hardware that you can use with your GameLift Anywhere fleet to test your games.

Choose Fleets from the left navigation pane, then choose Create fleet to add your GameLift Anywhere fleet in the desired location.

Choose Anywhere on the Choose compute type step.

Define your fleet details, such as a fleet name and optional items. For more information on settings, see Create a new GameLift fleet in the AWS documentation.

On the Select locations step, select the custom location that you created. The home AWS Region is automatically selected as the Region you are creating the fleet in. You can use the home Region to access and use your resources.

After completing the fleet creation steps to create your Anywhere fleet, you can see active fleets in both the managed EC2 instances and the Anywhere location. You also can integrate remote on-premises hardware by adding more GameLift Anywhere locations, so you can manage your game sessions from one place. To learn more, see Create a new GameLift fleet in the AWS documentation.

You can register your laptop as a compute resource in the fleet that you created. Use the fleet-id created in the previous step and add a compute-name and your laptop’s ip-address.

$ aws gamelift register-compute 
    --compute-name ChannyDevLaptop 
    --fleet-id fleet-12345678-abcdefghi 
    --ip-address 10.1.2.3

Now, you can start a debug session of your game server by retrieving the authorization token for your laptop in the fleet that you created.

$ aws gamelift get-compute-auth-token 
    --fleet-id fleet-12345678-abcdefghi 
    --compute-name ChannyDevLaptop

To run a debug instance of your game server executable, your game server must call InitSDK(). After the process is ready to host a game session, the game server calls ProcessReady(). To learn more, see Integrating games with custom game servers and Testing your integration in the AWS documentation.

Now Available
Amazon GameLift Anywhere is available in all Regions where Amazon GameLift is available.  GameLift offers a step-by-step developer guide, API reference guide, and GameLift SDKs. You can also see for yourself how easy it is to test Amazon GameLift using our sample game to get started.

Give it a try, and please send feedback to AWS re:Post for Amazon GameLift or through your usual AWS support contacts.

Channy

Announcing Amazon CodeCatalyst, a Unified Software Development Service (Preview)

Today, we announced the preview release of Amazon CodeCatalyst. A unified software development and delivery service, Amazon CodeCatalyst enables software development teams to quickly and easily plan, develop, collaborate on, build, and deliver applications on AWS, reducing friction throughout the development lifecycle.

In my time as a developer the biggest excitement—besides shipping software to users—was the start of a new project, or being invited to join a project. Both came with the anticipation of building something cool, cutting new code—seeing an idea come to life. However, starting out was sometimes a slow process. My team or I would need to update our local development environments—or entirely new machines—with tools, libraries, and programming frameworks. We had to create source code repositories and set up other shared tools such as Jira, Confluence, or Jenkins, configure build pipelines and other automation workflows, create test environments, and so on. Day-to-day maintenance of development and build environments consumed valuable team cycles and energy. Collaboration between the team took effort, too, because tools to share information and have a single source of truth were not available. Context switching between projects and dealing with conflicting dependencies in those projects, e.g., Python 3.6 for project X and Python 2.7 for project Y—especially when we had only a single machine to work on—further increased the burden.

It doesn’t seem to have gotten any better! These days, when talking to developers about their experiences, I often hear them express that they feel modern development has become even more complicated. This is due to having to select and configure a wider collection of modern frameworks and libraries, tools, cloud services, continuous integration and delivery pipelines, and many other choices that all need to work together to deliver the application experience. What was once manageable by one developer on one machine is now a sprawling, dynamic, complex net of decisions and tradeoffs, made even more challenging by the need to coordinate all this across dispersed teams.

Enter Amazon CodeCatalyst
I’ve spent some time talking with the team behind Amazon CodeCatalyst about their sources of inspiration and goals. Taking feedback from both new and experienced developers and service teams here at AWS, they examined the challenges typically experienced by teams and individual developers when building software for the cloud. Having gathered and reviewed this feedback, they set about creating a unified tool that smooths out the rough edges that needlessly slow down software delivery, and they added features to make it easier for teams to work together and collaborate. Features in Amazon CodeCatalyst to address these challenges include:

  • Blueprints that set up the project’s resources—not just scaffolding for new projects, but also the resources needed to support software delivery and deployment.
  • On-demand cloud-based Dev Environments, to make it easy to replicate consistent development environments for you or your teams.
  • Issue management, enabling tracing of changes across commits, pull requests, and deployments.
  • Automated build and release (CI/CD) pipelines using flexible, managed build infrastructure.
  • Dashboards to surface a feed of project activities such as commits, pull requests, and test reporting.
  • The ability to invite others to collaborate on a project with just an email.
  • Unified search, making it easy to find what you’re looking for across users, issues, code and other project resources.

There’s a lot in Amazon CodeCatalyst that I don’t have space to cover in this post, so I’m going to briefly cover some specific features, like blueprints, Dev Environments, and project collaboration. Other upcoming posts will cover additional features.

Project Blueprints
When I first heard about blueprints, they sounded like a feature to scaffold some initial code for a project. However, they’re much more! Parameterized application blueprints enable you to set up shared project resources to support the application development lifecycle and team collaboration in minutes—not just initial starter code for an application. The resources that a blueprint creates for a project include a source code repository, complete with initial sample code and AWS service configuration for popular application patterns, which follow AWS best practices by default. If you prefer, an external Git repository such as GitHub may be used instead. The blueprint can also add an issue tracker, but external trackers such as Jira can also be used. Then, the blueprint adds a build and release pipeline for CI/CD, which I’ll come to shortly, as well as other integrated tooling.

The project resources and integrated tools set up using blueprints, including the CI/CD pipeline and the AWS resources to host your application, make it so that you can press “deploy” and get sample code running in a few minutes, enabling you to jump right in and start working on your specific business logic.

Project blueprints when starting a new project

At launch, customers can choose from blueprints with Typescript, Python, Java, .NET, Javascript for languages and React, Angular, and Vue frameworks, with more to come. And you don’t need to start with a blueprint. You can build projects with workflows that run on anything that works with Linux and Windows operating systems.

Cloud-Based Dev Environments
Development teams can often run into a problem of “environment drift” where one team member has a slightly different version of a toolchain or library compared to everyone else or the test environments. This can introduce subtle bugs that might go unnoticed for some time. Dev Environment specifications, and the other shared resources, that blueprints create help ensure there’s no unnecessary variance, and everyone on the team gets the same setup to provide a consistent, repeatable experience between developers.

Amazon CodeCatalyst uses a devfile to define the configuration of an on-demand, cloud-based Dev Environment, which currently supports four resizable instance size options with 2, 4, 8, or 16 vCPUs. The devfile defines and configures all of the resources needed to code, test, and debug for a given project, minimizing the time the development team members need to spend on creating and maintaining their local development environments. Devfiles, which are added to the source code repository by the selected blueprint can also be modified if required. With Dev Environments, context switching between projects incurs less overhead—with one click, you can simply switch to a different environment, and you’re ready to start working. This means you’re easily able to work concurrently on multiple codebases without reconfiguring. Being on-demand, Dev Environments can also be paused, restarted, or deleted as needed.

Below is an example of a devfile that bootstraps a Dev Environment.

schemaVersion: 2.0.0
metadata:
  name: aws-universal
  version: 1.0.1
  displayName: AWS Universal
  description: Stack with AWS Universal Tooling
  tags:
    - aws
    - a12
  projectType: aws
commands:
  - id: npm_install
    exec:
      component: aws-runtime
      commandLine: "npm install"
      workingDir: /projects/spa-app
events:
  postStart:
    - npm_install
components:
  - name: aws-runtime
    container:
      image: public.ecr.aws/aws-mde/universal-image:latest
      mountSources: true
      volumeMounts:
        - name: docker-store
          path: /var/lib/docker
  - name: docker-store
    volume:
      size: 16Gi

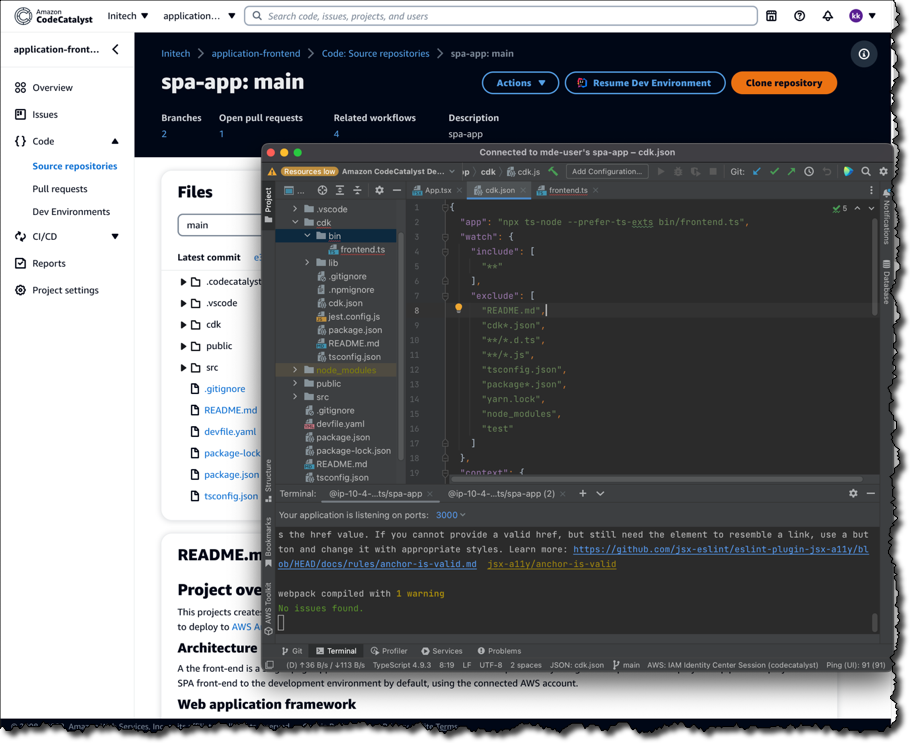
Developers working in cloud-based Dev Environments provisioned by Amazon CodeCatalyst can use AWS Cloud9 as their IDE. However, they can just as easily work with Amazon CodeCatalyst from other IDEs on their local machines, such as JetBrains IntelliJ IDEA Ultimate, PyCharm Pro, GoLand, and Visual Studio Code. Developers can also create Dev Environments from within their IDE, such as Visual Studio Code or for JetBrains using the JetBrains Gateway app. Below, JetBrains IntelliJ is being used.

Editing an application source file in JetBrains IntelliJ

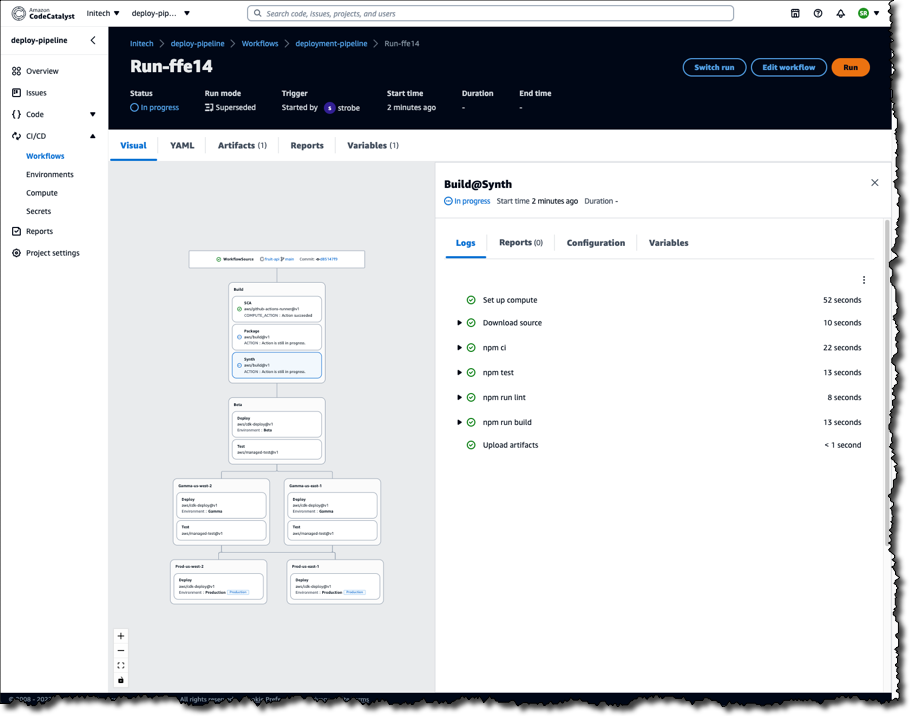
Build and Release Pipelines
The build and release pipeline created by the blueprint run on flexible, managed infrastructure. The pipelines can use on-demand compute or preprovisioned builds, including a choice of machine sizes, and you can bring your own container environments. You can incorporate build actions that are built in or provided by partners (e.g., Mend, which provides a software composition analysis build action), and you can also incorporate GitHub Actions to compose fully automated pipelines. Pipelines are configurable using either a visual editor or YAML files.

Build and release pipelines enable deployment to popular AWS services, including Amazon Elastic Container Service (Amazon ECS), AWS Lambda, and Amazon Elastic Compute Cloud (Amazon EC2). Amazon CodeCatalyst makes it trivial to set up test and production environments and deploy using pipelines to one or many Regions or even multiple accounts for security.

Running automated workflow

Project Collaboration
As a unified software development service, Amazon CodeCatalyst not only makes it easier to get started building and delivering applications on AWS, it helps developers of all levels collaborate on projects through a single shared project space and source of truth. Developers can be invited to collaborate using just an email. On accepting the invitation, the developer sees the full project context and can begin work at once using the project’s Dev Environments—no need to spend time updating or reconfiguring their local machine with required tools, libraries, or other pre-requisites.

Existing members of an Amazon CodeCatalyst space, or new members using their email, can be invited to collaborate on a project:

Inviting new members to collaborate on a project

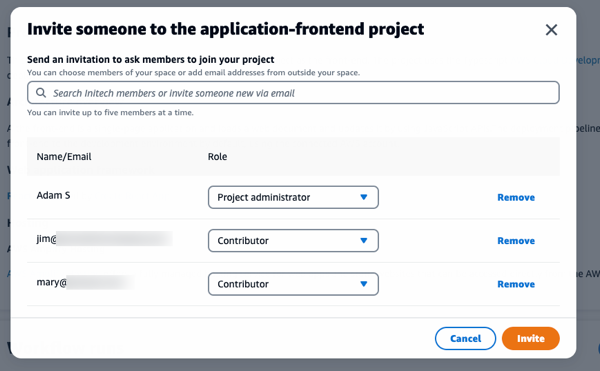
Each will receive an invitation email containing a link titled Accept Invitation, which when clicked, opens a browser tab to sign in. Once signed in, they can view all the projects in the Amazon CodeCatalyst space they’ve been invited to and can also quickly switch to other spaces in which they are the owner or to which they’ve been invited.

Projects I'm invited to collaborate on

From there, they can select a project and get an immediate overview of where things stand, for example, the status of recent workflows, any open pull requests, and available Dev Environments.

CodeCatalyst project summary

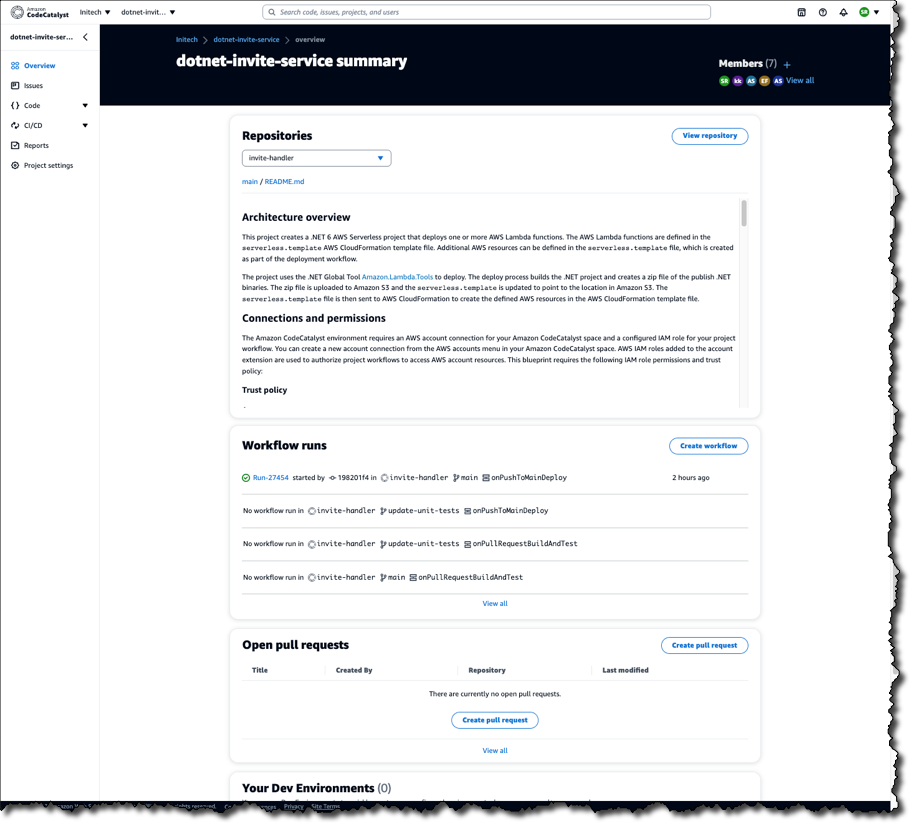
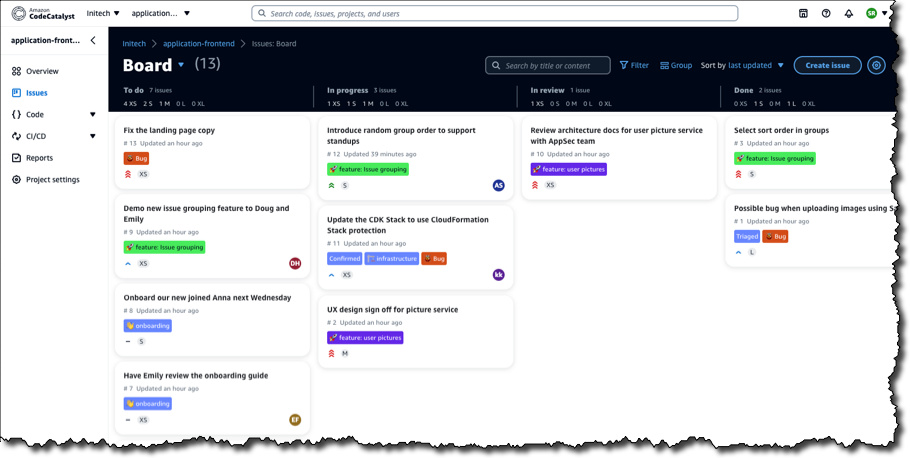
On the Issues board, team members can see which issues need to be worked on, select one, and get started.

Viewing issues

Being able to immediately see the context for the project, and have access to on-demand cloud-based Dev Environments, all help with being able to start contributing more quickly, eliminating setup delays.

Get Started with Amazon CodeCatalyst in the Free Tier Today!
Blueprints to scaffold not just application code but also shared project resources supporting the development and deployment of applications, issue tracking, invite-by-email collaboration, automated workflows, and more are all available today in the newly released preview of Amazon CodeCatalyst to help accelerate your cloud development and delivery efforts. Learn more in the Amazon CodeCatalyst User Guide. And, as I mentioned earlier, additional blogs posts and other supporting content are planned by the team to dive into the range of features in more detail, so be sure to look out for them!

New — Create Point-to-Point Integrations Between Event Producers and Consumers with Amazon EventBridge Pipes

It is increasingly common to use multiple cloud services as building blocks to assemble a modern event-driven application. Using purpose-built services to accomplish a particular task ensures developers get the best capabilities for their use case. However, communication between services can be difficult if they use different technologies to communicate, meaning that you need to learn the nuances of each service and how to integrate them with each other. We usually need to create integration code (or “glue” code) to connect and bridge communication between services. Writing glue code slows our velocity, increases the risk of bugs, and means we spend our time writing undifferentiated code rather than building better experiences for our customers.

Introducing Amazon EventBridge Pipes
Today, I’m excited to announce Amazon EventBridge Pipes, a new feature of Amazon EventBridge that makes it easier for you to build event-driven applications by providing a simple, consistent, and cost-effective way to create point-to-point integrations between event producers and consumers, removing the need to write undifferentiated glue code.

The simplest pipe consists of a source and a target. An optional filtering step allows only specific source events to flow into the Pipe and an optional enrichment step using AWS Lambda, AWS Step Functions, Amazon EventBridge API Destinations, or Amazon API Gateway enriches or transforms events before they reach the target. With Amazon EventBridge Pipes, you can integrate supported AWS and self-managed services as event producers and event consumers into your application in a simple, reliable, consistent and cost-effective way.

Amazon EventBridge Pipes bring the most popular features of Amazon EventBridge Event Bus, such as event filtering, integration with more than 14 AWS services, and automatic delivery retries.

How Amazon EventBridge Pipes Works
Amazon EventBridge Pipes provides you a seamless means of integrating supported AWS and self-managed services, favouring configuration over code. To start integrating services with EventBridge Pipes, you need to take the following steps:

  1. Choose a source that is producing your events. Supported sources include: Amazon DynamoDB, Amazon Kinesis Data Streams, Amazon SQS, Amazon Managed Streaming for Apache Kafka, and Amazon MQ (both ActiveMQ and RabbitMQ).
  2. (Optional) Specify an event filter to only process events that match your filter (you’re not charged for events that are filtered out).
  3. (Optional) Transform and enrich your events using built-in free transformations, or AWS Lambda, AWS Step Functions, Amazon API Gateway, or EventBridge API Destinations to perform more advanced transformations and enrichments.
  4. Choose a target destination from more than 14 AWS services, including Amazon Step Functions, Kinesis Data Streams, AWS Lambda, and third-party APIs using EventBridge API destinations.

Amazon EventBridge Pipes provides simplicity to accelerate development velocity by reducing the time needed to learn the services and write integration code, to get reliable and consistent integration.

EventBridge Pipes also comes with additional features that can help in building event-driven applications. For example, with event filtering, Pipes helps event-driven applications become more cost-effective by only processing the events of interest.

Get Started with Amazon EventBridge Pipes
Let’s see how to get started with Amazon EventBridge Pipes. In this post, I will show how to integrate an Amazon SQS queue with AWS Step Functions using Amazon EventBridge Pipes.

The following screenshot is my existing Amazon SQS queue and AWS Step Functions state machine. In my case, I need to run the state machine for every event in the queue. To do so, I need to connect my SQS queue and Step Functions state machine with EventBridge Pipes.

Existing Amazon SQS queue and AWS Step Functions state machine

First, I open the Amazon EventBridge console. In the navigation section, I select Pipes. Then I select Create pipe.

On this page, I can start configuring a pipe and set the AWS Identity and Access Management (IAM) permission, and I can navigate to the Pipe settings tab.

Navigate to Pipe Settings

In the Permissions section, I can define a new IAM role for this pipe or use an existing role. To improve developer experience, the EventBridge Pipes console will figure out the IAM role for me, so I don’t need to manually configure required permissions and let EventBridge Pipes configures least-privilege permissions for IAM role. Since this is my first time creating a pipe, I select Create a new role for this specific resource.

Setting IAM Permission for pipe

Then, I go back to the Build pipe section. On this page, I can see the available event sources supported by EventBridge Pipes.

List of available services as the event source

I select SQS and select my existing SQS queue. If I need to do batch processing, I can select Additional settings to start defining Batch size and Batch window. Then, I select Next.

Select SQS Queue as event source

On the next page, things get even more interesting because I can define Event filtering from the event source that I just selected. This step is optional, but the event filtering feature makes it easy for me to process events that only need to be processed by my event-driven application. In addition, this event filtering feature also helps me to be more cost-effective, as this pipe won’t process unnecessary events. For example, if I use Step Functions as the target, the event filtering will only execute events that match the filter.

Event filtering in Amazon EventBridge Pipes

I can use sample events from AWS events or define custom events. For example, I want to process events for returned purchased items with a value of 100 or more. The following is the sample event in JSON format:

{
   "event-type":"RETURN_PURCHASE",
   "value":100
}

Then, in the event pattern section, I can define the pattern by referring to the Content filtering in Amazon EventBridge event patterns documentation. I define the event pattern as follows:

{
   "event-type": ["RETURN_PURCHASE"],
   "value": [{
      "numeric": [">=", 100]
   }]
}

I can also test by selecting test pattern to make sure this event pattern will match the custom event I’m going to use. Once I’m confident that this is the event pattern that I want, I select Next.

Defining and testing an event pattern for filtering

In the next optional step, I can use an Enrichment that will augment, transform, or expand the event before sending the event to the target destination. This enrichment is useful when I need to enrich the event using an existing AWS Lambda function, or external SaaS API using the Destination API. Additionally, I can shape the event using the Enrichment Input Transformer.

The final step is to define a target for processing the events delivered by this pipe.

Defining target destination service

Here, I can select various AWS services supported by EventBridge Pipes.

I select my existing AWS Step Functions state machine, named pipes-statemachine.

In addition, I can also use Target Input Transformer by referring to the Transforming Amazon EventBridge target input documentation. For my case, I need to define a high priority for events going into this target. To do that, I define a sample custom event in Sample events/Event Payload and add the priority: HIGH in the Transformer section. Then in the Output section, I can see the final event to be passed to the target destination service. Then, I select Create pipe.

In less than a minute, my pipe was successfully created.

Pipe successfully created

To test this pipe, I need to put an event into the Amaon SQS queue.

Sending a message into Amazon SQS Queue

To check if my event is successfully processed by Step Functions, I can look into my state machine in Step Functions. On this page, I see my event is successfully processed.

I can also go to Amazon CloudWatch Logs to get more detailed logs.

Things to Know
Event Sources
– At launch, Amazon EventBridge Pipes supports the following services as event sources: Amazon DynamoDB, Amazon Kinesis, Amazon Managed Streaming for Apache Kafka (Amazon MSK) alongside self-managed Apache Kafka, Amazon SQS (standard and FIFO), and Amazon MQ (both for ActiveMQ and RabbitMQ).

Event Targets – Amazon EventBridge Pipes supports 15 Amazon EventBridge targets, including AWS Lambda, Amazon API Gateway, Amazon SNS, Amazon SQS, and AWS Step Functions. To deliver events to any HTTPS endpoint, developers can use API destinations as the target.

Event Ordering – EventBridge Pipes maintains the ordering of events received from an event sources that support ordering when sending those events to a destination service.

Programmatic Access – You can also interact with Amazon EventBridge Pipes and create a pipe using AWS Command Line Interface (CLI), AWS CloudFormation, and AWS Cloud Development Kit (AWS CDK).

Independent Usage – EventBridge Pipes can be used separately from Amazon EventBridge bus and Amazon EventBridge Scheduler. This flexibility helps developers to define source events from supported AWS and self-managed services as event sources without Amazon EventBridge Event Bus.

Availability – Amazon EventBridge Pipes is now generally available in all AWS commercial Regions, with the exception of Asia Pacific (Hyderabad) and Europe (Zurich).

Visit the Amazon EventBridge Pipes page to learn more about this feature and understand the pricing. You can also visit the documentation page to learn more about how to get started.

Happy building!

— Donnie

Step Functions Distributed Map – A Serverless Solution for Large-Scale Parallel Data Processing

I am excited to announce the availability of a distributed map for AWS Step Functions. This flow extends support for orchestrating large-scale parallel workloads such as the on-demand processing of semi-structured data.

Step Function’s map state executes the same processing steps for multiple entries in a dataset. The existing map state is limited to 40 parallel iterations at a time. This limit makes it challenging to scale data processing workloads to process thousands of items (or even more) in parallel. In order to achieve higher parallel processing prior to today, you had to implement complex workarounds to the existing map state component.

The new distributed map state allows you to write Step Functions to coordinate large-scale parallel workloads within your serverless applications. You can now iterate over millions of objects such as logs, images, or .csv files stored in Amazon Simple Storage Service (Amazon S3). The new distributed map state can launch up to ten thousand parallel workflows to process data.

You can process data by composing any service API supported by Step Functions, but typically, you will invoke Lambda functions to process the data with code written in your favorite programming language.

Step Functions distributed map supports a maximum concurrency of up to 10,000 executions in parallel, which is well above the concurrency supported by many other AWS services. You can use the maximum concurrency feature of the distributed map to ensure that you do not exceed the concurrency of a downstream service. There are two factors to consider when working with other services. First, the maximum concurrency supported by the service for your account. Second, the burst and ramping rates, which determine how quickly you can achieve the maximum concurrency.

Let’s use Lambda as an example. Your functions’ concurrency is the number of instances that serve requests at a given time. The default maximum concurrency quota for Lambda is 1,000 per AWS Region. You can ask for an increase at any time. For an initial burst of traffic, your functions’ cumulative concurrency in a Region can reach an initial level of between 500 and 3000, which varies per Region. The burst concurrency quota applies to all your functions in the Region.

When using a distributed map, be sure to verify the quota on downstream services. Limit the distributed map maximum concurrency during your development, and plan for service quota increases accordingly.

To compare the new distributed map with the original map state flow, I created this table.

Original map state flow New distributed map flow
Sub workflows
  • Runs a sub-workflow for each item in an array. The array must be passed from the previous state.
  • Each iteration of the sub-workflow is called a map iteration, and its events are added to the state machine’s execution history.
  • Runs a sub-workflow for each item in an array or Amazon S3 dataset.
  • Each sub-workflow is run as a totally separate child execution, with its own event history.
Parallel branches Map iterations run in parallel, with an effective maximum concurrency of around 40 at a time. Can pass millions of items to multiple child executions, with concurrency of up to 10,000 executions at a time.
Input source Accepts only a JSON array as input. Accepts input as Amazon S3 object list, JSON arrays or files, csv files, or Amazon S3 inventory.
Payload 256 KB Each iteration receives a reference to a file (Amazon S3) or a single record from a file (state input). Actual file processing capability is limited by Lambda storage and memory.
Execution history 25,000 events Each iteration of the map state is a child execution, with up to 25,000 events each (express mode has no limit on execution history).

Sub-workflows within a distributed map work with both Standard workflows and the low-latency, short-duration Express Workflows.

This new capability is optimized to work with S3. I can configure the bucket and prefix where my data are stored directly from the distributed map configuration. The distributed map stops reading after 100 million items and supports JSON or csv files of up to 10GB.

When processing large files, think about downstream service capabilities. Let’s take Lambda again as an example. Each input—a file on S3, for example—must fit within the Lambda function execution environment in terms of temporary storage and memory. To make it easier to handle large files, Lambda Powertools for Python introduced a new streaming feature to fetch, transform, and process S3 objects with minimal memory footprint. This allows your Lambda functions to handle files larger than the size of their execution environment. To learn more about this new capability, check the Lambda Powertools documentation.

Let’s See It in Action
For this demo, I will create a workflow that processes one thousand dog images stored on S3. The images are already stored on S3.

➜  ~ aws s3 ls awsnewsblog-distributed-map/images/
2022-11-08 15:03:36      27034 n02085620_10074.jpg
2022-11-08 15:03:36      34458 n02085620_10131.jpg
2022-11-08 15:03:36      12883 n02085620_10621.jpg
2022-11-08 15:03:36      34910 n02085620_1073.jpg
...

➜  ~ aws s3 ls awsnewsblog-distributed-map/images/ | wc -l
    1000

The workflow and the S3 bucket must be in the same Region.

To get started, I navigate to the Step Functions page of the AWS Management Console and select Create state machine. On the next page, I choose to design my workflow using the visual editor. The distributed map works with Standard workflows, and I keep the default selection as-is. I select Next to enter the visual editor.

Distributed Map - create a workflowIn the visual editor, I search and select the Map component on the left-side pane, and I drag it to the workflow area. On the right side, I configure the component. I choose Distributed as Processing mode and Amazon S3 as Item Source.

Distributed maps are natively integrated with S3. I enter the name of the bucket (awsnewsblog-distributed-map) and the prefix (images) where my images are stored.

On the Runtime Settings section, I choose Express for Child workflow type. I also may decide to restrict the Concurrency limit. It helps to ensure we operate within the concurrency quotas of the downstream services (Lambda in this demo) for a particular account or Region.

By default, the output of my sub-workflows will be aggregated as state output, up to 256KB. To process larger outputs, I may choose to Export map state results to Amazon S3.

Distributed Map - add a Lambda invocation

Finally, I define what to do for each file. In this demo, I want to invoke a Lambda function for each file in the S3 bucket. The function exists already. I search for and select the Lambda invocation action on the left-side pane. I drag it to the distributed map component. Then, I use the right-side configuration panel to select the actual Lambda function to invoke: AWSNewsBlogDistributedMap in this example.

Distributed Map - add a Lambda invocation

When I am done, I select Next. I select Next again on the Review generated code page (not shown here).

On the Specify state machine settings page, I enter a Name for my state machine and the IAM Permissions to run. Then, I select Create state machine.

Create State Machine - Final ScreenNow I am ready to start the execution. On the State machine page, I select the new workflow and select Start execution. I can optionally enter a JSON document to pass to the workflow. In this demo, the workflow does not handle the input data. I leave it as-is, and I select Start execution.

Start workflow execution Start workflow execution - pass input data

During the execution of the workflow, I can monitor the progress. I observe the number of iterations, and the number of items successfully processed or in error.

I can drill down on one specific execution to see the details.

Distributed Map - monitor execution details

With just a few clicks, I created a large-scale and heavily parallel workflow able to handle a very large quantity of data.

Which AWS Service Should I Use
As often happens on AWS, you might observe an overlap between this new capability and existing services such as AWS Glue, Amazon EMR, or Amazon S3 Batch Operations. Let’s try to differentiate the use cases.

In my mental model, data scientists and data engineers use AWS Glue and EMR to process large amounts of data. On the other hand, application developers will use Step Functions to add serverless data processing into their applications. Step Functions is able to scale from zero quickly, which makes it a good fit for interactive workloads where customers may be waiting for the results. Finally, system administrators and IT operation teams are likely to use Amazon S3 Batch Operations for single-step IT automation operations such as copying, tagging, or changing permissions on billions of S3 objects.

Pricing and Availability
AWS Step Functions’ distributed map is generally available in the following ten AWS Regions: US East (Ohio, N. Virginia), US West (Oregon), Asia Pacific (Singapore, Sydney, Tokyo), Canada (Central), and Europe (Frankfurt, Ireland, Stockholm).

The pricing model for the existing inline map state does not change. For the new distributed map state, we charge one state transition per iteration. Pricing varies between Regions, and it starts at $0.025 per 1,000 state transitions. When you process your data using express workflows, you are also charged based on the number of requests for your workflow and its duration. Again, prices vary between Regions, but they start at $1.00 per 1 million requests and $0.06 per GB-hour (prorated to 100ms).

For the same amount of iterations, you will observe a cost reduction when using the combination of the distributed map and standard workflows compared to the existing inline map. When you use express workflows, expect the costs to stay the same for more value with the distributed map.

I am really excited to discover what you will build using this new capability and how it will unlock innovation. Go start to build highly parallel serverless data processing workflows today!

— seb