

Azure Database for PostgreSQL – Hyperscale (Citus) includes new Brazil South, France Central, and Switzerland North regions to distribute your Postgres database to horizontally scale queries across multiple machines using sharding.
Month: April 2021
Get Started Using Amazon FSx File Gateway for Fast, Cached Access to File Server Data in the Cloud
As traditional workloads continue to migrate to the cloud, some customers have been unable to take advantage of cloud-native services to host data typically held on their on-premises file servers. For example, data commonly used for team and project file sharing, or with content management systems, has needed to reside on-premises due to issues of high latency, or constrained or shared bandwidth, between customer premises and the cloud.
Today, I’m pleased to announce Amazon FSx File Gateway, a new type of AWS Storage Gateway that helps you access data stored in the cloud with Amazon FSx for Windows File Server, instead of continuing to use and manage on-premises file servers. Amazon FSx File Gateway uses network optimization and caching so it appears to your users and applications as if the shared data were still on-premises. By moving and consolidating your file server data into Amazon FSx for Windows File Server, you can take advantage of the scale and economics of cloud storage, and divest yourself of the undifferentiated maintenance involved in managing on-premises file servers, while Amazon FSx File Gateway solves issues around latency and bandwidth.
Replacing On-premises File Servers
Amazon FSx File Gateway is an ideal solution to consider when replacing your on-premises file servers. Low-latency access ensures you can continue to use latency-sensitive on-premises applications, and caching conserves shared bandwidth between your premises and the cloud, which is especially important when you have many users all attempting to access file share data directly.
You can attach an Amazon FSx file system and present it through a gateway to your applications and users provided they are all members of the same Active Directory domain, and the AD infrastructure can be hosted in AWS Directory Service, or managed on-premises.
Your data, as mentioned, resides in Amazon FSx for Windows File Server, a fully managed, highly reliable and resilient file system, eliminating the complexity involved in setting up and operating file servers, storage volumes, and backups. Amazon FSx for Windows File Server provides a fully native Windows file system in the cloud, with full Server Message Block (SMB) protocol support, and is accessible from Windows, Linux, and macOS systems running in the cloud or on-premises. Built on Windows Server, Amazon FSx for Windows File Server also exposes a rich set of administrative features including file restoration, data deduplication, Active Directory integration, and access control via Access Control Lists (ACLs).
Choosing the Right Gateway
You may be aware of Amazon S3 File Gateway (originally named File Gateway), and might now be wondering which type of workload is best suited for the two gateways:
- With Amazon S3 File Gateway, you can access data stored in Amazon Simple Storage Service (Amazon S3) as files, and it’s also a solution for file ingestion into S3 for use in running object-based workloads and analytics, and for processing data that exists in on-premises files.
- Amazon FSx File Gateway, on the other hand, is a solution for moving network-attached storage (NAS) into the cloud while continuing to have low-latency, seamless access for your on-premises users. This includes two general-purpose NAS use-cases that use the SMB file protocol: end-user home directories and departmental or group file shares. Amazon FSx File Gateway supports multiple users sharing files, with advanced data management features such as access controls, snapshots for data protection, integrated backup, and more.
One additional unique feature I want to note is Amazon FSx File Gateway integration with backups. This includes backups taken directly within Amazon FSx and those coordinated by AWS Backup. Prior to a backup starting, Amazon FSx for Windows File Server communicates with each attached gateway to ensure any uncommitted data gets flushed. This helps further reduce your administrative overhead and worries when moving on-premises file shares into the cloud.
Working with Amazon FSx File Gateway
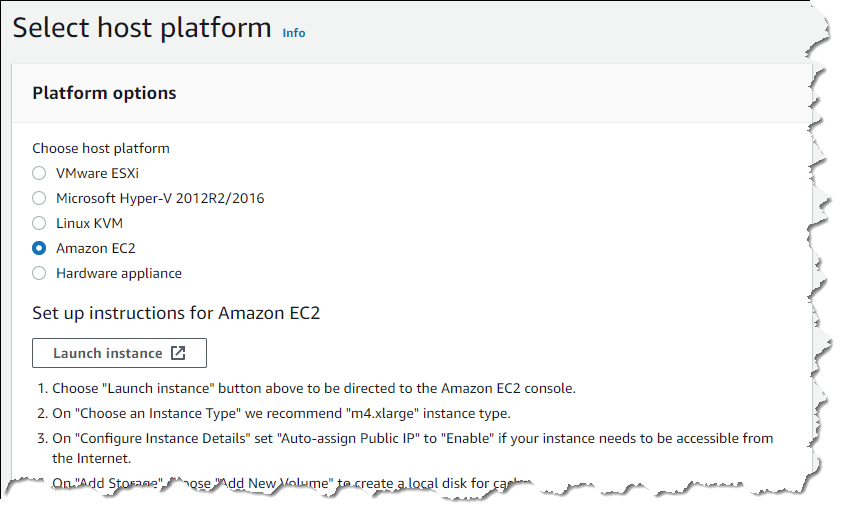
Amazon FSx File Gateway is available using multiple platform options. You can order and deploy a hardware appliance into your on-premises environment, deploy as a virtual machine into your on-premises environment (VMware ESXi, Microsoft Hyper-V, Linux KVM), or deploy in cloud as an Amazon Elastic Compute Cloud (Amazon EC2) instance. The available options are displayed as you start to create a gateway from the AWS Storage Gateway Management Console, together with setup instructions for each option.
Below, I choose to use an EC2 instance for my gateway.
The process of setting up a gateway is pretty straightforward and as the documentation here goes into detail, I’m not going to repeat the flow in this post. Essentially, the steps involved are to first create a gateway, then join it to your domain. Next, you attach an Amazon FSx file system. After that, your remote clients can work with the data on the file system, but the important difference is that they connect using a network share to the gateway instead of to the Amazon FSx file system.
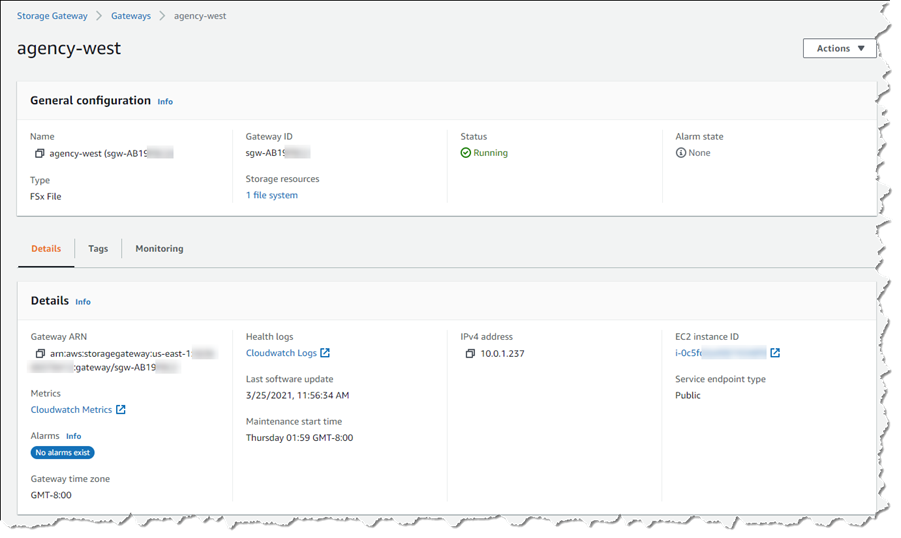
Below is the general configuration for my gateway, created in US East (N. Virginia).
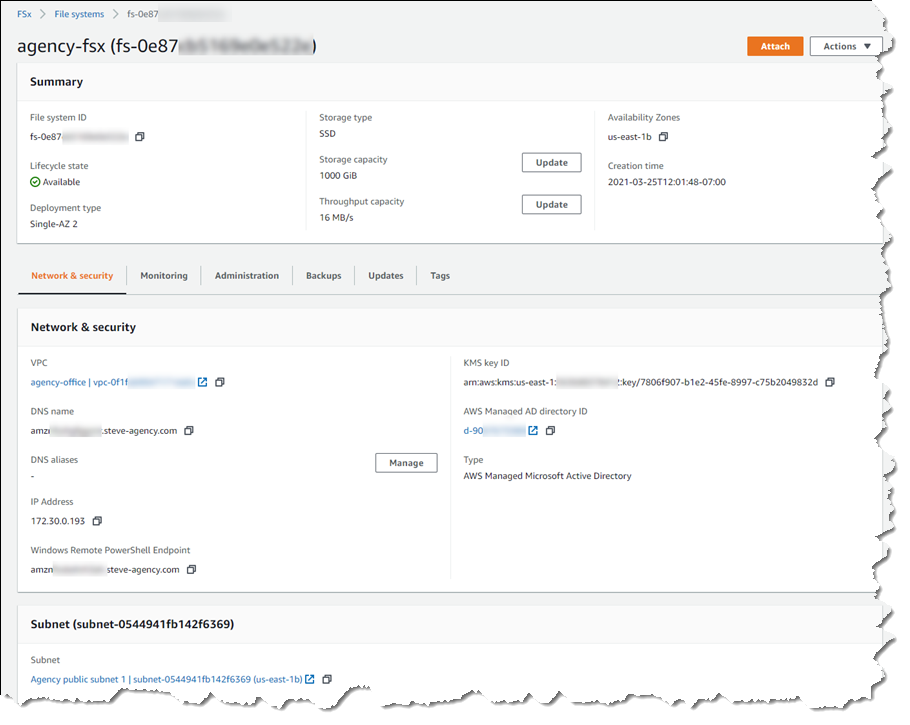
And here are the details of my Amazon FSx file system, running in an Amazon Virtual Private Cloud (VPC) in US East (N. Virginia), that will be attached to my gateway.
Note that I have created and activated the gateway in the same region as the source Amazon FSx file system, and will manage the gateway from US East (N. Virginia). The gateway virtual machine (VM) is deployed as an EC2 instance running in a VPC in our remote region, US West (Oregon). I’ve also established a peering connection between the two VPCs.
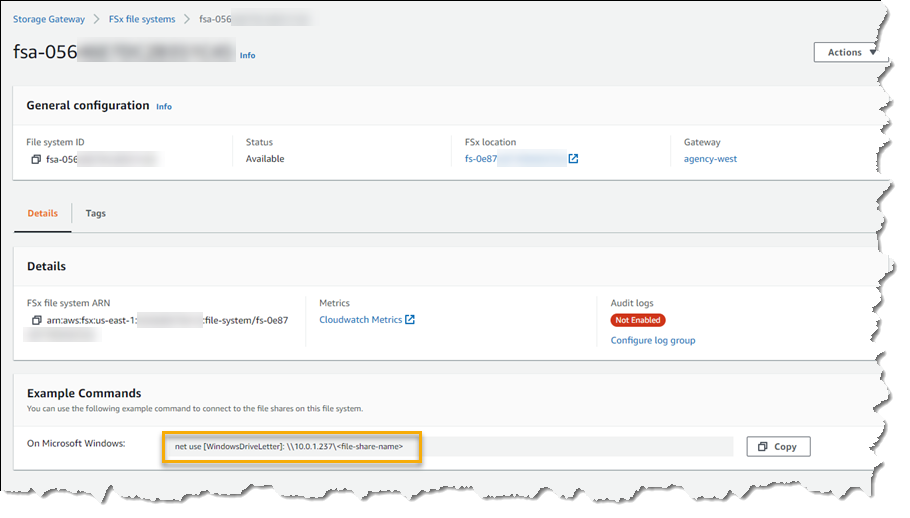
Once I have attached the Amazon FSx file system to my Amazon FSx File Gateway, in the AWS Storage Gateway Management Console I select FSx file systems and then the respective file system instance. This gives me the details of the command needed by my remote users to connect to the gateway.
Exploring an End-user Scenario with Amazon FSx File Gateway
Let’s explore a scenario that may be familiar to many readers, that of a “head office” that has moved its NAS into the cloud, with one or more “branch offices” in remote locations that need to connect to those shares and the files they hold. In this case, my head office/branch office scenario is for a fictional photo agency, and is set up so I can explore the gateway’s cache refresh functionality. For this, I’m imagining a scenario where a remote user deletes some files accidentally, and then needs to contact an admin in the head office to have them restored. This is possibly a fairly common scenario, and one I know I’ve had to both request, and handle, in my career!
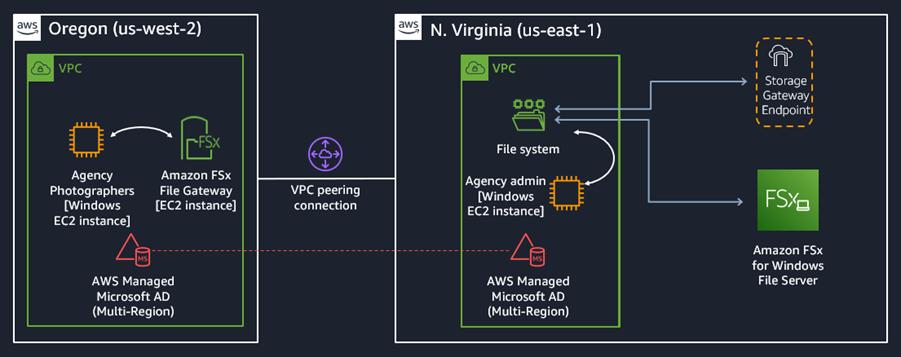
My head office for my fictional agency is located in US East (N. Virginia) and the local admin for that office (me) has a network share attached to the Amazon FSx file system instance. My branch office, where my agency photographers work, is located in the US West (Oregon) region, and users there connect to my agency’s network over a VPN (an AWS Direct Connect setup could also be used). In this scenario, I simulate the workstations at each office using Amazon Elastic Compute Cloud (EC2) instances.
In my fictional agency, photographers upload images to my agency’s Amazon FSx file system, connected via a network share to the the gateway. Even though my fictional head office, and the Amazon FSx file system itself are resources located on the east coast, the gateway and its cache provide a fast, low latency connection for users in the remote branch office, making it seem as though there is a local NAS. After photographers upload images from their assignments, additional staff in the head office do some basic work on them, and make the partly-processed images available back to the photographers on the west coast via the file share.
The image below illustrates the resource setup for my fictional agency.
I have set up scheduled multiple daily backups for the file system, as you might expect, but I’ve also gone a step further and enabled shadow copies on my Amazon FSx file system. Remember, Amazon FSx for Windows File Server is a Windows File Server instance, it just happens to be running in the cloud. You can find details of how to set up shadow copies (which are not enabled by default) in the documentation here. For the purposes of the fictional scenario in this blog post, I set up a schedule so that my shadow copies are taken every hour.
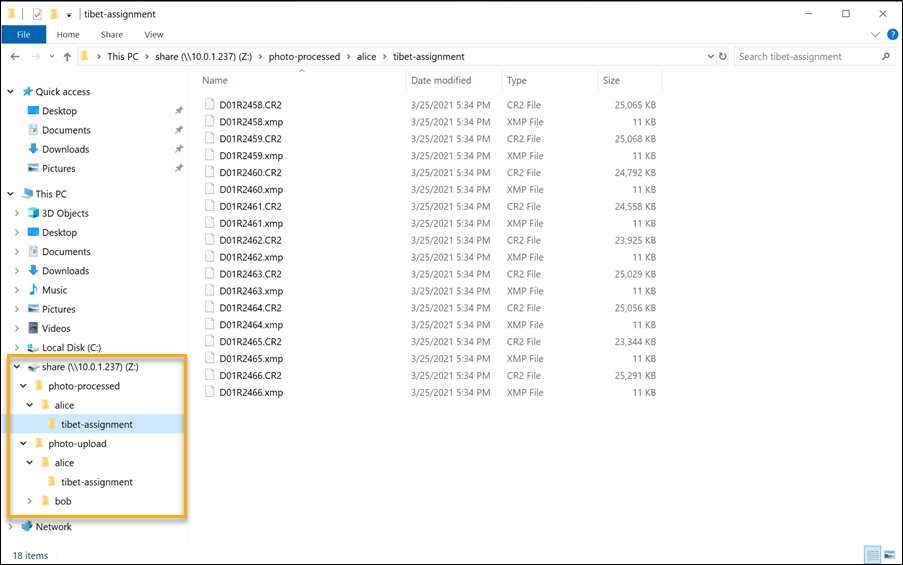
Back to my fictional agency. One of my photographers on the west coast, Alice, is logged in and working with a set of images that have already had some work done on them by the head office. In this image, it’s apparent Alice is connected and working on her images via the network share IP marked in an earlier image in this post – this is the gateway file share.
Suddenly, disaster strikes and Alice accidentally deletes all of the files in the folder she was working in. Picking up the phone, she calls the admin (me) in the east coast head office and explains the situation, wondering if we can get the files back.
Since I’d set up scheduled daily backups of the file system, I could probably restore the deleted files from there. This would involve a restore to a new file system, then copying the files from that new file system to the existing one (and deleting the new file system instance afterwards). But, having enabled shadow copies, in this case I can restore the deleted files without resorting to the backups. And, because I enabled automated cache refreshes on my gateway, with the refresh period set to every 5 minutes, Alice will see the restored files relatively quickly.
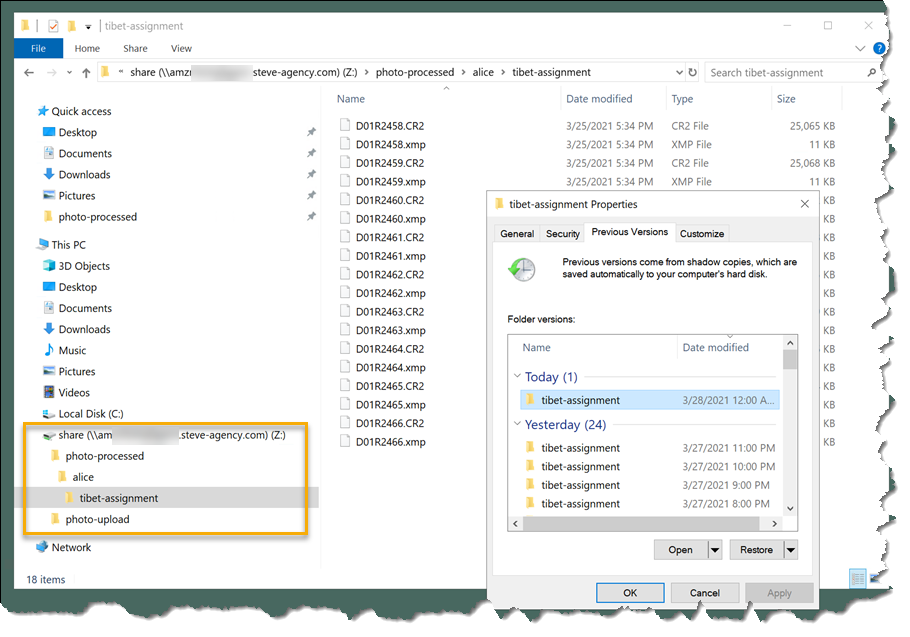
My admin machine (in the east coast office) has a network share to the Amazon FSx file system, so I open an explorer view onto the share, right-click the folder in question, and select Restore previous versions. This gives me a dialog where I can select the most recent shadow copy.
I ask Alice to wait 5 minutes, then refresh her explorer view. The changes in the Amazon FSx file system are propagated to the cache on the gateway and sure enough, she sees the files she accidentally deleted and can resume work. (When I saw this happen for real in my test setup, even though I was expecting it, I let out a whoop of delight!). Overall, I hope you can see how easy it is to set up and operate an Amazon FSx File Gateway with an Amazon FSx for Windows File Server.
Get Started Today with Amazon FSx File Gateway
Amazon FSx File Gateway provides a low-latency, efficient connection for remote users when moving on-premises Windows file systems into the cloud. This benefits users who experience higher latencies, and shared or limited bandwidth, between their premises and the cloud. Amazon FSx File Gateway is available today in all commercial AWS regions where Amazon FSx for Windows File Server is available. It’s also available in the AWS GovCloud (US-West) and AWS GovCloud (US-East) regions, and the Amazon China (Beijing), and China (Ningxia) regions.
You can learn more on this feature page, and get started right away using the feature documentation.


![]()
Azure Container Registry now generally available in Korea South region
Azure Container Registry handles private Docker container images as well as related content formats, such as Helm charts, OCI artifacts, and images built to the OCI image format specification.
New Azure VMs for general purpose and memory intensive workloads now in public preview
New Dv5, Dsv5, Ddv5, Ddsv5, and Ev5, Edv5 series Azure Virtual Machines deliver increased scalability and an upgraded CPU architecture, including better price to performance compared to the prior generation. The new VMs – now in public preview – run on the 3rd Generation Intel® Xeon® Platinum 8370C (Ice Lake) processor in a hyper-threaded configuration. This custom processor can reach an all-core Turbo clock speed of up to 3.5GHz and features Intel® Turbo Boost Technology 2.0, Intel® Advanced Vector Extensions 512 (Intel® AVX-512) and Intel® Deep Learning Boost.
Public preview: Enhancements to encryption using customer managed keys for Azure Backup
Encryption of backup data in Recovery Services vaults using customer managed keys has enhancements in public preview.
Public preview: Azure Purview is now available in the UK South and Australia East region
Azure Purview is now available in public preview in the Australia East and UK South region. You can now provision Azure Purview accounts in these regions as a public preview offering.
Action required: upgrade your AML cluster to Ubuntu 18.04 LTS by 30 April 2021
Ubuntu 16.04 community support ends on 30 April 2021 – Transition to 18.04 immediately
Decrease Your Machine Learning Costs with Instance Price Reductions and Savings Plans for Amazon SageMaker
Launched at AWS re:Invent 2017, Amazon SageMaker is a fully-managed service that has already helped tens of thousands of customers quickly build and deploy their machine learning (ML) workflows on AWS.
To help them get the most ML bang for their buck, we’ve added a string of cost-optimization services and capabilities, such as Managed Spot Training, Multi-Model Endpoints, Amazon Elastic Inference, and AWS Inferentia. In fact, customers find that the Total Cost of Ownership (TCO) for SageMaker over a three-year horizon is 54% lower compared to other cloud-based options, such as self-managed Amazon EC2 and AWS-managed Amazon EKS.
Since there’s nothing we like more than making customers happy by saving them money, I’m delighted to announce:
- A price reduction for CPU and GPU instances in Amazon SageMaker,
- The availability of Savings Plans for Amazon SageMaker.
Reducing Instance Prices in Amazon SageMaker
Effective today, we are dropping the price of several instance families in Amazon SageMaker by up to 14.2%.
This applies to:
- The following instance families: ml.t2, ml.t3, ml.m4, ml.m5, ml.m5d, ml.c4, ml.c5, ml.c5d, ml.c5n, ml.r5, ml.r5d, ml.g4dn, and ml.inf1.
- All instance-based workloads: Notebook instances, Amazon SageMaker Studio instances, Training instances, Batch Transform instances, Real-time Endpoint instances, Amazon SageMaker Data Wrangler instances, Amazon SageMaker Processing instances.
Detailed pricing information is available on the Amazon SageMaker pricing page.
As welcome as price reductions are, many customers have also asked us for a simple and flexible way to optimize SageMaker costs for all instance-related activities, from data preparation to model training to model deployment. In fact, as a lot of customers are already optimizing their compute costs with Savings Plans, they told us that they’d love to do the same for their Amazon SageMaker costs.
Introducing SageMaker Savings Plans
Savings Plans for AWS Compute Services were launched in November 2019 to help customers optimize their compute costs. They offer up to 72% savings over the on-demand price, in exchange for your commitment to use a specific amount of compute power (measured in $ per hour) for a one- or three-year period. In the spirit of self-service, you have full control on setting up your plans, thanks to recommendations based on your past consumption, to usage reports, and to budget coverage and utilization alerts.
SageMaker Savings Plans follow in these footsteps, and you can create plans that cover ML workloads based on:
- All ml.* instance families.
- All instance-based workloads: Notebook instances, Amazon SageMaker Studio instances, Training instances, Batch Transform instances, Real-time Endpoint instances, Amazon SageMaker Data Wrangler instances, Amazon SageMaker Processing instances.
Savings Plans don’t distinguish between instance families, instance types, or AWS regions. This makes it easy for you to maximize savings regardless of how your use cases and consumption evolve over time, and you can save up to 64% compared to the on-demand price.
For example, you could start with small instances in order to experiment with different algorithms on a fraction of your dataset. Then, you could move on to preparing data and training at scale with larger instances on your full dataset. Finally, you could deploy your models in several AWS regions to serve low-latency predictions to your users. All these activities would be covered by the same Savings Plan, without any management required on your side.
Understanding Savings Plans Recommendations
Savings Plans provides you with recommendations that make it easy to find the right plan. These recommendations are based on:
- Your SageMaker usage in the last 7, 30 or 60 days. You should select the time period that best represents your future usage.
- The term of your plan: 1-year or 3-year.
- Your payment option: no upfront, partial upfront (50% or more), or all upfront. Some customers prefer (or must use) this last option, as it gives them a clear and predictable view of their SageMaker bill.
Instantly, you’ll see what your optimized spend would be, and how much you could start saving per month. Savings Plans also suggest an hourly commitment that maximizes your savings. Of course, you’re completely free to use a different commitment, starting as low as $0.001 per hour!
Once you’ve made up your mind, you can add the plan to your cart, submit it, and start enjoying your savings.
Now, let’s do a quick demo, and see how I could optimize my own SageMaker spend.
Recommending Savings Plans for Amazon SageMaker
Opening the AWS Cost Management Console, I see a Savings Plans menu on the left.

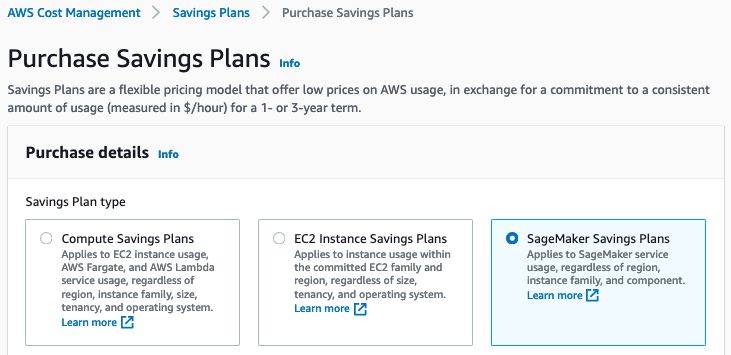
Clicking on Recommendations, I select SageMaker Savings Plans.

Looking at the available options, I select Payer to optimize cost at the Organizations level, a 1-year term, a No upfront payment, and 7 days of past usage (as I’ve just ramped up my SageMaker usage).

Immediately, I see that I could reduce my SageMaker costs by 20%, saving $897.63 every month. This would only require a 1-year commitment of $3.804 per hour.

The monthly charge on my AWS bill would be $2,776 ($3.804 * 24 hours * 365 days / 12 months), plus any additional on-demand costs should my actual usage exceed the commitment. Pretty tempting, especially with no upfront required at all.
Moving to a 3-year plan (still no upfront), I could save $1,790.19 per month, and enjoy 41% savings thanks to a $2.765 per hour commitment.

I could add this plan to the cart as is, and complete my purchase. Every month for 3 years, I would be charged $2,018 ($2.765 * 24 * 365 / 12), plus additional on-demand cost.
As mentioned earlier, I can also create my own plan in just a few clicks. Let me show you how.
Creating Savings Plans for Amazon SageMaker
In the left-hand menu, I click on Purchase Savings Plans and I select SageMaker Savings Plans.
I pick a 1-year term without any upfront. As I expect to rationalize my SageMaker usage a bit in the coming months, I go for a commitment of $3 per hour, instead of the $3.804 recommendation. Then, I add the plan to the cart.
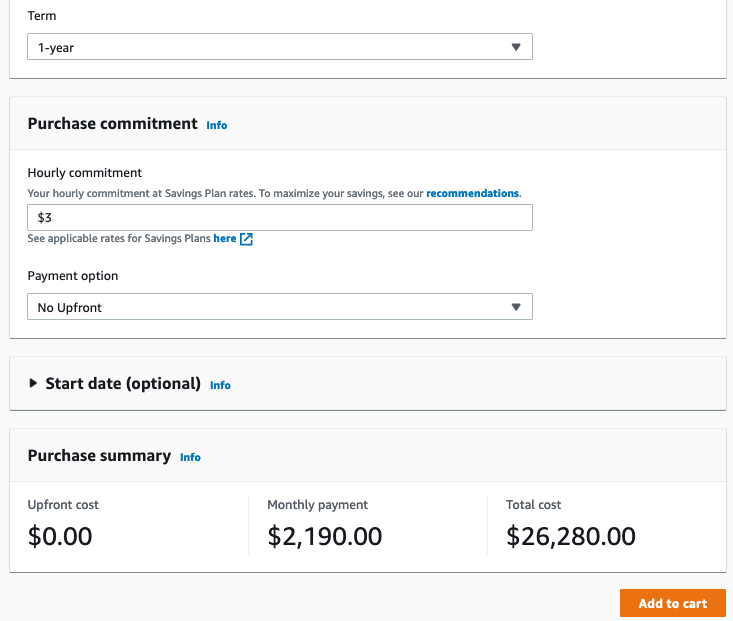
Confirming that I’m fine with an optimized monthly payment of $2,190, I submit my order.

The plan is now active, and I’ll see the savings on my next AWS bill. Thanks to utilization reports available in the Savings Plans console, I’ll also see the percentage of my commitment that I’ve actually used. Likewise, coverage reports will show me how much of my eligible spend has been covered by the plan.
Getting Started
Thanks to price reductions for CPU and GPU instances and to SageMaker Savings Plans, you can now further optimize your SageMaker costs in an easy and predictable way. ML on AWS has never been more cost effective.
Price reductions and SageMaker Savings Plans are available today in the following AWS regions:
- Americas: US East (N. Virginia), US East (Ohio), US West (Oregon), US West (N. California), AWS GovCloud (US-West), Canada (Central), South America (São Paulo).
- Europe, Middle East and Africa: Europe (Ireland), Europe (Frankfurt), Europe (London), Europe (Paris), Europe (Stockholm), Europe (Milan), Africa (Cape Town), Middle East (Bahrain).
- Asia Pacific: Asia Pacific (Singapore), Asia Pacific (Tokyo), Asia Pacific (Sydney), Asia Pacific (Seoul), Asia Pacific (Mumbai), and Asia Pacific (Hong Kong).
Give them a try, and let us know what you think. As always, we’re looking forward to your feedback. You can send it to your usual AWS Support contacts, or on the AWS Forum for Amazon SageMaker.


![]()
Azure Purview resource set pattern rules available in public preview
Azure Purview is announcing the public preview of resource set pattern rules. A resource set is a single object in the data catalog that represents a large number of assets in storage. Resource set pattern rules allow you to customize or override how Azure Purview detects which assets are grouped as resource sets and how they are displayed within the catalog.
Azure Data Factory announces Data Flow general availability in two new Azure regions
Azure Data Factory has released Mapping Data Flows for 2 new Azure regions: US Virgina Gov & US Arizona Gov